Two Wheeler Is Gyroscope Stabilized

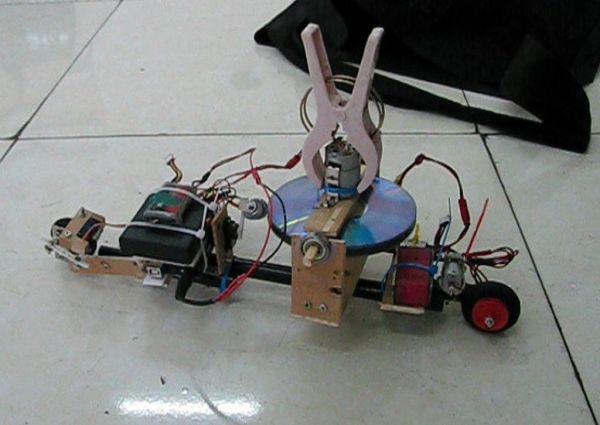
[Jim] loves gyros – not those newfangled MEMS devices, but old-fashioned mechanical gyroscopes. His obsession has pushed him to build this gyro stabilized two wheeler. We love watching hacks come together from simple basic materials and hand tools, with liberal amounts of hot glue to hold everything in place.  That seems to be [Jim’s] philosophy as well.

This is actually the fifth incarnation of [Jim’s] design. Along the way he’s learned a few important secrets about mechanical gyro design, such as balancing the motor and gyro assembly to be just a bit top-heavy. [Jim’s] gyro is a stack of CDs directly mounted to the shaft of a brushed speed400 R/C airplane motor. The motor spins the CDs up at breakneck speed – literally. [Jim] mentions that they’ve exploded during some of his early experiments.

The gyroscope is free to move in the fore-aft direction. Side to side balance tilting is on the wheels themselves. The wheels are model airplane wheels, which have a curved tread. No cheating by using flat LEGO wheels in [Jim’s] lab! A potentiometer measures the tilt angle of the gyro. The voltage from the pot is fed into an Arduino Uno which closes the loop by moving a servo mounted counterweight.

The vehicle is controlled with a regular R/C plane radio. A servo steers the front wheel while another DC motor drives the rear wheel. Not only is [Jim’s] creation able to balance on its own, it can even make a U-Turn within a hallway.

Continue reading “Two Wheeler Is Gyroscope Stabilized”

The Smallest ATtiny85 Based USB Board

Nanite 86

“Possibly the smallest ATtiny85 based ‘duino derivative”. Indeed! When Olimex announced the Olimexino 85s as the smallest Arduino ever, [Tim] took that as a challenge. His very small Arduino based USB devboard is quite a bit smaller than the Olimexino!

The Nanite 85 was carefully designed to be both small and functional. Not only is it 20% smaller than the Olimexino, but also sports a reset button! One of the coolest aspects of this design is that it has the same pinout and size as a DIP ATtiny85. This means that you can use the Nanite 85 for developing your code with the USB bootloader, and then you can directly replace it with a standard (pre-programmed) ATtiny85. The major downside to using this device over the aforementioned devices, is that it does not include a voltage regulator for powering the device via USB (or battery), the device is simply hooked directly to the 5V rail from the USB connector.

We can’t help but be impressed with this well-thought-out design. It is also easy to assemble since it uses larger surface mount components. If smaller components were used, even more features (such as a regulator) could be included. Do you have an even smaller USB Arduino? The race is on for the smallest Arduino ever!

Tell Time And Blink An LED On Your Wrist With WatchDuino

Watchduino Open Source Watch

Is your hipster wrist having a hard time waiting for the debut of the iWatch? There’s a new open hardware/software project out that could help calm your nerves. The WatchDuino is exactly what it sounds like, an Arduino-based wrist watch.

The component list is short and inexpensive. The meat and potatoes consist of an ATMega328, crystal, Nokia LCD screen and LiPo battery. The USB-rechargeable battery lasts about a week before needing to be such. Besides presenting the Time and Date in both analog or digital formats (as you would expect) there is an alarm and timer. Additionally, there are 2 games, Pong and Snake. Any lack of features is made up for the fact that the software is open and can be modified and added to by the community. We’re sure the development of this watch will be quick and significant.

Continue reading “Tell Time And Blink An LED On Your Wrist With WatchDuino”

Cadence Meter Proves Wearable Development Is All About Just Doing It

wearables-just-start-doing


The tech involved in the fitness world really empowers athletes, whether they’re serious or not, to improve their performance by providing empirical evidence. The Striker project focuses on cadence, which is the frequency of strides when running, or revolutions when pedaling. It uses a force sensitive resistor in the shoe to measure footfalls or power strokes.

The concept behind the device is solid, and there are consumer-grade devices already on the market that are capable of performing the same functions. In fact, a Garmin device is used to help measure the accuracy of the system. But we love to see bootstrapped projects, and this one distinguishes itself not only in finished product, but in the process itself. To us it screams: “What are you waiting for, build a prototype and then iterate!”.

The larger image above shows the earliest working version which is just a piece of fabric that wraps around the forearm to hold a 4-digit 7-segment display. The wire following the arm of the wearer snakes all the way down to the shoe to connect with the force sensor. The image to the right is the first wireless version of the readout. But the project has already seen at least two more versions after this one, mostly using SparkFun components.

We think this is but one example of the kind of stuff we want to see as contenders for The Hackaday Prize. The project uses Open Design and it’s arguably a connected device because the sensor and readout connect to each other (but ideally you’d want to add more connectivy to get at the data). The open nature of the build could lead to leaps forward in the technology by affording talented people wider development access.

Continue reading “Cadence Meter Proves Wearable Development Is All About Just Doing It”

The Zorkduino

zork

Zork, the famous Infocom text-based adventure game, is actually quite the technical achievement in software engineering. It’s an amazingly large world to explore, albeit in text form only, running on an interpreter that allows paging, loading, and saving the complete state. All this, built to run on computers with meager amounts of RAM in the late 70s. You might think it would be easy to play Zork on an Arduino, but as [rossum] found out, that’s easier said than done (alternate blog link)

While most computers that were capable of running Zork had at least 8k of RAM, if not more, the ATMega328 in the Arduino only has 2k of RAM. Those fancy home computers of yore also had built-in video, a keyboard, and most of the time, a disk drive. The Arduino has none of that.

[Rossum] faced this challenge head on, capitalizing on the onboard hardware of the Arduino. Video is generated by using SPI mode on a UART at top speed – 8 MHz. This just shifts out pixels from the video buffer on an SD card. The keyboard is handled like any other PS/2 keyboard project on the Arduino, and audio is generated by toggling a pin at 1000Hz for a keypress, and 3600Hz for SD card access.

The finished product includes a bunch of other Infocom games on the SD card, including Leather Goddesses of Phobos, and the ability to run Hitchhiker’s Guide to the Galaxy, the game regarded by many as being better than the book. Video below.

Continue reading “The Zorkduino”

Arduino Electronic Load

A Simple Programmable Electronic Load Using The Arduino

Some projects are both educational and useful. We believe that [Jasper’s] Arduino based electronic load is one of those project.

[Jasper’s] electronic load can not only act as a constant current load, but also as a constant power and constant resistive load as well. The versatile device has been designed for up to 30V, 5A, and 15W. It was based on a constant current source that is controlled by a DAC hooked up to the Arduino. By measuring both the resulting voltage and current of the load, the system can dynamically adapt to achieve constancy. While we have seen other Arduino based constant loads before, [Jasper’s] is very simple and straight forward compartively. [Jasper] also includes both the schematic and Arduino code, making it very easy to reproduce.

There are tons of uses for a voltage controlled current source, and this project is a great way to get started with building one. It is an especially great project for putting together your knowledge of MOSFET theory and opamp theory!

Profiling An Arduino

profiling

In proper, high-dollar embedded development environments – and quite a few free and open source ones, as well – you get really cool features like debugging, emulation, and profiling. The Arduino IDE doesn’t feature any of these bells a whistles, so figuring out how much time is spent in one section of code is nigh impossible. [William] came up with a clever solution to this problem, and while it doesn’t tell you exactly how much time is spent on a specific line of code, it’s still a good enough tool to be a great help in optimization.

[William]’s solution is to create a ‘bin’ for arbitrary chunks of code – one for each subroutine or deeply nested loop. When the profiler run, you end up with a histogram of how much time is spent per block of code. This is done with an interrupt that runs at about 1 kHz, with macros sprinkled around the code. Each time the interrupt ticks, the macro runs and increases a counter by one. Let the sketch run for a minute or so, and you get an idea of how much time is spent in a specific area of code.

It’s a bit of a kludge, but when you’re dealing with extremely minimal tools, any sort of help in debugging is sorely needed and greatly appreciated.