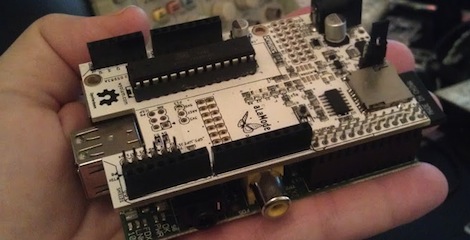
Reading Sega Carts Off A Breadboard

Golden Axe is great, and the Sonic 3/Sonic and Knuckles combo is one of the highest works of art from the 16-bit era, but for those of us without a working Genesis or Megadrive, we’ve had to make due with the ROMs others provide. [Lee] figured out an easy way to read the data off these old Sega cartridges using easily scavenged parts and an Arduino Mega, paving the way for an Arduino-based ROM dumper.

The connector on the bottom of a Sega Genesis cartridge has a 2×32 pinout, normally requiring 64 connections to actually read the card. These connectors aren’t readily available, but [Lee] did manage to find a few 2×31 pin connectors lying around in the form of old ISA sockets. The outer pins of a Genesis cart are used for grounds and a ‘cartridge insert’ slot, and after filing away the end of an old ISA connector, [Lee] found he could actually read the data on these old game cartridges.

There are 49 data and address pins on these old Sega carts, so an Arduino Mega needed to be brought into the mix to actually read some of the data on the ROM chip. As of now, [Lee] can read data from the cart but has only gotten so far as to read the licensing data stored at 0x80. Still, very cool and the first step towards an Arduinofied Sega cart dumper.

The Proper Way To Put An Arduino In A Raspberry Pi

For all their hoopla, the GPIO pins on the Raspberry Pi aren’t terribly useful on their own. Sure, you can output digital data, but our world is analog and there just isn’t any ADCs or DACs on these magical Raspi pins.

The AlaMode, a project designed by [Kevin], [Anool], and [Justin] over at the Wyolum OSHW collaborative aims to fix this. They developed a stackable Arduino-compatable board for the Raspberry Pi.

Right off the bat, the AlaMode plugs directly into the GPIO pins of the Raspberry Pi. From there, communication with the ATMega of the Arduino is enabled, allowing you to send and receive data just as you would with an Arduino. There’s a real-time clock, servo headers, plenty of ways to power the board, and even a breakout for this GPS module.

A lot of unnecessary cruft is done away with in the AlaMode; There’s no USB port, but it can be programmed directly over the GPIO pins of the Raspberry Pi. Pretty neat, and we can’t wait to grab one for our Raspi.

Using An IR Remote With Your Arduino

If you’ve ever needed a short-range remote control for a project, [firestorm] is here to help you out. He put up a great tutorial on using an IR remote to do just about anything with everyone’s favorite microcontroller platform.

[firestorm] used the Arduino IRremote library to decode the button presses on his remote. After uploading the IR receive demo included in the library, the Arduino spit out hex codes of what the IR receiver was seeing. [firestorm] wrote these down, and was able to program his Arduino to respond to each individual button press.

After figuring out the IR codes for his remote, [firestorm] threw a shift register into his bread board and attached a seven-segment LED. Since [firestorm] knows the codes for the number buttons on his remote, it’s very easy to have the LED display flash a number when the corresponding button on the remote is pressed.

A single seven-segment display might not be extremely useful, but with [firestorm]’s tutorial, it’s easy to give your Arduino some remote control capabilities with a simple IR receiver. Not bad for a few dollars in parts.

Self Balancing Robot Uses Cascading PID Algorithms

At this point we’re beginning to think that building a self-balancing robot is one of the rights of passage alongside blinking some LEDs and writing Hello World on an LCD screen. We’re not saying it’s easy to pull off a build like this one. But the project makes you learn a lot about a wide range of topics, and really pushes your skills to the next level. This latest offering comes from [Sebastian Nilsson]. He used three different microcontrollers to get the two-wheeler to stand on its own.

He used our favorite quick-fabrication materials of threaded rod and acrylic. The body is much taller than what we’re used to seeing and to help guard against the inevitable fall he used some foam packing material to protect the top level. Three different Arduino boards are working together. One monitors the speed and direction of each wheel. Another monitors the IMU board for position and motion feedback, and the final board combines data from the others and takes care of the balancing. Two PID algorithms provide predictive correction, first by analyzing the wheel motion, then feeding that data into the second which uses the IMU feedback. It balances very well, and can even be jostled without falling. See for yourself in the clip after the break.

Continue reading “Self Balancing Robot Uses Cascading PID Algorithms”

Kegerator Tallies Your Pints On Untappd While You Sit Back With A Cold One

untappd-auto-checkin

[Jeff] admits that he’s pretty well addicted to Untappd, a site he describes as a Foursquare for beer. Like his fellow beer nerds, he enjoys reporting the pints he’s had, even if they happen to be from his own stash of homebrew kegs. Untappd certainly supports this level of dedication, but it seemed silly to [Jeff] that he needed to grab his phone each time he poured himself a cold one in the comfort of his own home.

He took a look around the room and spied an Arduino doing a whole lot of nothing, so he set off to build a system that would allow him to automatically record his drinking habits without the use of his smartphone. The system is not overly complex, and measures pours using flow sensors, uploading the results to Untappd using their “check-in” API. [Jeff] was sure to include several other useful features into his build, including a lockout timer that prevents multiple check-ins when simply topping off a pint, as well as “neighbor mode” which lets you pour a round for friends without recording the pour.

Be sure to check out the build in its entirety on [Jeff’s] site, and let us know if you’re doing something equally cool with your keg setup at home.

Joystick Operated Security Cam Will Overlook The Moat

What good is a moat if nobody is guarding it? We suppose that depends on what beasties lurk beneath the surface of the water, but that’s neither here nor there. The members of LVL1 continue their quest to outdo each other in augmenting the building’s automated features. The latest offering is this security camera which is operated with an analog thumb stick.

These are the people who are building a moat (which the city things is a reflecting pool) in front of their main entrance. Now they will be able to see and sense if anyone is trying to get across the watery hazard. The hack marries an ultrasonic rangefinder and camera module with a pair of servo motors. The brackets for the motors allow a full range of motion, and the signal is translated by an Arduino and Video Experimenter shield to put out a composite video signal. That’s not going to make streaming all that easy, but we’re sure that is just one more hack away.

Laser Light Painting Includes Camera Control

This laser light painting setup can even control the camera. But it probably will not work with your average point-and-shoot. The exposure time used is somewhere around 2 seconds long, a feature which is hard to find on anything but DSLR cameras.

The setup relies on a red laser diode to do the painting. When viewed in real time you only see a dot tracing out a cryptic pattern and occasionally switching on and off. But with a long exposure the intense light persists to achieve an image like the one seen above. Note the ghosting around the rig as it has moved while the shutter was open.

The Arduino controlled device consists of a base which pivots the diode horizontally, with a servo for aiming on the vertical axis. Since the sketch is divided up by letter, we wonder how hard it would be to adapt this for use with a point-and-shoot? Perhaps you could capture one letter at a time and layer the frames in post production?

It seems this is a lot easier to build than some of the LED plotters we’ve looked at. If you do make your own don’t forget to send a link our way.

Continue reading “Laser Light Painting Includes Camera Control”