[Carlos Agell] sent in a tip where he captured images from an analog camera with an Arduino.
We’ve seen a few AVR/Arduino hacks that generate video, although overclocking is necessary if you want to do anything beyond a Breakout clone. [Carlos]’ hack bucks that trend and now he can capture video with an Arduino.
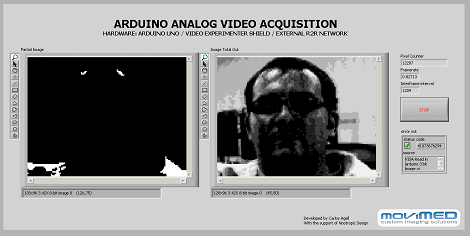
The project captures individual frames from NTSC video at a resolution of 128×96. Although the Arduino isn’t powerful enough for real-time capture, [Carlos] managed this by capturing only thresholds and sending them over to a computer running a program coded in LabVIEW. The PC program reassembles the images of the thresholds and produces a tiny image in 3-bit grayscale.
[Carlos] used the Video Experimenter shield which is impressive in it’s own right. The Video Experimenter is able to do object tracking and edge detection, so we’re wondering when we’ll see robots with computer vision running off an Arduino. Check out a demo of the nootropic design video experimenter shield after the break.
UPDATE: Carlos wrote a sketch in Processing that does the same thing as his LabVIEW program.