rc_car

Racing Wheel Guided R/C Car With Video Feed

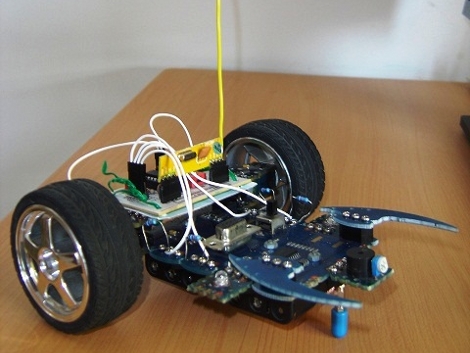
Instructables user [Kaeru no Ojisan] enjoys constructing R/C kit cars and wanted to build one that could be driven using a PC racing wheel he had on hand. Not satisfied with simply guiding it with the racing wheel, he added a web cam to the car so that he can monitor its location from the comfort of his desk chair.

The car is loaded down with all sorts of electronics to get the job done, requiring four separate battery packs to keep them online. An Arduino controls the motor and the steering servos, receiving its commands wirelessly via a Bluetooth add-on. The camera connects to a USB to Ethernet converter, which enables the car’s video feed to be transmitted via the onboard wireless router.

The racing wheel interface seems to work just fine, though we don’t doubt that the whole setup can be easily simplified, reducing both weight and battery count. While [Kaeru no Ojisan] says that the car is in its concept stages and there are a few bugs to work out, we think it’s a good start.

Stick around to see a quick video of the car in testing.

Continue reading “Racing Wheel Guided R/C Car With Video Feed”

Real-time Digital Puppetry

digital_puppet_show

If it sometimes seems that there is only a finite amount of things you can do with your kids, have you ever considered making movies? We don’t mean taking home videos – we’re talking about making actual movies where your kids can orchestrate the action and be the indirect stars of the show.

Maker [Friedrich Kirchner] has been working on an application called MovieSandbox, which is an open-source realtime animation tool. A couple of years in the making, the project is cross-platform compatible on both Windows and Apple computers (with Linux in the works), making it accessible to just about everyone.

His most recent example of the software’s power is a simple digital puppet show, which is sure to please young and old alike. Using sock puppets fitted with special flex sensors, he is able to control his on-screen cartoon characters by simply moving his puppets’ “mouths”. An Arduino is used to pass the sensor data to his software, while also allowing him to dynamically switch camera angles with a series of buttons.

Obviously something like this requires a bit of configuration in advance, but given a bit of time we imagine it would be pretty easy to set up a digital puppet stage that will keep your kids happily occupied for hours on end.

Continue reading to see a quick video of his sock puppet theater in action.

[via Make]

Continue reading “Real-time Digital Puppetry”

The Start To Finish Of An Interactive Exhibit

[Andrew & Deborah O’Malley] were tapped to created an interactive exhibit. The mission was to show that social problems take continual support from a lot of people before they can be solved. The piece needed to be architectural in nature, and they ended up building this touch-sensitive model building with individually lighted windows.

The project log that the [O’Malleys] posted shows a well executed battle plan. They used tools we’re all familiar with to achieve a highly polished and pleasing result. The planning stages involved a virtual mock-up using Google SketchUp. The details needed to order the shell from a fabricator were pulled from this early work, while the team set their sights on the electronics that shed light and that make the piece interactive. The former is provided by a Shiftbrite module for each window, the latter comes from the Capacitive Sensing Library for Arduino. Despite some difficulty in tuning the capacitive grid, and getting all of those Shiftbrites to talk to each other, the exhibit went swimmingly. It’s not hard to imagine how easy it is to start a conversation once attendees are attracted by the seductive powers of touch sensitive blinky lights.

The Concepts Behind Robotic Maze Solving

[Patrick McCabe’s] latest offering is a well-built maze-solving bot. This take on the competitive past-time is a little more approachable for your common mortal than the micro-bot speed maze solving we’ve seen. Don’t miss seeing the methodical process play out in the clips below the fold.

The playing field that [Patrick’s] robot is navigating is made up of a electrical-tape track on a white background. The two-inch tall double-decker bot is every economical. It uses an RBBB Arduino board to read an optical reflectance sensor array made by Pololu, then it drives a couple of geared motors using an L293D h-bridge breakout board. But we already know that [Patrick’s] a talented robot builder, this time around we’re happy to see his in-depth discussion of how to program a robot to solve a maze. In it he covers all of the different situations your robot might face and how to deal with them. Once you’ve dug through all of the concepts, dust off that bot you’ve got lying in the corner and start writing some new firmware.

Continue reading “The Concepts Behind Robotic Maze Solving”

BlinkM Smart Garage Door Opener

garage_indicator

Calling Canada home, Hackaday reader [TheRafMan] has seen his share of bitterly cold winters. He also knows all too well how hard it is to get his cars started in the morning if somebody happens to leave the garage open. After the door was left open overnight for the second time this last winter, he decided that it was time to add an indicator inside the house that would alert him when the garage had not been closed .

Inspired by our BlinkM Arduino coverage a short while back, his circuit incorporates a BlinkM as well as several other components he already had on hand. He disassembled the garage door switch situated in the house and fit the BlinkM into the switch box once he had finished programming it. A set of wires was run to the BlinkM, connecting it to both a power supply located in the garage as well as the magnetic switch he mounted on the door.

The end result is a simple and elegant indicator that leaves plenty of room for expansion. In the near future, he plans on adding an additional indicator strobe to let him know when the mail has arrived, not unlike this system we covered a few months ago.

Stick around to see a quick video demonstration of his garage door indicator in action.

Continue reading “BlinkM Smart Garage Door Opener”

Data Scraping And Visualization With Python

arduino_dial

[Greg] built himself a small indicator dial with his laser cutter, and wanted to use it for visualizing server performance and load information. Before he started using it for server monitoring however, he thought he should test out his data parsing skills on a simpler data set.

Pachube has a wealth of information that can be freely used for whatever project you might have in mind, so [Greg] started looking around for something interesting to track. Eventually he located the data feed for a tanker ship and wired his dial to display the ship’s speed. He uses a Python script to interface with the Pachube API, which is fed to his Netduino board. A servo motor then changes the position of the dial based on the feed’s data. Since large tankers don’t change speed often, the experiment was a bit of a letdown. He searched for a bit and tuned into another feed that tracked wind speed in New Zealand, getting much better results.

His future plans include hooking it directly to his network and eventually using it to monitor his servers…at least once the novelty of tracking random data feeds wears off.

All of his code is available on GitHub, and he is happy to make a gauge for anyone who is interested, though he doesn’t currently list a price.

Motion Controlled Reddit Vote Sign.


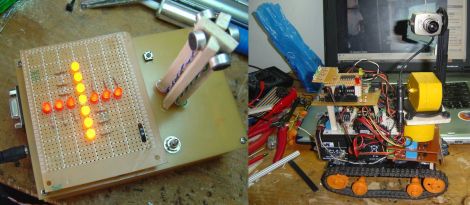
A little while back I attended the largest east coast gathering of folks from the ever popular social news site, Reddit.com. Those of you familiar with Reddit already know that it is all about link aggregation. Users post links to interesting websites and material, and can then vote up or vote down content based on interest or relevance. Through the magical site algorithms original and interesting content is, as implied, aggregated up to the front page.  The whimsical nature of this big DC event lead many people to furnish signs of all types based on the culture of the site, internet memes, etc… The signs that really caught my attention were based primarily on the stylistic site layout, blowing up mail icons and other Reddit specific graphics.

The concept of using site graphics gave me the idea of being able to personally vote up or down other peoples’ signs. It was far too easy to just make a cardboard arrow, and I don’t have a color printer. I happened to have a shelved coffee table project involving orange and blue LEDs. Same colors as the arrows! Sweet. To make this project work I would have to work entirely from my project pile, there simply was no time to order anything from the internet. I managed to crank out a functional up/down voting sign in 3 days leading up to the gathering (and the morning of), here is what I did:

Continue reading “Motion Controlled Reddit Vote Sign.”