Open Hacker Conference Badge Project Needs Your Help!

[Aestetix] writes in to tell us that the OpenAMD (Attendee Meta-Data) project is working on a new revision of their hardware, to be debuted at CCC Camp this fall.

For the uninitiated, OpenAMD combines an Active RFID tracking system with social networking, and is completely open-source. You walk into the conference, put on the OpenAMD badge, and suddenly you can see yourself as a dot moving around on a map. Or you can log into the social networking site, create a profile, and watch as your personal information is pulled into the mesh, which then tells you talks you might like, people you might like, where those people are, and more. There’s even an open API where you can create your own ‘killer’ apps, which may include games or other interesting aggregates of the attendee information.

Continue reading “Open Hacker Conference Badge Project Needs Your Help!”

build_status_board

LED Build Monitor Helps Keep An Eye On Your Servers

In his line of work, Hackaday reader [Pedantite] often has to monitor the build status of several continuous integration servers throughout the day. One afternoon, he got the idea to install a set of stop lights in the office in order to monitor the status of the servers, but filed it away as a “wouldn’t it be cool if…” project.

After some time had passed, he was bitten by the idea bug again and decided he would build a physical device to display the status of his build processes. This time around, he brainstormed on a smaller scale and the result is the “Indictron” you see above.

He built a simple LED board made up of four rows of four LEDs to display the build processes. Different LEDs are lit depending on the project’s current build status as well as the results of the previous build. The board uses an ATmega88, and interfaces with a compiler watchdog application using a virtual USB package made specifically for AVR micro controllers.

The end result is a simple, yet useful status board that “just works”. He does not seem to have code or schematics posted on his site at the moment, but we’re pretty sure he would share them upon request.

If you’re interested in a bit more of [Pedantite’s] work, check out his “Good Times” parental timer we featured last week.

Compost Heap Temperature Logger Helps Keep Things Hot

compost_temp_logger

HackHut user [lackawanna] is looking to start his own compost pile, but as many urban composters discover, things can get quite smelly if you don’t manage it properly. The process of composting is broken up into two phases, aerobic and anaerobic decomposition. The former is the first stage to occur and produces plenty of heat, but should be scentless. The latter gives off less heat and is more of a stink due to putrefaction. Carefully monitoring the temperature of the pile and restarting the aerobic phase when necessary helps to keep the process “healthy” and scent-free.

[lackawanna] built a simple temperature monitor that he plans on using to track the status of his compost pile once he gets started. It uses an ATmega328 as the brains of the operation and an old metal can transistor as his temperature sensor. Using relative measurements of the compost pile taken in 10 minute intervals, he can determine when the aerobic phase is underway, as well as when things begin turning anaerobic. At that point, the sensor alerts him that the pile needs to be turned.

The build is pretty simple, but leaves plenty of room for expansion. It should be relatively easy to add a more friendly notification interface as well as install multiple sensors to the pile for obtaining aggregate temperature data.

Atmega Analog Two Pack

Back in February, [ProtoStack] posted a pretty good tutorial on how to do Analogue to Digital Conversion on an Atmega168. Based on a bread board, the tutorial also shows the often forgotten low pass filter on the AVCC lines to ensure an extra stable reference and an analog input connection to a simple voltage divider as a study point.

Moving on into the micro controller, the registers you’re going to need to twiddle are laid out and explained in detail. Finally you’re shown how to put it all together in a software project that outputs the analog reading onto a standard character LCD.

But hold on! There is more. Just released is a follow up to that tutorial which adds on Analogue to Digital Conversion Interrupts on an Atmega168A. So if you’re sitting there looking at an Arduino and want to know more about what’s going on under the hood, these are a good place to start.

Class Up Your Next Party With The Drink Making Unit 2.0

drink_making_unit_20

The crew over at [Evil Mad Scientist Laboratories] has been hard at work preparing for the Barbot 2011 cocktail robotic exhibition. This year, they are packing some serious drinking fun with the Drink Making Unit 2.0. The predictably named follow-up to last year’s wildly popular Drink Making Unit doubles the mixing capability with six, rather than three fluids, and provides a visually stimulating drink mixing experience.

While they are similarly named, the new unit has been completely redesigned since last year. No longer are they relying on breast pumps to move the alcohol along. Instead, they are using compressed air to dispense fluids from wash bottles which were constructed from laboratory beakers. The fluids are measured in specially altered graduated cylinders that are designed to tip over and release their contents when the appropriate amount of alcohol has been poured. These cylinders are designed to mimic the movement of Japanese garden fixtures called “deer chasers”, tipping back and forth solely powered by the ingress and egress of liquid.

The dispenser’s control panel houses an ATmega164, which orchestrates the entire operation. It interfaces with the LED driver boards that make up the display via SPI. The micro controller is also tasked with monitoring when the graduated cylinders tip their libations into the dispensing funnel, which is done using IR LEDs and photogates.

It’s a great looking machine, and while there isn’t any drink mixing video as of yet, we can’t wait to see it in action.

Interactive Dice Game Pits Man Against Machine

dice_game

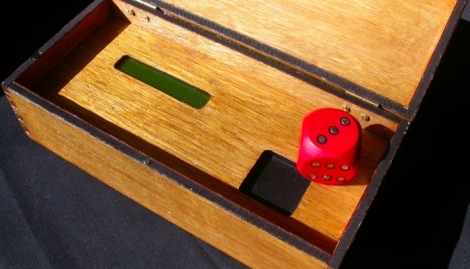
While most dice games are based on luck and chance more than anything else, [Mike] decided he wanted to create a dice game that took a little more skill to play. He built a replica of a game found in Ian Stewart’s “The Cow Maze”, a book of mathematical stories and puzzles.

The theory behind the game is as follows:

A number is randomly drawn and is considered the “heap”. Players take turns reducing the heap, using the die to represent the number they would like to remove. The only restrictions placed on moves are that you cannot re-use the same number chosen by your opponent in the preceding move, nor can you use the number on the die face opposite that number. The winner of the game is the individual reducing the heap to exactly zero, though you can also lose the game automatically if you reduce the heap to a negative number.

The game operates using a magnet-loaded wooden die and hall sensors built into the playing surface. The sensors relay the value of the die’s face to the ATmega chip he used to run the game. His code provides the logic for your computer opponent as well as for keeping score.

The whole project is wrapped up in a nice-looking wooden box that gives it a bit of old time-y charm, micro controller and LCD aside.

Be sure to check out the video below to see a few rounds of the game being played, and swing by his site for more details.

[via SparkFun]

Continue reading “Interactive Dice Game Pits Man Against Machine”

Magic 8 Thing Answers All Of Your Burning Questions

magic_8_thing

[Pete] was hard at work putting off a repair job for a friend, and wondered how much longer he could possibly procrastinate. With no fellow humans in earshot to which he could propose this question, he thought it would be great if he could ask a Magic 8-ball for an answer. Alas, he doesn’t have a Magic 8-ball, so he would have to build one if he wanted his answer.

Continuing to delay the repair job, he scrounged around his house and dug up an ATmega328 to control the 8-ball and a LCD panel to display the sage-like responses. He wanted the 8-ball to be as authentic in operation as he could, so he had to locate some sort of sensor that would register if the device had been shaken. With no accelerometer at hand, he opted to use a mercury tilt switch that he scavenged from an old thermostat. He wrote some software to display the responses from the original Magic 8-ball when shaken, then he threw the components together in a small plastic case.

As you can see in the video below, his Magic 8-thing works just like the original, sans the dark fluid and icosahedron. If you were wondering, he did finally ask the 8-thing whether he had procrastinated long enough on his initial task – the response: “Yes”

If you’re in the mood for more Magic 8-ball shenanigans, check out these posts!

Continue reading “Magic 8 Thing Answers All Of Your Burning Questions”