Class Up Your Next Party With The Drink Making Unit 2.0

drink_making_unit_20

The crew over at [Evil Mad Scientist Laboratories] has been hard at work preparing for the Barbot 2011 cocktail robotic exhibition. This year, they are packing some serious drinking fun with the Drink Making Unit 2.0. The predictably named follow-up to last year’s wildly popular Drink Making Unit doubles the mixing capability with six, rather than three fluids, and provides a visually stimulating drink mixing experience.

While they are similarly named, the new unit has been completely redesigned since last year. No longer are they relying on breast pumps to move the alcohol along. Instead, they are using compressed air to dispense fluids from wash bottles which were constructed from laboratory beakers. The fluids are measured in specially altered graduated cylinders that are designed to tip over and release their contents when the appropriate amount of alcohol has been poured. These cylinders are designed to mimic the movement of Japanese garden fixtures called “deer chasers”, tipping back and forth solely powered by the ingress and egress of liquid.

The dispenser’s control panel houses an ATmega164, which orchestrates the entire operation. It interfaces with the LED driver boards that make up the display via SPI. The micro controller is also tasked with monitoring when the graduated cylinders tip their libations into the dispensing funnel, which is done using IR LEDs and photogates.

It’s a great looking machine, and while there isn’t any drink mixing video as of yet, we can’t wait to see it in action.

Interactive Dice Game Pits Man Against Machine

dice_game

While most dice games are based on luck and chance more than anything else, [Mike] decided he wanted to create a dice game that took a little more skill to play. He built a replica of a game found in Ian Stewart’s “The Cow Maze”, a book of mathematical stories and puzzles.

The theory behind the game is as follows:

A number is randomly drawn and is considered the “heap”. Players take turns reducing the heap, using the die to represent the number they would like to remove. The only restrictions placed on moves are that you cannot re-use the same number chosen by your opponent in the preceding move, nor can you use the number on the die face opposite that number. The winner of the game is the individual reducing the heap to exactly zero, though you can also lose the game automatically if you reduce the heap to a negative number.

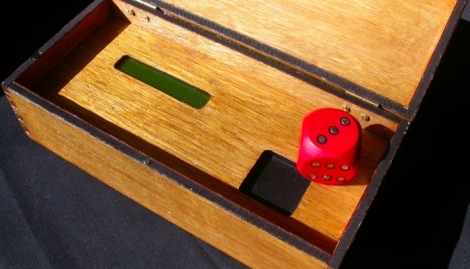
The game operates using a magnet-loaded wooden die and hall sensors built into the playing surface. The sensors relay the value of the die’s face to the ATmega chip he used to run the game. His code provides the logic for your computer opponent as well as for keeping score.

The whole project is wrapped up in a nice-looking wooden box that gives it a bit of old time-y charm, micro controller and LCD aside.

Be sure to check out the video below to see a few rounds of the game being played, and swing by his site for more details.

[via SparkFun]

Continue reading “Interactive Dice Game Pits Man Against Machine”

Magic 8 Thing Answers All Of Your Burning Questions

magic_8_thing

[Pete] was hard at work putting off a repair job for a friend, and wondered how much longer he could possibly procrastinate. With no fellow humans in earshot to which he could propose this question, he thought it would be great if he could ask a Magic 8-ball for an answer. Alas, he doesn’t have a Magic 8-ball, so he would have to build one if he wanted his answer.

Continuing to delay the repair job, he scrounged around his house and dug up an ATmega328 to control the 8-ball and a LCD panel to display the sage-like responses. He wanted the 8-ball to be as authentic in operation as he could, so he had to locate some sort of sensor that would register if the device had been shaken. With no accelerometer at hand, he opted to use a mercury tilt switch that he scavenged from an old thermostat. He wrote some software to display the responses from the original Magic 8-ball when shaken, then he threw the components together in a small plastic case.

As you can see in the video below, his Magic 8-thing works just like the original, sans the dark fluid and icosahedron. If you were wondering, he did finally ask the 8-thing whether he had procrastinated long enough on his initial task – the response: “Yes”

If you’re in the mood for more Magic 8-ball shenanigans, check out these posts!

Continue reading “Magic 8 Thing Answers All Of Your Burning Questions”

Lego Minifig Multimeter Makes Resistor Sorting A Lot More Fun

lego_minifig_multimeter

While there’s typically not much room on our work bench for toys, [David] over at Robot Room has put together a pretty cool multimeter for which we would make an exception.

His Lego Minifig multimeter is constructed using mostly standard off-the-shelf Legos, and a pair of Minifigs he modified to suit his needs. Translucent Minifig heads were sourced online to allow the neck-mounted LEDs to shine through, and each of the bodies were drilled out in several places to accommodate the wires he uses to take measurements.

The multimeter will display the resistance of any item from 10 – 10,000,000 Ω, as well as measure the voltage of any battery you can manage to fit under the Minifig’s metal wrench. The multimeter takes measurements using an ATmega168, and relays that data through a serial to USB converter connected to a nearby computer. The computer is host to a .NET application he wrote which displays and speaks both the resistance and voltage values.

Keep reading to see a quick video walkthrough and a demonstration of the multimeter at work.

Continue reading “Lego Minifig Multimeter Makes Resistor Sorting A Lot More Fun”

Sleek Numitron Clock Tells The Time And Temperature

numitron_clock

Instructables user [janw] is a big fan of nixie clocks, but he had never built one before. He decided he would rather start small and build a clock using numitron tubes first, before moving to nixies. He preferred the simpler tubes due to their much lower voltage requirements and the fact that he would not have to use any specialized power supply for his project.

His clock serves double-duty, functioning as a thermometer as well. Timekeeping is regulated with a DS12307, and temperature is monitored using a DS18B20 single wire sensor – both of which are pretty common in these sorts of projects. Both are wired to an Atmega48 MCU which serves as the brain of the clock.

The numitrons were mounted in a handsome 5-layer milled acrylate stand with a pair of buttons mounted on the bottom which allow him to set the time. It really is a spectacular looking timepiece, and a great first effort on [janw’s] part.

Be sure to stick around to see a video of the clock in action.

Continue reading “Sleek Numitron Clock Tells The Time And Temperature”

Amazing Backyard Rocket Ship Tree House

Ravenna_Ultra-Low-Altitude_Vehicle

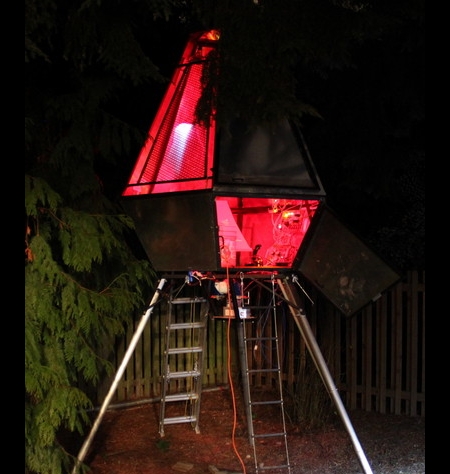
If you thought you had a cool tree house as a kid, think again. Tasked with landscaping his back yard and building a tree house for his son, [Jon] decided to go all out and build him a rocket ship instead.

Rising 15 feet into the Seattle skyline, the tree house known as the Ravenna Ultra-Low-Altitude Vehicle (RULAV), is sure to be the envy of every kid in the neighborhood. [Jon] and a friend worked for well over a year on their creation, welding, grinding, painting, and riveting their way along. After the structure was built, they fabricated some custom PCBs, using them to build the ship’s 14 control panels. The entire operation is controlled by a custom OS built to run on the three ATmega MCUs that manage operations.

Not content with just a handful of knobs and switches, the ship contains over 800 LEDs among its laundry list of electronics goodies. Compressed air is used to shoot water from positioning “thrusters”, while a paint mixer spins under the ship to simulate the rough and bumpy nature of space travel. The simulated launches are capped off with plenty of authentic NASA-style audio and a sub woofer that gives everything a deep, resonating rumble.

The project is truly amazing, and a ton of work went into every little detail in order to make this the most spectacular tree house ever seen. [Jon] definitely takes the award for “Coolest Dad Ever” for this build, even we’re jealous!

The pictures certainly don’t do it justice, so be sure to check out the video below for a quick introduction and demo of this awesome project.

Thanks to [Jeremy Elson] for the tip.

Continue reading “Amazing Backyard Rocket Ship Tree House”

Analog To Digital Converter Build

analogue_digital_converter

[Daniel Garcia] sent us a quick tutorial he put together demonstrating how to use an ATmega168 to perform analog to digital conversions. This timely tutorial would make for a nice complimentary project for those of you who decided to build your own digital to analog converter after reading our post from a few days ago.

The ATmega168 has six pins that are typically used for digital I/O, but they can be used for analog input as well. In his example, he uses a trimpot as an analog input device, connecting it to one of the aforementioned analog pins. Its value is returned as a 16-bit number which is then displayed on the attached LCD. The LCD display and the breadboard layout used in this project are covered in his previous writeups, so be sure to give those a read through before working through this tutorial.