Giant Resistor-shaped Ohmmeter

resistance-measuring-resistor

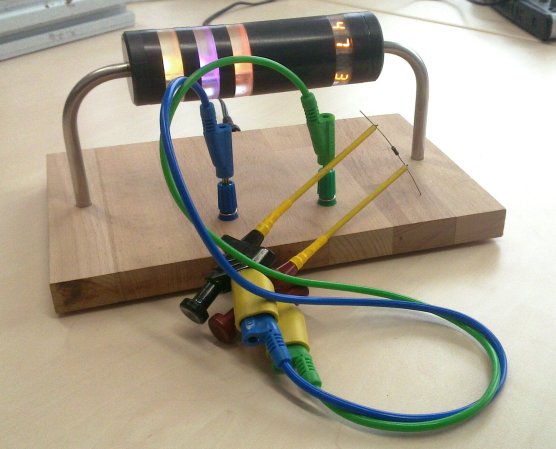
The fun of having a giant resistor-shaped Ohmmeter is that it reads back the resistance by displaying the color code. If you’re not too hot with decoding those bands there’s a helper band to the right which will display the value numerically.

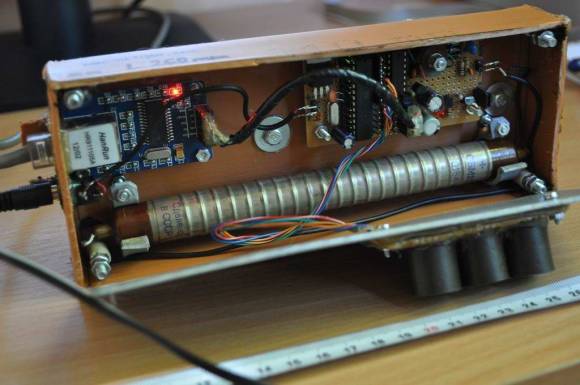
All of the electronics are housed in the opaque part of the resistor, making for a nice low-profile base. The bent leads are hollow and allow [Sebastian] and his friend to run power and measurement leads through to the power connector on the back and the pair of banana jacks near the front. Each translucent ring houses an RGB LED, except for the one on the right which has four 7-segment display modules embedded in it. An ATmega168 takes the measurements using its Analog to Digital Converter (ADC) to read the value from a voltage divider. You can see a quick demo of the Ohmmeter in the video after the jump.

This would be a fun thing to pair with that giant breadboard.

Continue reading “Giant Resistor-shaped Ohmmeter”

Online Radiation Monitoring Station

geiger-counter-build

This is a Geiger counter which charts its readings on a webpage. [Radu Motisan] put a lot of time into the build and it shows. This thing is packed with features and the hardware choices were the best combinations found through several iterations of development.

In addition to radiation levels the sensor unit takes several other measurements. These include temperature, humidity, luminosity, and barometric pressure. All of the sensor data is monitored and gathered by an ATmega168 which can be charted on a webpage with the help of an ENC28J60 Ethernet chip. The collection and display of this data is detailed at the post linked above.

For those interested in the hardware development, [Radu] published many updates along the way. These are available in his forums posts, as well as his build log. He doesn’t have any videos of his recent work, but way back in May he did publish a clip (found after the break) which shows the testing of different Geiger tubes.

Continue reading “Online Radiation Monitoring Station”

Raspy Juice Gives You Serial Ports And Servo Control

Up next on the continual march of expansion boards for the Raspberry Pi is the Raspy Juice, a board designed to break out the GPIO pins on the Raspberry Pi into servo, serial, and other miscellaneous connections.

The Raspy Juice features an ATMega168A microcontroller connected to the Raspberry Pi as an I2C slave device. Not only does the addition of a microcontroller add analog inputs to the Raspberry Pi, but also RS232 and RS485 serial connections, a real-time clock, and four JST plugs for hobby servos.

Because the Raspberry Pi can be powered from the GPIO header, the creator, [NTT] added a buck regulator so batteries or solar cells can be used to power the Raspberry Pi.

The Raspberry Pi is a terribly awesome robotics platform, but sadly limited by its capability to drive motors and servos natively. The Raspy Juice adds some much-needed capability to the Raspberry Pi, and we can’t wait to see a robot take its first steps with this expansion board.

Wide Word-clock Takes A Modular Approach

[Ishan Karve] took on the challenge of building his own word clock. This is a timepiece that displays the current time in the same syntax you would use if someone asked you what time it was. You’ll find a lot of these projects around, with one of our favorites using etched copper clad as a bezel. But [Ishan] departed for the ordinary by building a clock that is rectangular rather than square. To do so he uses a 16×8 LED matrix that is made up of small modules.

He designed a board that holds a 4×4 LED matrix and includes pin headers on each edge. This way he can arrange these 16-pixel blocks into arrays to make a larger grid. For the clock he used eight boards. These are driven by two MAX7219 chips, with an ATmega168 as the main controller and a DS1307 to keep time. Each LED is isolated by a thick layer of acrylic which as one hole for each pixel. This prevents light from bleeding over into letters that should not be illuminated. Check out the result in the clip after the break.

Continue reading “Wide Word-clock Takes A Modular Approach”

Bluetooth Control In A Power Strip

[Mansour] had a ceramic space heater mounted near the ceiling of his room. Since heat rises this is not the best design. He upgraded to an infrared heater which works a lot better, but lacks the timer function he used on the old unit. His solution wasn’t just to add a timer. He ended up building a Bluetooth module into a power strip in order to control the device wirelessly. He ends up losing all but two outlets on the strip, but everything fits inside the original case so we think it’s a reasonable trade-off.

He uses relays on both the live and neutral wires to switch the two outlets. These are driven via MOSFETs to protect the ATmega168 which controls the board. The microcontroller and Bluetooth module both need a regulated DC power source, so he included a transformer and regulator in the mix. After the break you can see him demonstrating the system using two lamps. There’s even a terminal interface which lets you select different control commands by sending the appropriate character. This interface makes script a breeze.

At least this power strip doesn’t spy on you.

Continue reading “Bluetooth Control In A Power Strip”

Adding Bluetooth Audio Playback To A Toyota Matrix

In this project [Ryan] shows how he added Bluetooth audio to the stock stereo of his Toyota Matrix. The work he did with his add-on hardware is quite good. And the installation was surprisingly easy. For example, the dashboard bezel which is hanging in the foreground of this picture simply pulls off without the need for any tools. Also, the CD changer input for the stereo is what he uses to patch into the system. It just happened to have a 0.1″ pin header so finding a connector that would work wasn’t a problem.

As for the add-on hardware, he built his own circuit board around an ATmega168 microcontroller and Bluegiga WT32 Bluetooth module. To connect to the car’s data system he went with an RS485 driver chip. It’s not quite the right part but it works well enough for his purposes. So far he can get audio playback working and plans to add support for hands free phone calls and displaying audio track information. Hey, maybe he’ll even add some extra shake-based automation; who knows?

Get a look at the install in the clip after the break.

Continue reading “Adding Bluetooth Audio Playback To A Toyota Matrix”

Six-digit VFD Alarm Clock

[Haris Andrianakis] just finished building this very clean-looking vacuum fluorescent display clock. It shows six digits using IV-11 tubes, and also has a half-dozen RGB LEDs to spice things up (check out the video after the break for an example). An ATmega168 drives the device, controlling the display and serving as a battery-backed real-time clock.

As with any tube-based clock there’s a fair amount of work that goes into driving the display. Each tube has a filament which requires 1.2V, and the segments themselves need 60 volts to light up. The microcontroller is not hard to protect; this is done with a series of transistor-based circuits used for switching. But the need for three voltages (to power microcontroller, filament, and segments) means a more complex PSU design. [Haris] chose to use a MAX6921 to simplify the process.

If you’re considering building something like this, we’d recommend looking for some 12-segment tubes. As we’ve seen before, they can display letters as well as numbers in case you wish to repurpose the device in the future.

Continue reading “Six-digit VFD Alarm Clock”