Restoring A PDP-10 Console Panel

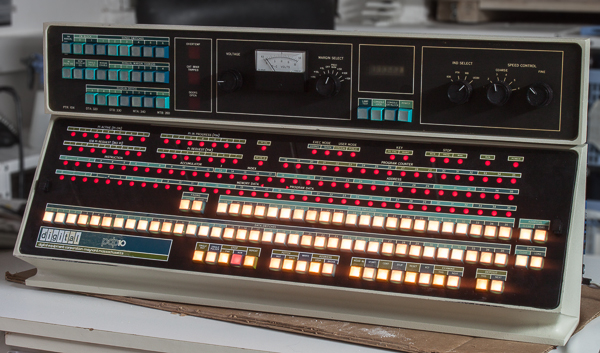
The PDP-10 was one of the first computers [Jörg] had gotten his hands on, and there are very, very few people that can deny the beauty of a panel full of buttons, LEDs, dials, and analog meters. When one of the front panels for a PDP-10 showed up on eBay, [Jörg] couldn’t resist; a purchase that would lead him towards repairing this classic console and making it functional again with a BeagleBone.

The console [Jörg] picked up is old enough to have voted for more than one Bush administration, and over the years a lot of grime has covered the beautiful acrylic panels. After washing the panel in a bathtub, [Jörg] found the dried panel actually looked worse, like an old, damaged oil painting. This was fixed by carefully scraping off the clear coat over two weeks; an important lesson in preserving these old machines. They’re literally falling apart, even the ones in museums.

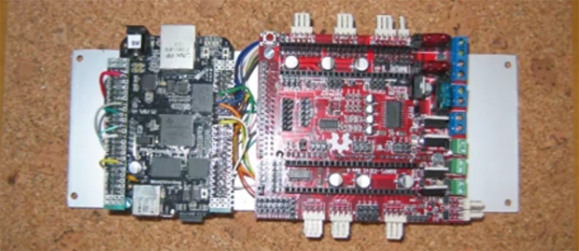
With the front panel cleaned, [Jörg] turned his attention to the guts of this panel. The panel was wired up for LEDs, and each of the tiny flashlight bulbs in the pushbuttons were replaced. The panel was then connected to a BlinkenBone with a ton of wiring, and the SIMH simulator installed. That turns this console into a complete, working PDP-10, without sucking down kilowatts of power and heating up the room

This isn’t the first time we’ve seen [Jörg] with a BeagleBone and some old DEC equipment; earlier he connected the front panel of a PDP-11 variant to one of these adapters running the same software.

Talking BeagleBoard With [Jason Kridner]

[Jason Kridner] is a member of the i3 Detroit hackerspace and during the Hackaday meet-up we were able to spend a few minutes talking about what’s going on with BeagleBoard right now. For those of you that don’t know, BeagleBoard is a non-profit foundation which guides the open hardware initiative of the same name. This includes BeagleBone which is the third iteration of the platform. [Jason’s] a good guy to talk to about this as he co-founded the organization and has been the driving force in the community ever since.

Right now the organization is participating in the Google Summer of Code. This initiative allows students to propose open source coding projects which will help move the community forward. Students with accepted proposals were paired with mentors and are paid for the quality code which is produced. One of the projects this year is a 100 Megahertz, 14-channel Logic Analyzer which [Jason] is waving around in the video. It’s the GSoC project of [Kumar Abhishek] and you can learn more from his proposal.

Also of interest in the video is a discussion about the power of the BeagleBone’s PRUs, or Programmable Real-Time Units. They’re basically unused microcontrollers that have direct access to a lot of the processor’s features and are just waiting for you to bend them to your will. Having these is a huge boon for hardware hackers. If you haven’t played with them before, check out our earlier article on what PRUs are all about and then give it a whirl yourself.

After the break there’s a brief table of contents which maps the topics shown off in the video.

Continue reading “Talking BeagleBoard With [Jason Kridner]”

An Introduction To The BeagleBone PRU

BBB 
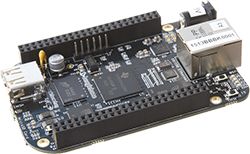
While the BeagleBone is usually compared to the Raspberry Pi, there are a few features that make the ‘Bone a vastly more capable single board computer. There is a small difference in the capabilities of the processor, but the real power of the BeagleBone comes from the PRUs available: two small cores that give the BeagleBone the hardware equivalent of bitbanging pins. [Texane] has put up two great tutorials for using the PRU in the BeagleBone that should be required reading for every BeagleBone owner.

The first tutorial goes over the capabilities of the PRUs in the BeagleBone and setting up the software environment to develop your own hardware interfaces with the PRU. While writing code for the PRU has usually involved the Beagleboard packages, TI has recently released a version of Code Composer Studio that gives the option to compile C code for the PRU.

[Texane] used this C compiler to rehash the earlier, assembly only PRU program, making development significantly easier. There’s still a bit of inline assembly, and the inline assembly support isn’t as advanced as in GCC, but it’s still much easier than the assembly only variant.

While [Texane] is using the PRU in his BeagleBone to develop something at a synchrotron facility, three are a few things where really fast hardware bitbanging comes in handy: it can be used to make a video card for a vintage mac, or any sort of VGA video card, really. Very cool stuff, especially now that you can write something in C.

BeagleBone Blacks Still Not Available, Here’s Blue Steel

zoolander

The BeagleBone Black has been featured in an improbable number of awesome project, ranging from driving thousands of LEDs for a video display, to 3D printer controller boards. There’s a lot you can do with a tiny Linux board that’s much more powerful than the Raspberry Pi – if you can find one, that is. The BeagleBone Black has been out of stock everywhere for months now, with little sign of when distributors will receive some new stock.

Luckily, the BeagleBone Black is open source. Anyone can make them. Finally, someone did. It’s called Blue Steel, and notwithstanding the inevitable Zoolander references, it’s pretty much the same as the BeagleBone Black we all know and love.

There are a few differences between Blue Steel and the BeagleBone Black: Blue Steel doesn’t have an HDMI output, and the 4GB of on-board Flash featured on the BeagleBone isn’t found on Blue Steel. Still, it has the same processor, same amount of RAM, and the same connectors found in the BeagleBone Black.

You can pre-order Blue Steel here, with the boards eventually shipping at the end of the month. It’s the same price as the BeagleBone Black, not ideal considering the missing HDMI port and Flash storage. Still, you can actually buy it now, something you can’t say about the BeagleBone.

Mini Ms. Pacman

Ms
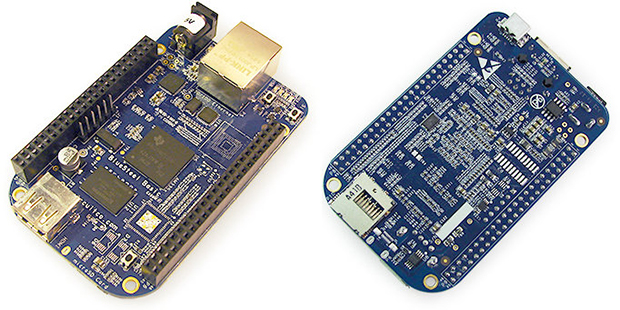
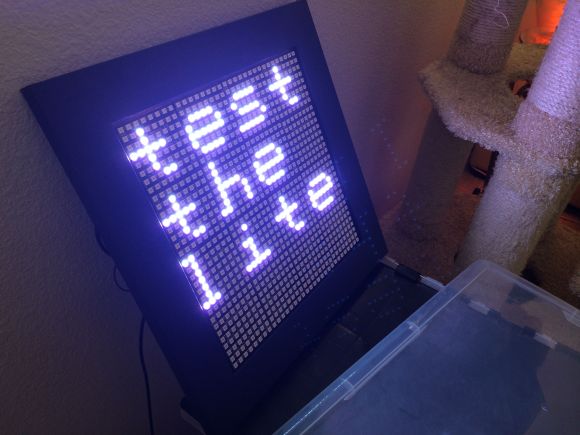
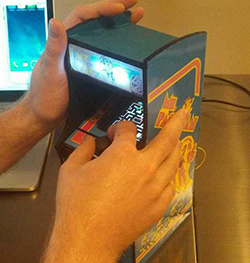
The bragging rights of owning a vintage arcade machine are awesome, but the practicality of it – restoring what is likely a very abused machine, and the sheer physical space one requires – doesn’t appeal to a lot of people. [Jason] has a much better solution to anyone who wants a vintage arcade machine, but doesn’t want the buyer’s remorse that comes with the phrase, “now where do we put it?” It’s a miniaturized Ms. Pacman, mostly scale in every detail.

The cabinet is constructed out of 1/8″ plywood, decorated with printed out graphics properly scaled down from the full-size machine. Inside is a BeagleBone Black with a 4.3″ touchscreen, USB speakers, and a battery-backed power supply.

The control system is rather interesting. Although [Jason] is using an analog joystick, the resistive touch screen monopolizes the ADC on the BeagleBone. The solution to this problem would be to write a driver, or if you’re [Jason], crack the joystick open and scratch away the resistive contact until you have a digital joystick. A nice solution, considering Ms. Pacman doesn’t use an analog joystick anyway.

Pictures over on [Jason]’s G+ page, along with a vertical video that G+ displays properly. Thanks, Google.

Aluminum LED Matrix Looks Professionally Made

IMG_1073

[David Donley] has wanted to make a LED matrix for a while now, and has decided to finally pull the trigger — after all, that many LEDs certainly aren’t cheap!

He’s using a set of 16 Adafruit 8×8 NeoPixel LED Matrices (almost $600 worth of LEDs) and a BeagleBone Black to control them. To mount the LED matrices he bought a sheet of 6061-T6 aluminum for two purposes — one to act as a giant heatsink, and two, to look cool. All he had to do was drill some holes in the sheet for the connectors, and then use 3M 300LSE double-sided adhesive to stick the NeoPixels to the surface. The result is a border-less display that looks clean and professional.

To power the array he’s using a 5V 90A power supply — at full brightness these LEDs can consume around 325W, or 65A at 5V!  Taking notes from the opensource LEDscape code on GitHub he’s made his own software to control the display — stick around after the break to see it in action.

Continue reading “Aluminum LED Matrix Looks Professionally Made”

BeagleBone Black + RAMPS

CRAMPS

The BeagleBone Black, with an impressive amount of computing power and a whole bunch of I/O, would make an impressive CNC controller, save for two shortcomings: The BBB isn’t in stock anywhere, and CNC capes are a little on the pricey side. [Marc Peltier] can’t do anything about finding a distributor that doesn’t have the BeagleBone on backorder for you, but he did come up with an adapter for the very popular RAMPS-FD 3D printer controller board (Forum, French, Here’s the Google translation matrix).

The RAMPS-FD is an extension of the RAMPS board and a shield for the Arduino Due. Both the Due and BBB work on 3.3 V, meaning controlling the RAMPS-FD is simply a matter of finding the correct wiring diagram and pin assignments on the BeagleBone. [Marc] solved this problem by using the settings from the BeBoPr cape and using the existing BeBoPr LinuxCNC configuration.

The end result of [Marc]’s tinkering is something a lot like [Charles Steinkueler]’s CNC capes for the BeagleBone Black we saw at the Midwest RepRap Fest. [Charles] isn’t selling his capes, but no one else seems to be selling BeagleBone Blacks, either.

Continue reading “BeagleBone Black + RAMPS”