Use Movie Tools To Make Your Robot Move Like Movie Robots

Robots of the entertainment industry are given life by character animation, where the goal is to emotionally connect with the audience to tell a story. In comparison, real-world robot movement design focus more on managing physical limitations like sensor accuracy and power management. Tools for robot control are thus more likely to resemble engineering control consoles and not artistic character animation tools. When the goal is to build expressive physical robots, we’ll need tools like ROBiTS project to bridge the two worlds.

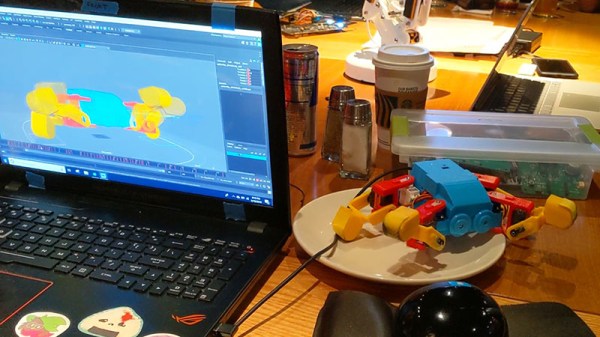
As an exhibitor at Maker Faire Bay Area 2019, this group showed off their first demo: a plugin to Autodesk Maya that translate joint movements into digital pulses controlling standard RC servos. Maya can import the same STL files fed to 3D printers, easily creating a digital representation of a robot. Animators skilled in Maya can then use all the tools they are familiar with, working in full context of a robot’s structure in the digital world. This will be a far more productive workflow for animation artists versus manipulating a long flat list of unintuitive slider controls or writing code by hand.

Of course, a virtual world offers some freedoms that are not available in the physical world. Real parts are not allowed to intersect, for one, and then there are other pesky physical limitations like momentum and center of gravity. Forgetting to account for them results in a robot that falls over! One of the follow-up projects on their to-do list is a bridge in the other direction: bringing physical world sensor like an IMU into digital representations in Maya.

We look forward to seeing more results on their YouTube channel. They join the ranks of other animated robots at Maker Faire and a promising addition to the toolbox for robot animation from Disney Research’s kinetic wires to Billy Whiskers who linked servos to Adobe Animate.

Continue reading “Use Movie Tools To Make Your Robot Move Like Movie Robots”

Kinetic Wire Animatronics Bend It Like Disney

The House of Mouse has been at the forefront of entertainment technology from its very beginnings in an old orange grove in Anaheim. Disney Imagineers invented the first modern animatronics in the 1960s and they’ve been improving the technology ever since, often to the point of being creepy.

But the complicated guts of an animatronic are sometimes too much for smaller characters, so in the spirit of “cheaper, faster, better”, Disney has developed some interesting techniques for animated characters made from wire. Anyone who has ever played with a [Gumby] or other posable wireframe toys knows that eventually, the wire will break, and even before then will plastically deform so it can’t return to its native state.

Wires used as the skeletons of animated figures can avoid that fate if they are preloaded with special shapes, or “templates,” that redirect the forces of bending. The Disney team came up with a computational model to predict which template shapes could be added to each wire to make it bend to fit the animation needs without deforming. A commercially available CNC wire bender installs the templates that lie in the plane of the wire, while coiled templates are added later with a spring-bending jig.

The results are impressive — the wire skeleton of an animated finger can bend completely back on itself with no deformation, and the legs of an animated ladybug can trace complicated paths and propel the beast with only servos pulling cables on the jointless legs. The video below shows the method and the animated figures; we can imagine that figures animated using this technique will start popping up at Disney properties eventually.

From keeping guests safe from robotic harm to free-flying robotic aerialists, it seems like the Disney Imagineers have a hardware hacker’s paradise at the Happiest Place on Earth.

Continue reading “Kinetic Wire Animatronics Bend It Like Disney”

Animated Progress Bar Shows LCD New Tricks

A small LCD screen can be extremely helpful with small microcontroller projects. Not everything needs to communicate to a fancy server using an ESP8266. However, if the simplicity of the character displays irks you, it’s possible to spice them up a little bit with custom characters and create animations, like [Fabien] did with his animated Arduino progress bar. (Google Translate from French)
The project started out simply enough: all [Fabien] needed was a progress bar. It’s easy enough to fill in the “characters” on the 2×16 character LCD screen one-by-one to indicate progress, and the first version of this did exactly that. The second version got a little bit fancier by adding a border around the progress bar and doubling its resolution, but the third version is where knowing the inner machinations of the microcontroller really paid off. Using a custom charset reuse optimization, [Fabien] was able to use 19 custom characters at a time when the display will normally only allow for eight. This was accomplished by placing the custom characters in memory in the correct order, to essentially trick the microcontroller into displaying them.
These types of microcontroller hacks get deep into the inner workings of the microcontroller and help expose some tricks that we can all use to understand their operation on a deeper level. Whether you’re using PWM to get a microcontroller to operate a TV, or creating the ATtiny-est MIDI synth, these tricks are crucial to getting exactly what you want out of a small, inexpensive microcontroller.