These days, you rarely have to build your own Linux kernel. You just take what your distribution ships, and it usually works just fine. However, [Andrei] became enamored with a friend’s cyberdeck and decided that he’d prefer to travel with a very small laptop. The problem is, it didn’t work well with a stock kernel. So, time to build the kernel again.
Of course, he tried to simply install Linux. The installer showed a blank screen. You might guess that you need to add ‘nomodeset’ to the kernel options. But the screen was still a bit wacky. [Andrei] likens troubleshooting problems like this to peeling an onion. There are many layers to peel back, and you are probably going to shed some tears.
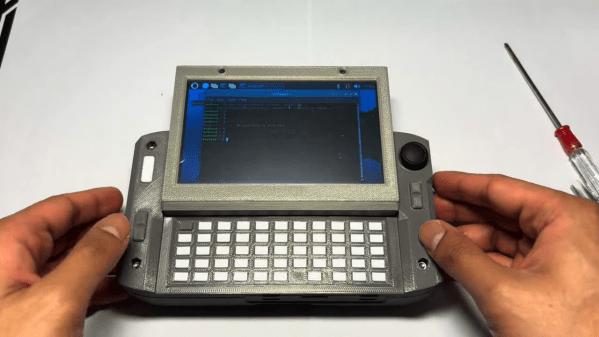
As with many cyberdecks, it uses the Raspberry Pi as its powerhouse. There are a couple of nice touchscreens and a decent keyboard, plus the usual ports and some nice programmable controls. These are none of them out of the ordinary for a cyberdeck, but what really shines with this one is the attention to detail in the mechanical design. Those touchscreens rotate on ball bearings, the hinges are just right, the connections to the Pi have quick release mechanisms, and custom PCBs and ribbon cables make distributing those GPIOs a snap.
On top of all that the aesthetics are on point; this is the machine you want to take into the abandoned mining base with you. Best of all it’s all available from the linked GitHub repository, and you can marvel as we did at the video below the break.
Computers and cellphones can do so many things, but sometimes if you want to doodle or take a note, pencil and paper is the superior technology. You could carry a device and a pocket notebook, or you could combine the best of analog and digital with the KeyMo.
[NuMellow] wanted a touchpad in addition to a keyboard for his portable terminal since he felt Raspbian wouldn’t be so awesome on a tiny touchscreen. With a wider device than something like Beepy, and a small 4″ LCD already on hand, he realized he had some space to put something else up top. Et voila, a cyberdeck with a small notebook for handwritten/hand drawn information.
The device lives in a 3D printed case, which made some iterations on the keyboard placement simpler, and [NuMellow] even provided us with actual run time estimates in the write-up, which is something we often are left wondering about in cyberdeck builds. If you’re curious, he got up to 7.5 hours on YouTube videos with the brightness down or 3.5 hours with it at maximum. The exposed screen and top-heaviness of the device are areas he’s pinpointed as the primary cons of the system currently. We hope to see an updated version in the future that addresses these.
Have you ever seen a toy and said “That wants to be a deck”? [Attoparsec] did, when his eyes fell upon the Little Talking Scholar, a punch card driven toy from the 1980s. It’s now a punch card driven cyberdeck.
The punch card interface on the toy is only six bits, but sixty-four application cards are probably more than parents would have wanted to keep track of in 1989. Originally, they cued up simple matching games on an anonymous epoxy-coated microprocessor; after [Attoparsec]’s surgery, they do the same thing, cuing up custom Python applications on the Raspberry Pi Zero he’s implanted into this thing.
All-in-one computers in which the mainboard lurked beneath a keyboard were once the default in home computing, but more recently they have been relegated to interesting niche devices such as the Raspberry Pi 400 and 500.
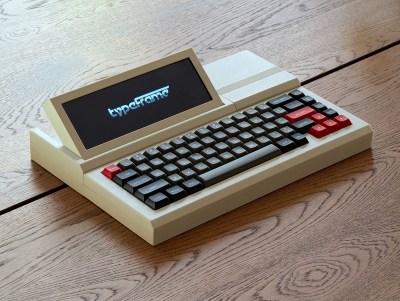
The Bento is another take on the idea, coming at it not with the aim of replacing a desktop machine, instead as a computer for use with wearable display glasses. The thinking goes that when your display is head mounted, why carry around a screen with your laptop.
On top it’s a keyboard, but underneath it’s a compartmentalized space similar to the Japanese lunchboxes which lend the project its name. The computing power comes courtesy of a Steam Deck so it has a USB-C-for-everything approach to plugging in a desktop, though there’s a stated goal to produce versions for other boards such as the Raspberry Pi. There’s even an empty compartment for storage of peripherals.
We like this computer, both for being a cyberdeck and for being without a screen so not quite like the other cyberdecks. It’s polished enough that we could almost imagine it as a commercial product. It’s certainly not the first Steam Deck based cyberdeck we’ve seen.
It’s been at least a few hours since Hackaday last featured a cyberdeck, so to avoid the specter of withdrawal, we present you with [Sp4m]’s SPACEdeck, a stylish phone-based cyberdeck!
The SPACEdeck takes a Samsung Galaxy S24 and puts it into a handsome clamshell case with a wireless keyboard, turning the phone into a tiny-screened laptop that urges you not to panic. Is The Hitchiker’s Guide to The Galaxy available on the Playstore? Well, the e-book of the novel surely is, and having access to Wikipedia comes close. The design is building off (or out from, as the case may be) a 3D-printed phone case for the S24 by Digital Proto.
Given that the Galaxy S24 has more horsepower than the ancient Macbook we’re writing this on, this setup is probably going to be more useful than you might think, especially when paired with Termux to give you the full power of Linux.
Like some modern laptops, the screen can rotate 180 degrees for when the keyboard isn’t needed. The case will also allow for Nintendo Switch2 joycon integration, but that’s a work in progress for now. The connection points will also be modular so other accessories can be used. All files will be released once [Sp4m] is happy with how the Joycons are holding on, hopefully with a license that will allow us to remix this for other phones.
[Nicholas LaBonte] shows off a Cyberdeck Handheld that demonstrates just how good something can look when care and attention goes into the design and fabrication. He wanted to make something that blended cyberpunk and nautical aesthetics with a compact and elegant design, and we think he absolutely succeeded.
On the inside is a Raspberry Pi and an RTL-SDR. The back of the unit is machined from hardwood, and sports a bronze heat sink for the Raspberry Pi. The front has a prominent red PSP joystick for mouse input and a custom keyboard. The keyboard is especially interesting. On the inside it’s a custom PCB with tactile switches and a ATmega32U4 running QMK firmware — a popular choice for DIY keyboards — and presents to the host as a regular USB HID device.
The keys are on a single plate of little tabs, one for each key, that sits between the front panel and press on the tact switches inside.
How did he make those slick-looking keys? It’s actually a single plate that sits between the front panel and the switches themselves. [Nicholas] used a sheet of polymer with a faux-aluminum look to it and machined it down, leaving metal-looking keys with engraved symbols as tabs in a single panel. It looks really good, although [Nicholas] already has some ideas about improving it.
On the right side is the power button and charging port, and astute readers may spot that the power button is where a double-stack of USB ports would normally be on a Raspberry Pi 5. [Nicholas] removed the physical connectors, saving some space and connecting the USB ports internally to the keyboard and SDR.
As mentioned, [Nicholas] is already full of ideas for improvements. The bronze heat sink isn’t as effective as he’d like, the SDR could use some extra shielding, and the sounds the keyboard ends up making could use some work. Believe it or not, there’s still room to spare inside the unit and he’d maybe like to figure out a way to add a camera, GPS receiver, or maybe a 4G modem. We can’t wait! Get a good look for yourself in the video, embedded below.