Hackaday Links Column Banner

Hackaday Links: January 25, 2015

Misumi is doing something pretty interesting with their huge catalog of aluminum extrusions, rods, bolts, and nuts. They’re putting up BOMs for 3D printers. If you’ve ever built a printer with instructions you’ve somehow found on the RepRap wiki, you know how much of a pain it is to go through McMaster or Misumi to find the right parts. Right now they have three builds, one with linear guides, one with a linear shaft, and one with V-wheels.

So you’re finally looking at those fancy SLA or powder printers. If you’re printing an objet d’arte like the Stanford bunny or the Utah teapot and don’t want to waste material, you’re obviously going to print a thin shell of material. That thin shell isn’t very strong, so how do you infill it? Spheres, of course. By importing an object into Meshmixer, you can build a 3D honeycomb inside a printed object. Just be sure to put a hole in the bottom to let the extra resin or powder out.

Remember that episode of The Simpsons where Homer invented an automatic hammer? It’s been reinvented using a custom aluminum linkage, a freaking huge battery, and a solenoid. Next up is the makeup shotgun, and a reclining toilet.

[Jan] built a digitally controlled analog synth. We’ve seen a few of his FM synths VA synths built from an LPC-810 ARM chip before, but this is the first one that could reasonably be called an analog synth. He’s using a digital filter based on the Cypress PSoC-4.

The hip thing to do with 3D printers is low-poly Pokemon. I don’t know how it started, it’s just what the kids are doing these days. Those of us who were around for Gen 1 the first time it was released should notice a huge oversight by the entire 3D printing and Pokemon communities when it comes to low-poly Pokemon. I have corrected this oversight. I’ll work on a pure OpenSCAD model (thus ‘made completely out of programming code’) when I’m sufficiently bored.

*cough**bullshit* A camera that can see through walls *cough**bullshit* Seriously, what do you make of this?

CY8CKIT-049-41XX Dev Kit

Cypress Launches $5 ARM Dev Board

We do love new development boards at Hackaday, and it’s always nice to see companies providing cheap tools for their products. For those needing a cheap ARM solution, Cypress has just released a PSoC based board that’ll cost you less than $5.

There’s two main ICs on the development board. The first is the target: an ARM Cortex M0+ based PSoC 4 MCU. The second is a CY7C65211 USB bridge. This device is communicates with the target’s built in bootloader for flashing code.

The bridge can also be configured to talk UART, GPIO, I2C or SPI.  If you need a USB to serial converter, this part of the board could be worth $5 alone.

The PSoC 4 target happens to be similar to the one our own [Bil Herd] used in his Introduction to PSoC video. If you’re looking to get into PSoC, [Bil] provides a good introduction to what makes these chips unique, and how to get started.

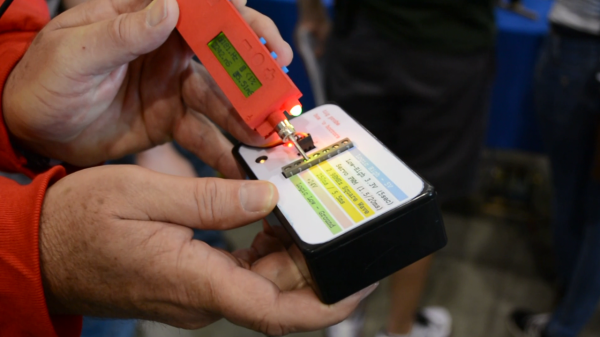
TIQ probe and test box

TIQ Probe Is More Logical Than Most

[youtube=https://www.youtube.com/watch?v=XZz1W-LurlU&w=580]


We had [Mark] on our “dance card” for people to find at Maker Faire. But before we could track him down he bumped into us holding the TIQ Probe in one hand and a testing box in the other. TIQ is conceived in the form factor of a traditional logic probe but thanks to the Cypress PSoC 5LP inside it’s much, much smarter than the decades-old bench tools. Sure, it can tell you if that uC pin is a 1 or a 0, but it can also detect what type of signal it’s probing and has built-in protection for over-voltage.

The point of the tool is to bridge the gap between things which would be measured with a DMM and those measured with a proper Oscilloscope. We think he did a pretty good job of including the things that someone just starting out without expensive bench equipment might want. For instance, you can set it to trigger on common data protocols like i2c, and use the probe itself as a rudimentary pulse generator.

The bulk of the details on the probe can be found on its Kickstarter page (which has just a few days left). You may also be interested in his company page. We’re curious about the insides of the test rig he was hauling around. [Mark] is a regular reader so hopefully he’ll leave a comment below with the details of that black box.

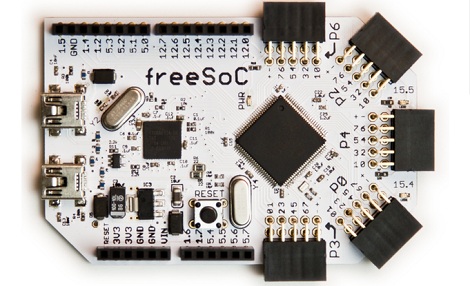
FreeSoC, For When You Need 68 I/O Pins

Like many of us, [Jon] began his journey through the magical world of microcontrollers with an Arduino. For a beginner, the Arduino is a wonderful tool, but [Jon] quickly found himself limited by the platform. There are too few pins on the Arduino, and and the platform doesn’t really lend itself to extremely complex projects. To this end, [Jon] designed freeSoC, an Arduino-compatible platform based on the Cypress Semiconductor PSoC 5.

The Cypress PSoC 5 is an extremely capable microcontroller with 60 general purpose I/O pins and 8 special purpose, high current outputs. Every pin on [Jon]’s freeSoC is completely configurable; if you want 24 SPI ports and a dozen 20-bit ADCs, just launch Cypress’ design software and configure the chip graphically. With this many I/O ports, the PSoC 5 is as useful as an FPGA, without all the hassle of actually being and FPGA.

A really neat feature of the freeSoC is its ability to be programmed graphically. Using Cypress’ PSoC Creator IDE, the multitude of I/O pins can be configured to just about anything very easily. Because the PSoC 5 is based on an ARM Cortex-M3, programming the freeSoC is as easy as any one of many ARM dev boards that were recently released.

[Jon] came up with a very, very neat project here, and it’s something we can definitely see the utility of.

Thanks [Dale] for sending this one in.

The Rube-Goldberg Of Car Audio

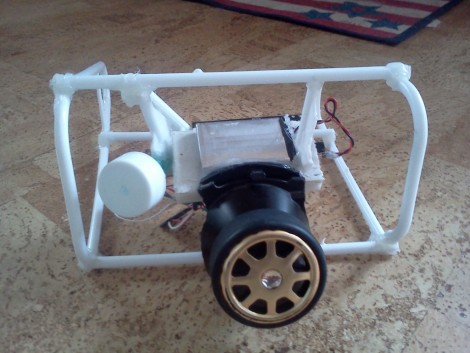
[Anthony Pray] had his car stereo stolen. When thinking about replacing it he realized the he and his wife never used it for anything other than an Auxiliary connection to play songs from their cellphones. So instead of buying a head unit he pulled an unused home audio amplifier out of a dark corner of his house and wired it to the car speakers. Problem solved, except that the under-dash installation meant the only volume control is on the phone playing the audio. He decided to build a wireless audio controller that would let him send commands to the phone without quite as much distraction from the road.

The device you see above is his creation. What a beauty. But seriously, it’s so random and hacked together how can you not love it? And, it works!

The frame is made from plastic coat hangers, and the wheel is an old RC control knob. There’s even a play/pause feature built from the clicking properties of a retractable ball-point pen. A Cypress PSoC board reads the knob and pen positions, then pushes commands via a Bluetooth module in order to control the phone. He recorded a testing video (after the break) which gives you a better look at the functionality of this setup. Continue reading “The Rube-Goldberg Of Car Audio”

IM-ME USB Dongle Hacking

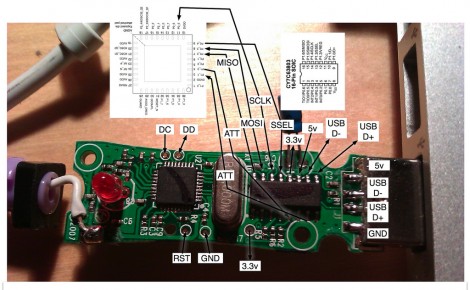
This circuit board is from the USB dongle of a Girl Tech IM-ME. [Joby Taffey] took it apart and poked around to learn its secrets. These dongles come along with the pink pager that has become a popular low-cost hacking platform. But we haven’t seen much done with the dongle itself up until now.

[Joby] used the OpenBench Logic Sniffer to gain some insight on what’s going on here. The board has two chips on it, a Cypress CY7C63803 USB microcontroller which talks to the computer over USB and also communicates over SPI with a Chipcon CC1110 SoC radio. It looks like reprogramming the Cypress chip is a no-go, so he went to work on the CC1110. The inter-chip communications data that he acquired by sniffing the SPI lines gave him all he needed to reimplement the protocol using his own firmware. As a proof of concept he to reflashed the CC1110 and can now send and receive arbitrary commands from the dongle. There’s a tiny video after the break showing a script on the computer turning the dongle’s LED on and off.

Continue reading “IM-ME USB Dongle Hacking”

Read Every Bit On A DVD

If you are curious about reading all the bits on a DVD, [tmbinc] has devised a hardware hack that uses a Pioneer DVD drive with leads soldered onto it and a Cypress FX2 microcontroller board to grab the flow of bits and push them over USB2.0. My favorite part of this tutorial is when you slow the spinning DVD down very slightly with your finger with a scope hooked up over what you believe to be the raw data stream from the disk. If the data rate slows when you physically slow down the disk, you probably are grabbing data from the correct pin. [tmbinc] even put together a software tool to process the resulting raw DVD data.