Wonderful Foldable Printable Dodecahedron

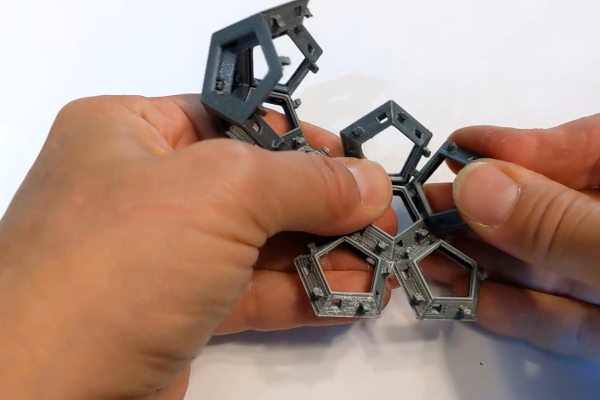
Debra Ansell of [GeekMomProjects] fame came up with a neat, 3D design that prints flat and then folds up into everyone’s favorite Platonic solid: a D12.

Why would you want to do this? Well, folding up your 3D prints gives you a third dimension “for free” without using all that support material. Here, all of the outside faces of the dodecahedron are printed flat against the build plate, which is probably the nicest side of your prints. And embedding LEDs in the resulting shape would probably be easy because they’re all in plane. And speaking of LEDs, we kinda expected to see them here, given Debra’s motto: “LEDs improve everything” — that part is up to you.

Debra notes that she likes PETG instead of PLA for the extra strength in the thin-printed hinges, and we’d bet that your printer’s tolerances will need to be spot on for the clips that hold the whole thing together. (We’d be tempted to apply a little super-duper glue.)

As always with Debra’s projects, there’s some creative solutions on display here that’ll help you out whether you need a D12 or a D20, so give it a look!

Thanks [Peter] for the tip.

Continue reading “Wonderful Foldable Printable Dodecahedron”

Blinking An Arduino LED, In Julia

The Julia programming language is a horrible fit for a no-frills microcontroller like the ATMega328p that lies within the classic Arduino, but that didn’t stop [Sukera] from trying, and succeeding.

All of the features that make Julia a cool programming language for your big computer make it an awful choice for the Arduino. It’s designed for interactivity, is dynamically typed, and leans heavily on its garbage collection; each of these features alone would tax the Mega to the breaking point. But in its favor, it is a compiled language that is based on LLVM, and LLVM has an AVR backend for C. Should just be a simple matter of stubbing out some of the overhead, recompiling LLVM to add an AVR target for Julia, and then fixing up all the other loose ends, right?

Well, it turns out it almost was. Leaning heavily on the flexibility of LLVM, [Sukera] manages to turn off all the language features that aren’t needed, and after some small hurdles like the usual problems with volatile and atomic variables, manages to blink an LED slowly. Huzzah. We love [Sukera’s] wry “Now THAT is what I call two days well spent!” after it’s all done, but seriously, this is the first time we’ve every seen even super-rudimentary Julia code running on an 8-bit microcontroller, so there are definitely some kudos due here.

By the time that Julia is wedged into the AVR, a lot of what makes it appealing on the big computers is missing on the micro, so we don’t really see people picking it over straight C, which has a much more developed ecosystem. But still, it’s great to see what it takes to get a language designed around a runtime and garbage collection up and running on our favorite mini micro.

Thanks [Joel] for the tip!

3D Printed Concrete Beam Improves Sustainability

Many of the 3D printed houses and structures we’ve seen use concrete and are — frankly — a little underwhelming. Making big squares out of concrete isn’t that hard and while we are sure there is some benefit, it isn’t overwhelming. [Andy Coward] apparently felt the same way and set out to find ways that 3D printing could offer unique benefits in building structures. The result: a beam that would be difficult to create with conventional techniques but is easy to make with a printer. The advantage is that it uses 78% less concrete than a conventional beam with the same properties.

The key is that in a normal beam, not much of the concrete is bearing a significant load. It is simply there because you need some concrete on one side of the beam and then some more on the other side. In the center, surprisingly little of the concrete actually supports anything. The new beam takes advantage of this along with a steel reinforcement at a strategic point. Still, it uses 70% less steel than a typical reinforced beam.

Continue reading “3D Printed Concrete Beam Improves Sustainability”

Don’t Mind If I Ski-Do

There is an age-old tradition among hackers of just making it yourself. Whether the real thing is too expensive or you think you can make a better one, the itch strikes, and it can quickly spread. [Homemade Madness] has quite the itch as he builds his own jetski.

What is a jetski but a boat with a shell on top? In an earlier video, he created a boat out of plywood and, after the usual steps of fiberglass and sealing, was proud to float around in his relatively normal-looking boat. But now that he had a working bottom, it was time to return to CAD. He printed out templates for all various shapes he would need, each labeled with a different designator, and glued them to the plywood. No fancy CNC here, just a steady hand and a jigsaw. We love the professional build instructions he compiled for himself that detail in LEGO-like quality exactly how each piece slots into where and in what order to do them. In addition to the top layer of the jetski, he also designed a stand for the boat to rest on while he made it, which is just going the extra mile. A ceiling-mounted winch made it easy to lift the ship into position. Next, he connected all the various framing pieces with PU glue. Thin plywood acted as cladding on top of the skeleton. Filling, sanding, and fiberglass overlaid the structure, making it waterproof. More sanding and some primer later, and it was ready for another water test.

He designed a version with an outboard motor, but he’s trying to build one with a built-in jet drive. So we’re looking forward to seeing the next step and him flying around on his custom watercraft. But what he has already done is quite impressive. If you’re looking for something a little smaller to pull you around the water, why not take a look at this little 3d printed tug boat? Video after the break.

Continue reading “Don’t Mind If I Ski-Do”

Scrambling Pocket Calculators Made Easy With EMP Box V2

[Rostislav Persion] has for some time been interested in making small, portable EMP devices capable of interfering with nearby electronics. In these EMP devices, high voltage is used to create a portable spark gap generator, whose operation in turn creates electromagnetic pulses capable of resetting or scrambling nearby electronics such as pocket calculators.

Bridging adjacent holes narrows the spark gap, resulting in more frequent pulses.

His original EMP box designs relied on spark gaps constructed from metal screws threaded into a clear plastic insulator, but this newest design ditches fussy screw adjustments and relies on perfboard. By cutting out a single row of plated perfboard holes and soldering the high voltage terminals to each end, the empty holes in between form the essential parts of a spark gap.

It’s even adjustable: one simply bridges adjacent holes with solder to effectively decrease the gap. As for generating the high voltage itself, a DC voltage multiplier from Amazon takes care of that. Watch the device reset some calculators in the short video below.

Looking for high-voltage experiments that aren’t so sketchy? Get yourself a Van de Graff generator, some metal balls, and a little bit of oil, and make some art.

Continue reading “Scrambling Pocket Calculators Made Easy With EMP Box V2”

Working With BGAs: Design And Layout

The Ball Grid Array, or BGA package is no longer the exclusive preserve of large, complex chips on computer motherboards: today even simple microcontrollers are available with those little solder balls. Still, many hobbyists prefer to stay with QFP and QFN packages because they’re easier to solder. While that is a fair point, BGA packages can offer significant space savings, and are sometimes the only choice: with the ongoing chip shortage, some other package versions might simply be unavailable. Even soldering doesn’t have to be complicated: if you’re already comfortable with solder paste and reflow profiles, adding a BGA or two into the mix is pretty easy.

In this article we’ll show that working with BGA chips is not as difficult as it may seem. The focus will be on printed circuit board design: how to draw proper footprints, how to route lots of signals and what capabilities your PCB manufacturer should have. We’ll cover soldering and rework techniques in a future article, but first let’s take a look at why BGAs are used at all.

Continue reading “Working With BGAs: Design And Layout”

Ubuntu 22.04 setup screen shown on the Google's Nest Hub display

Breaking Google Nest Hub’s Secure Boot

[frederic] tells a story about their team’s hack of a Google Nest Hub (2nd generation) — running Ubuntu on it, through bypassing Google’s boot image signature checks. As with many good hacks, it starts with FCC website pictures. Reverse-engineering a charger and USB daughterboard pin-out, they found a UART connection and broke it out with a custom adapter. With a debug console and insights into the process, they went on hacking, slicing through hardware and software until it was done with.

This story gives plenty of background and insight into both the code that was being investigated, and the way that attack targets were chosen. Through fuzzing, they found a buffer overflow in the bootloader code that could be triggered with help of a non-standard block size. USB flash drives tend to have these hard-coded, so they built a special firmware for a Pi Pico and shortly thereafter, achieved code execution. Then, they hooked into uboot functions and loaded Ubuntu, bypassing the boot image signature checks.

This is a wonderful documentation of a hacking journey, and an exciting read to boot (pun intended). The bug seems to have been patched for half a year now, so you probably can’t flash your Google Nest into Ubuntu anymore. However, you might be able to run an up-to-date Linux on your Amazon Echo.

We thank [Sven] for sharing this with us!