RasPi Traffic Monitor

Dedicated Automobile Traffic Monitor With Raspberry Pi

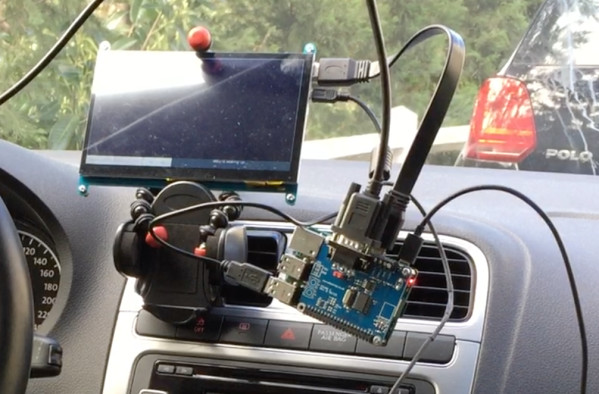
[j3tstream] wanted an easier way to monitor traffic on the roads in his area. Specifically, he wanted to monitor the roads from his car while driving. That meant it needed to be easy to use, and not too distracting.

[j3tstream] figured he could use a Raspberry Pi to run the system. This would make things easy since he’d have a full Linux system at his disposal. The Pi is relatively low power, so it’s run from a car cigarette lighter adapter. [j3tstream] did have to add a custom power button to the Pi. This allows the system to boot up and shut down gracefully, preventing system files from being corrupted.

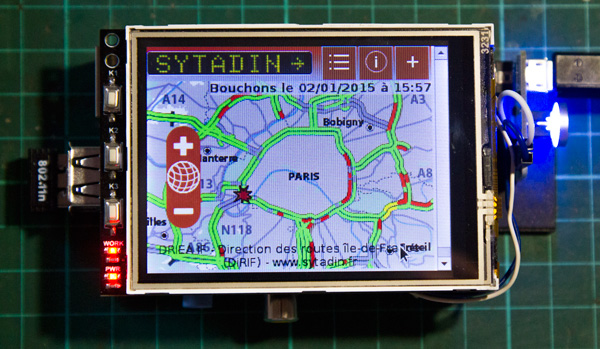
After searching eBay, [j3tstream] found an inexpensive 3.2″ TFT LCD touchscreen display that would work nicely for displaying the traffic data. The display was easy to get working with the Pi. [j3tstream] used the Raspbian linux distribution. His project page includes a link to download a Raspbian image that already includes the necessary modules to work with the LCD screen. Once the image is loaded, all that needs to be done is to calibrate the screen using built-in operating system functions.

The system still needed a data connection. To make things simple and inexpensive, [j3tstream] used a USB WiFi dongle. The Pi then connects to a WiFi hot spot built into his 4G mobile phone. To view the traffic map, [j3tstream] just connects to a website that displays traffic for his area.

The last steps were to automate as much as possible. After all, you don’t want to be fumbling with a little touch screen while driving. [j3tstream] made some edits to the LXDE autostart file. These changes automatically load a browser in full screen mode to the traffic website. Now when [j3tstream] boots up his Pi, it automatically connects to his WiFi hotspot and loads up local traffic maps.
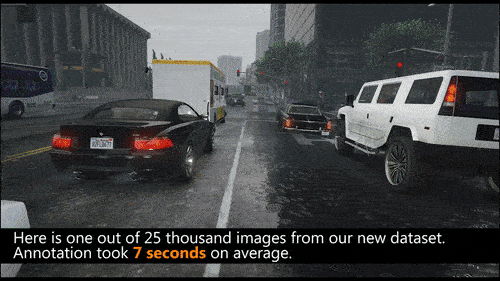
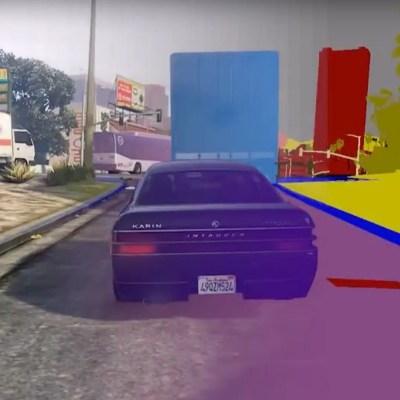
Heads Up Controls For Your IPod

[Cmonaco3’s] girlfriend wanted a better way to control her iPod when driving. She didn’t want to take her eyes of the road and asked him if he could help. He ended up building a heads up display which reads out track information and offers a few simple buttons for control.

The display includes controls for track forward, track back, and play/pause. Those buttons, along with the LCD screen, mount on the windshield using a suction cup. This way the driver doesn’t have to completely remove focus from the road to control the iPod which is sitting in the passenger’s seat.

To accomplish this [Cmonaco] used a dock connector breakout board for communication between an Arduino and the iPod. The Arduino pulls song information to be displayed on the graphic LCD screen, and sends commands to the iPod when it detects a button push. See a quick demo of the setup after the break.

Continue reading “Heads Up Controls For Your IPod”

Better Driving With A Bullduino

Despite what you may have heard from the kids hanging out in the parking lot of Taco Bell, there’s a lot to be said about driving conservatively. Not peeling out after ever red light and stop sign does wonders for the life of your engine, and not slamming on the brakes 50 feet away from an intersection will keep your brake pads going a long time. [aromaoftacoma] wanted a dashboard gauge telling him how good of a driver he is, so when he got a bullduino he knew what he had to do.

[aromaoftacoma]’s project for the Redbull creation contest uses the very cool Arduino shield/Redbull logo known as a bullduino with an accelerometer to track how conservatively he’s driving. Quick stops and starts are murder on an automobile – it’s the same reason your grandmother has had the same car for 20 years – so [aromaoftacoma] made a wonderful display using red and blue LEDs behind each charging bull.

Because simply blinking a LED in response to data pulled from an accelerometer is a little boring, [aromaoftacoma] added a servo to change the orientation of the charging bulls. When he’s driving well, the blue bull is tilted up, and when he stops short the red bull becomes the focus of attention. Not a bad build at all.

You can check out [aromaoftacoma]’s build video after the break.

Continue reading “Better Driving With A Bullduino”

Discrete Logic Driving Game Development

[Caleb] is hard at work on a driving game based on 7400 series logic chips. This will be his entry in the Open 7400 Logic Competition, and it really outlines why this contest is especially tricky.

The concept behind the game is quite simple. You’re the driver of a car (the red dot at the bottom of the display square seen above) and need to navigate the curves in the road as you drive along. It’s the same game as we saw played on receipt paper back in June. [Caleb’s] using and LED matrix as the display, and we’re confident that if we grabbed our favorite microcontroller we could have this up and running on an 8×8 bi-color display in an afternoon. But doing it without the crutch of a programmable chip really brings out the clever engineer inside of you.

The circuit seen above is a Logisim proof-of-concept that [Caleb] went on to test on the breadboard. He thought he had everything figured out until he realized that his Data Flip-Flops were very occasionally not powering up in the same state as he predicted. Don’t worry, he found a solution to the problem. But we can’t wait to see what other hurdles he encounters as he pushes on toward completing the project.

Precision Erector Set Connects Multiple Cameras

[youtube=http://www.youtube.com/watch?v=nIWGKowjuIo]

Check out the exoskeleton that [Curt von Badinski] built for filming driving scenes. This extremely configurable wrap-around frame resembles a children’s toy from the past but allows an almost unlimited set of configurations. Five cameras simultaneous capture the driving scene. The current setup is used to shoot the television show 24.

[Thanks Robert]