7 Segment Display Using Neopixel Rings

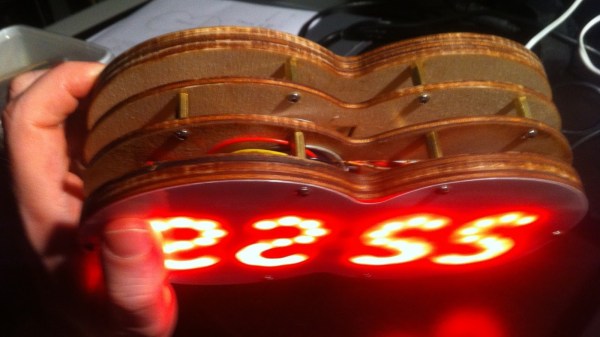
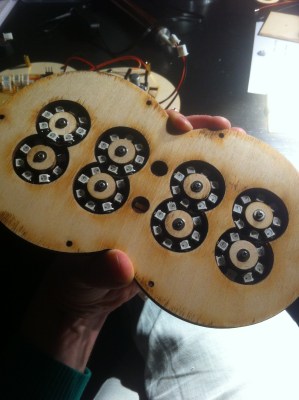
There’s something about clocks — sooner or later, every hacker wants to build one. And we end up seeing all kinds of display techniques being used to show time. For the simplest of builds, 7-segment display modules usually get dug up from the parts bin. If you have a bunch of “smart” LED’s (WS2812’s, APA102’s), then building your own custom 7-segment modules isn’t too difficult either. [rhoalt] had neither, but he did have several 8 LED Neopixel rings lying around. So he thought of experimenting with those, and built a ‘Binoctular’ LED clock which uses the Neopixel rings as 7 segment displays.

figure-eight-segment-displaysEach digit is made using one pair of Neopixel rings, stacked to form a figure of eight. All the digits are composed of arcs, so readability isn’t the best but it’s not hard either. [rhoalt] does mention that the display is easier to read via blurred camera images rather than visually, which isn’t surprising. We’re long used to seeing numbers composed of straight line segments, so arc segmented digits do look weird. But we wouldn’t have known this if [rhoalt] hadn’t shown us, right ? Maybe a thicker diffuser with separator baffles may improve the readability.
The rest of the build is pretty plain vanilla — an Arduino Nano clone, a DS3231 RTC, a Lithium battery, and some buttons, all housed together in a laser cut enclosure which follows the figure of eight design brief. And as usual, once you’ve built one, it’s time to improve and make a better version.

Alarm System Upgrade Tips The Functionality Scale

Residential-grade commercial alarm systems are good at a few things but terrible at others, like keeping pace with telephone technology. So what to do when a switch to VOIP renders your alarm system unable to call in reinforcements? Why not strip out the old system and roll your own value-added alarm and home automation system?

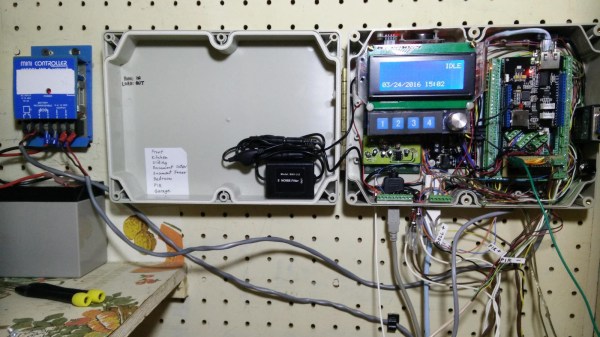
Generally, the hardest part about installing an alarm system is running the wires to connect sensors to the main panel, so [Bill Dudley] wisely chose to leverage the existing wiring and just upgrade the panel. And what an upgrade it is. [Bill]’s BOM reads like a catalog page from SparkFun or Adafruit – Arduino MEGA 2560, Ethernet shield, a sound board, stereo amplifier, X10 interface, and a host of relays, transformers, and converters. [Bill] is serious about redundancy, too – there’s an ESP8266 to back up the wired Ethernet, and a DS3231 RTC to keep the time just in case NTP goes down. The case is a bit crowded, but when closed up it’s nicely presentable, and the functionality can’t be beat.

Rehabilitating old alarm systems is a popular project that we’ve covered plenty of times, like this Arduino upgrade for a DSC 1550 panel. But we like the way [Bill] really went the extra mile to build add value to his system.

A Laser Cut Word Clock

DIY laser cut word clock.

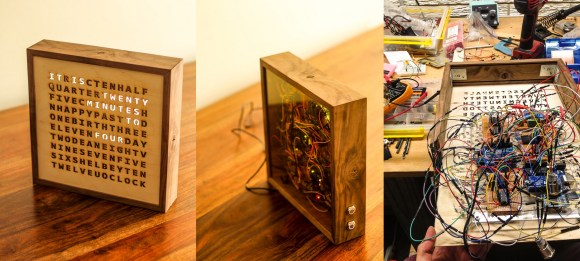
What is a word clock? A word clock is a clock that displays the time typographically that is also an interactive piece of art. Rather than buy one for $1500, [Buckeyeguy89] decided to build one as a present for his older brother. A very nice present indeed!

There are many different things that come into play when designing a word clock. The front panel is made from a laser cut piece of birch using the service from Ponoko. Additionally, white translucent pieces of acrylic were needed to keep each word’s light from bleeding into the neighboring letters. The hardware uses two Arduinos to control the LEDs and a DS3231 RTC for keeping accurate time. The results are very impressive, but it would sure make assembly easier if a custom PCB was used in the final version. For a one-off project, this makes a great birthday present.

The craftsmanship of this word clock is great, making it well suited for any home. What projects have you built that involve more than just electronics? Sometimes, quality aesthetics make all the difference.

LED Clock Lights Up A Dead Mac Mini

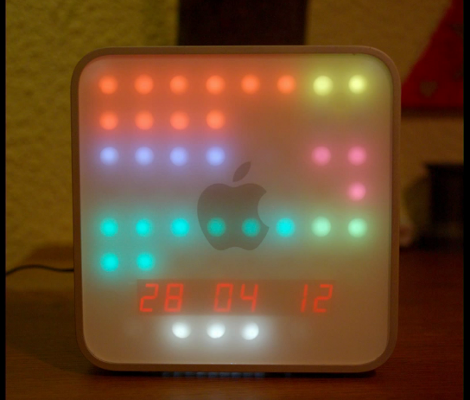
[Professor Shadoko’s] Mac Mini died. But since the case designs on Apple products are half the reason to buy them, he decided to reuse the enclosure by turning it into this clock (translated).

As with the binary clock we saw yesterday, this one uses a bunch of LEDs to display the time, but it does it in a way that’s a bit more readable if you know what you’re looking for. The face has been divided up into two columns. On the left is hours, then minutes and seconds in increments of five. To the right is AM/PM, with minutes and seconds in increments of one. If we’re doing this right, the time seen above is 10:23:42 PM on April 28th, 2012. The white LEDs below the date act as a digital pendulum, scrolling left and right as the seconds tick by.

The display uses two MAX7219 LED drivers to control the grid which is build on a big hunk of protoboard. An Arduino ties the whole system together with a Chonodot for accurate time keeping. There’s even an ambient light sensor which adjusts the LED intensity to make this readable in direct sun, or the dark of night. See a demo clip embedded after the break.

Continue reading “LED Clock Lights Up A Dead Mac Mini”

Bare-bones Electronic Advent Calendar

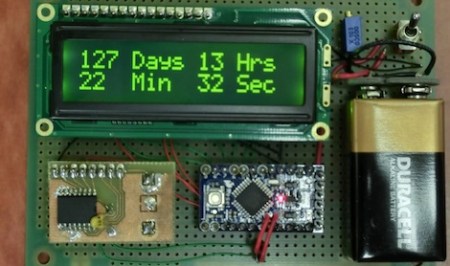
It’s officially September now (in some parts of the world), and that means we’ve been watching the Christmas decorations go up on the floor of Costco, Walmart and Target for the last few weeks. As a small test of reality, [Eric] decided to build an electronic advent calendar that counts down the days until Christmas. As a simple build using parts lying around on the bench, [Eric] did a pretty good job at deferring his kid’s questions of, “How long until Christmas?” to a machine.

The build is fairly bare-bones, using only an Arduino Pro Mini, RTC and LCD display. For the real-time clock, [Eric] used the ever popular DS3231 RTC. The software reads the time from the clock and calculates the number of seconds between the present time and the hard-coded target date.

Everything is powered by a 9 Volt battery that wouldn’t last the remaining 115 days until Christmas. There is a power switch and the RTC has a battery backup, so the build will probably suffice for all but the most fanatical child.

Warm Tube Clock, Take 2

warm_nixie_v2

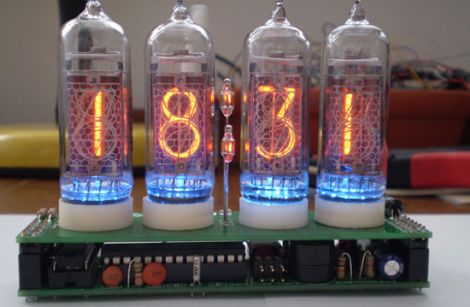
[Mure] wrote in to let us know he has put the finishing touches on the second iteration of his Warm Tube Nixie clock. We featured his original creation here last year, and while many things remain the same, he has still found a few things that he was able to improve on.

The first notable feature is the new real time clock. Instead of using a discrete crystal to keep time and a temperature sensor for compensation, he has opted to use a DS3231 RTC IC. It is far more accurate than the crystal, and it features a built-in temperature sensor as well. The alarm functionality has been simplified too, moving the controls into firmware rather than having to use a sliding switch to do so.

With the mainboard redesign, it would have been easy to leave behind the nixie “shields” he created for his first clock, but with a focus on interoperability, he chose to make this clock fully compatible with version one’s shields and vice versa.

While the changes aren’t groundbreaking, it’s nice to see a project like this undergo continued refinements. If you want to build a clone of this clock, [Mure] has made sure that all of the schematics and source code are available on his site.

Continue reading to see a brief video demo of the clock in action.

Continue reading “Warm Tube Clock, Take 2”

Ice Tube Clock, Meet The ChronoDot

[Alex] ramped up the precision of his timepiece by adding a ChronoDot to the Ice Tube Clock. These two items are among our favorites; the Ice Tube Clock for its old-style multi-digit display, and the ChronoDot for combining a DS3231, battery, and components into a nice small package.

There is a schematic link at the very bottom left of [Alex’s] writeup. He mentions that he depopulated the clock crystal and its capacitor pair from the board and patched into the clock input on the AVR. A 100K pull-up resistor is included in the wiring as called for in the DS3231 datasheet. Although not specifically referenced, we assume that [Alex] reprogrammed the ATmega168 clock select fuses to use an external clock signal.

Now he can sit back knowing that the clock will be within 10 seconds per year accuracy.