In the early 90s, the Creative Sound Blaster was the soundcard. It wasn’t the absolute best sounding card on the market, but it quickly became the defacto standard and delivered good sound at the right price. It relied primarily on the Yamaha OPL-3 FM synthesis chip, but if you were feeling spendy, you could pimp it out with a Wave Blaster add-on card, which essentially bolted a sample synthesis engine onto the card. This gave the card a broad palette of sampled instruments with which to play MIDI tunes all the sweeter, so you could impress your grade school chums who came over to play DOOM.
It’s now 2017, if you hadn’t checked the calendar, and Sound Blasters from yesteryear are only going to go further upward in price. It goes without saying that add-on daughterboards and accessories are even rarer and are going to be priced accordingly. So, if you’re building a vintage gaming rig and are desperate for that sample-synth goodness, [Serdashop] are here to help with their latest offering, the Dreamblaster S2.
It’s reportedly the smallest Wave Blaster add-on board available, which is awesome. If you’re sticking it on top of your Sound Blaster 16, yes, it’s pointless – you’re not exactly short on room. But if you want to integrate this with a compact microcontroller project? Size matters. Yes, you can feed this thing MIDI signals and it’ll sing for you. A hot tip for the uninitiated: MIDI speaks serial, just like everything and everyone else. Your grandma learned to speak it in the war, you know.
Your options for hooking this up are either slotting it into a Wave Blaster compatible card, or buying the carrier board that allows you to use it with a Game Port, in addition to custom-wiring it to your own hardware. We’d love to see this as a HAT for the Raspberry Pi Zero. Do it, send it in and we’ll write it up.
We’ve seen [Serdashop]’s hardware here before – namely, the earlier Dreamblaster X2. Video below the break.
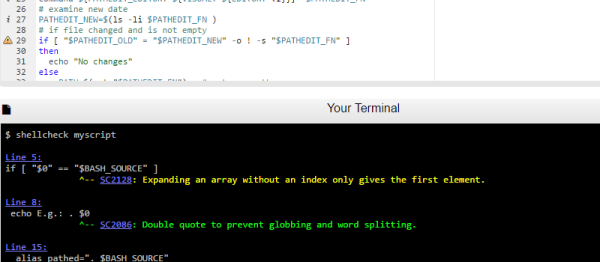
It used to be one of the joys of writing embedded software was never having to deploy shell scripts. But now with platforms like the Raspberry Pi becoming very common, Linux shell scripts can be a big part of a system–even the whole system, in some cases. How do you know your shell script is error-free before you deploy it? Of course, nothing can catch all errors, but you might try ShellCheck.
When you compile a C program, the compiler usually catches most of your gross errors. The shell, though, doesn’t look at everything until it runs which means you might have an error just waiting for the right path of an if statement or the wrong file name to occur. ShellCheck can help you identify those issues before deployment.
If you don’t like pasting your script into a Web page, you can install the checker locally by visiting GitHub. The readme file there also explains what kind of things the tool can catch. It can even integrate with common editors (as seen in the video below).
Few things are as infuriating as clocks that are not synchronized. It’s frustrating when the clock on the range and the clock on the microwave act like they’re in time zones that are one minute apart. Now picture that same issue over dozens of clocks in a train station, or hundreds in a school or factory. It’s no wonder that slave clocks, which advance on signals from a master clock, were developed.
When a pair of vintage Lepaute slave clocks made their way to [melka], he knew just what to do – build his own master clock to keep the slave on track. This particularly stylish slave clock uses pulses of alternating polarity every 30 seconds and will work on 1.5-volt pulses, which let [melka] meet his design goal of running for a year off a single AA battery. To keep the power needs low, [melka] relies on the RTC to wake up the MSP430 every second to increment a counter. When it hits 30, a pulse is sent to the clock’s motor through an H-bridge; the MCU alternates the polarity of every other pulse to advance the clock.
It’s not immediately clear how the clock is set; we recall the slave clocks in high school rapidly advancing for Daylight Saving adjustments, so we assume [melka] has provided some way of pulsing the clock quickly to set the time. Regardless, it’s a good lesson in low-power design. And be sure to check out this PIC-based master clock replacement, too.
Three hundred bucks for a new car key? Nonsense! When you lose your keys or want to have an extra made for that new teen driver, don’t let the stealership lighten your wallet. Just pull the ECU and hack some hex to add the new keys.
The video below is a whirlwind tour of the process [speedkar9] uses to reprogram Toyota ECUs to allow new keys to pass the security test on your new(er) car. Since the early 2000s or so, most manufacturers have included RFID chips in their keys so that only known keys will start a car. In Toyotas, this is done by an RFID reader in the steering column that passes the inserted key’s code to the engine control unit. If the 8-byte key code matches one of three values stored in the ECU, the car will start. Clearing the EEPROM in the ECU is the focus of [speedkar9]’s process, which connecting to the EEPROM and reading the contents. His rig includes an RS-232 serial connection, so the hardest part of this hack might be rounding up a PC with a DB-9 jack, but once you’ve got that covered, it’s just a little bit-bashing to “virginize” the ECU to ready it for reprogramming.
The details of the procedure will vary by manufacturer, of course, and cars of a more recent vintage will likely have even more security to worry about. Might you even run afoul of DRM like you would by hacking a tractor? Perhaps. But $300 is $300.
When I was asked to cover the Unconference in Los Angeles last week, I have to admit that I was a more than a little uncomfortable with the idea. I’m not big on traveling, and the idea of meeting a lot of folks was a little intimidating. Surely meeting Hackaday readers in person would be like walking into a real-life version of the comments section of a particularly controversial post. Right?
I couldn’t have been more wrong.
The LA Unconference, held at the Supplyframe Design Lab in Pasadena, was a far more collegial and engaging conference than any I’ve been to in my professional life. I couldn’t have asked for a better group to share the afternoon and evening with, and the quality of the talks was excellent. The Design Lab turned out to be a great space for the event — a large main room for the talks with plenty of little areas to break away for impromptu discussions and networking.
The four bar linkage is a type of mechanical linkage that is used in many different devices. A few examples are: locking pliers, bicycles, oil well pumps, loaders, internal combustion engines, compressors, and pantographs. In biology we can also find examples of this linkage, as in the human knee joint, where the mechanism allows rotation and keeps the two legs bones attached to each other. It is also present in some fish jaws that evolved to take advantage of the force multiplication that the four bar mechanism can provide.
How It Works
Deployable mirror with scissor linkages. By [Catsquisher] via Wikimedia CommonsThe study of linkages started with Archimedes who applied geometry to the study of the lever, but a full mathematical description had to wait until the late 1800’s, however, due to the complexity of the resulting equations, the study and design of complex linkages was greatly simplified with the advent of the digital computer.
Mechanical linkages in general are a group of bodies connected to each other to manage forces and movement. The bodies, or links, that form the linkage, are connected to each other at points called joints. Perhaps the simplest example is the lever, that consists of a rigid bar that is allowed to pivot about a fulcrum, used to obtain a mechanical advantage: you can raise an object using less force than the weight of the object.
Two levers can be connected to each other to form the four bar linkage. In the figure, the levers are represented by the links a (A-D) and b (B-C). The points A and B are the fulcrum points. A third link f (C-D) connects the levers, and the fourth link is the ground or frame g (A-B) where the mechanism is mounted. In the animation below, the input link a (the crank) performs a rotational motion driving the rocker rod b and resulting in a reciprocating motion of the link b (the rocker).
This slider-crank arrangement is the heart of the internal combustion engine, where the expansion of gases against a sliding piston in the cylinder drives the rotation of the crank. In a compressor the opposite happens, the rotation of the crank pushes the piston to compress the gas in the cylinder. Depending on how the mechanism is arranged, it can perform the following tasks:
convert rotational motion to reciprocating motion, as we just discussed above.
convert reciprocating motion to rotational motion, as in the bicycle.
constrain motion, e.g. knee joint and car suspension.
One interesting application of the four bar linkage is found in locking pliers. The B-C and C-D links are set at an angle close to 180 degrees. When force is applied to the handle, the angle between the links is less than 180 (measured from inside the linkage), and the resulting force in the jaws tries to keep the handle open. When the pliers snap into the locked position that angle becomes less than 180, and the force in the jaws keeps the handle in the locked position.
In a bicycle, the reciprocating motion of the rider´s legs is converted to rotational motion via a four bar mechanism that is formed by the two leg segments, the bicycle frame, and the crank.
An example from nature, the Moray eel. Image from [Matthew West]As with many other inventions of humankind, we often find that nature has already come up with the same idea via evolution. The parrotfish lives on coral reefs, from which it feeds, and has to grind the coral to get to the polyps inside. For that job, they need a very powerful bite. The parrotfish obtains a mechanical advantage to the muscle force by using a four bar linkage in their jaws! Other species also use the same mechanism, one is the Moray eel, shown in the image, which has the very particular ability to launch its jaws up in the mouth to capture its prey, much like the alien from the film series.
The joints connecting the links in the linkage can be of two types. A hinged joint is called a revolute, and a sliding joint is called a prismatic. Depending on the number of revolute and prismatic joints, the four bar linkage can be of three types:
Planar quadrilateral linkage formed by four links and four revolute points. This is shown in the animation above.
Slider-crank linkage, formed by three revolute joints and a prismatic joint.
Double slider formed by two revolute joints and two prismatic joints. The Scotch yoke and the trammel of Archimedes are examples.
There are a great number of variations for the four bar linkage, and as you can guess, the design process to obtain the forces and movements that we need is not an easy task. An excellent resource for the interested reader is KMODDL (Kinematic Models for Design Digital Library) from Cornell University. Other interesting sites are the 507 mechanical movements, where you can find nice animations, and [thang010146]’s YouTube channel.
We hope to have piqued your curiosity in mechanical things. In these times of ultra fast developments in electronics, looking at the working of mechanisms that were developed centuries ago, but are still present and needed in our everyday lives can be a rewarding experience. We plan to work on more articles featuring interesting mechanisms so please let us know your favorites in the comments below.
Join [Jørgen Kragh Jakobsen], Analog/digital Design Engineer at Merus-Audio, for this week’s Hack Chat.
Every week, we find a few interesting people making the things that make the things that make all the things, sit them down in front of a computer, and get them to spill the beans on how modern manufacturing and technology actually happens. This is the Hack Chat, and it’s happening this Friday, March 31, at noon PDT (20:00 UTC).
Jørgen’s company has developed a line of multi level Class D amplifiers that focus on power reduction to save battery life in mobile application without losing audio quality.
There are a lot of tricks to bring down power consumption, some on core technologies on transistor switching, others based on input level where modulation type and frequency is dynamically changed to fit everything from background audio level to party mode.
Here’s How To Take Part:
Our Hack Chats are live community events on the Hackaday.io Hack Chat group messaging.
Log into Hackaday.io, visit that page, and look for the ‘Join this Project’ Button. Once you’re part of the project, the button will change to ‘Team Messaging’, which takes you directly to the Hack Chat.
You don’t have to wait until Friday; join whenever you want and you can see what the community is talking about.
Upcoming Hack Chats
We’ve got a lot on the table when it comes to our Hack Chats. On April 7th, our host will be [Samy Kamkar], hacker extraordinaire, to talk reverse engineering.


 In a bicycle, the reciprocating motion of the rider´s legs is converted to rotational motion via a four bar mechanism that is formed by the two leg segments, the bicycle frame, and the crank.