How I²C EEPROM Talks To The Bus

You will probably be familiar with I²C, a serial bus typically used for not-very-fast communication with microcontroller peripherals. It’s likely though that unless you are an I²C wizard you won’t be intimately familiar with the intricacies of its operation, and each new device will bring a lengthy spell of studying data sheets and head-scratching.

If the previous paragraph describes you, read on. [Clint Stevenson] wrote a library for interfacing I²C EEPROMs to Arduino platforms, and when a user found a bug when using it on an ATtiny85, he wrote up his solution. The resulting piece is a clear explanation of how I²C EEPROMs talk to the bus, the various operations you can perform on them, and the overhead each places on the bus. He then goes on to explain EEPROM timing, and how since it takes the device a while to perform each task, the microcontroller must be sure it has completed before moving to the next one.

In the case of [Clint]’s library, the problem turned out to be a minor incompatibility with the Arduino Wire library over handling I²C start conditions. I²C has a clock and a data line, both of which are high when no tasks are being performed. A start condition indicates to the devices on the bus that something is about to happen, and is indicated by the data line going low while the clock line stays high for a while before the clock line starts up and the data line carries the I²C command. He’s posted samples of code on the page linked above, and you can find his library in his GitHub repository.

If you want to know more about I²C, take a look at Hackaday Editor [Elliot Williams’] masterclasses on the subject: What could go wrong, I²C edition, and Embed With Elliot, I²C bus scanning.

Serial EEPROM die picture, By Epop (Own work) [CC0], via Wikimedia Commons.

I2C Bit Injection Adds Memory Banks To Everything

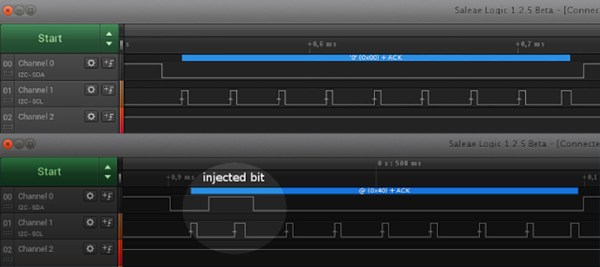
[Igor] wished to upgrade his newly acquired radio — a Baofeng UV-82 — with a larger memory for storing additional scanning channels, and came up with a very elegant solution: Replacing it’s EEPROM with a larger one and injecting the additional memory address bits into the I2C data line.

Continue reading “I2C Bit Injection Adds Memory Banks To Everything”

Mostly Non-Volatile Memory With Supercapacitors

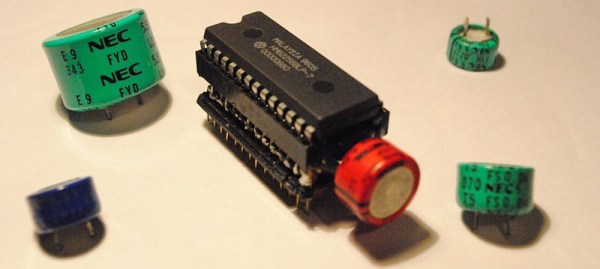
Back in the days of old, computers used EPROMs to store their most vital data – usually character maps and a BASIC interpreter. The nature of these EPROMs meant you could write to them easily enough, but erasing them meant putting them under an ultraviolet light. Times have changed and now we have EEPROMs, which can be erased electronically, and Flash, the latest and greatest technology that would by any other name be called an EEPROM. [Nicholas] wanted an alternative to these 27xx-series EPROMs, and found his answer in supercapacitors.

[Nick]’s creation is a mostly non-volatile memory built around an old 62256 32k SRAM. SRAM is completely unlike EPROMs or Flash, in that it requires power to keep all its bits in memory. Capacitor technology has improved dramatically since the 1980s, and by using a supercap and one of these RAM chips, [Nick] has created a substitute for a 27-series EPROM that keeps all its memory alive for days at a time.

The circuit requires a small bit of electronics tucked between the EPROM socket and the SRAM chip; just enough to turn the 12 Volts coming from the EPROM programming pin to the 5 Volts expected from the SRAM’s Write Enable pin. This is accomplished by a few LEDs in series, and a 0.1F 5.5V supercap which keeps the SRAM alive when the power is off.

As for why anyone would want to do this when modern technologies like Flash can be found, we can think of two reasons. For strange EPROM sizes, old SRAMs abound, but a suitable Flash chip in the right package (and the right voltage) might be very hard to find. Also, EEPROMs have a write lifetime; SRAMs can be written to an infinite number of times. It’s not the best solution in every case, but it is certainly interesting, and could be useful for more than a few vintage computing enthusiasts.

This project makes us think of another where an LED may have been supplying keep-alive power to some volatile memory.

Dumping Old PROMs With New Hardware

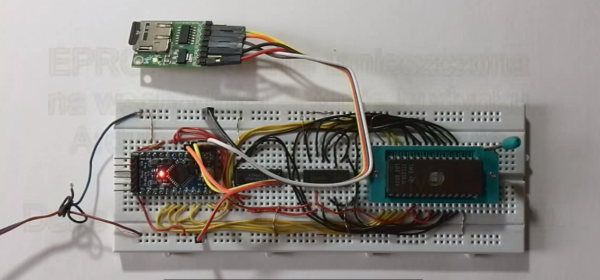
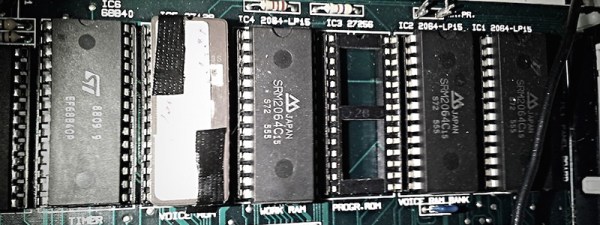
[ijsf] recently came across a very old synthesizer from a defunct West German company. This was one of the first wavetable synths available, and it’s exceptionally rare. Being so rare, there isn’t much documentation on the machine. In an attempt at reverse engineering, [ijsf] decided to dump the EPROMs and take a peek at what made this synth work. There wasn’t an EPROM programmer around to dump the data, but [ijsf] did have a few ARM boards around. It turns out building a 27-series PROM dumper is pretty easy, giving [ijsf] an easy way to dig into the code on this machine.

The old EPROMs in this machine have 5v logic, so [ijsf] needed to find a board that had a ton of IOs and 5v tolerant inputs. He found the LPC2148, which has a nice USB system that can be programmed to dump the contents of a PROM over serial. Interfacing the PROM is as simple as connecting the power and ground, the address lines, data, and the signal lines. After that, it’s just a matter of stepping through every address according to the timing requirements of the PROM. All the data was dumped over a serial interface, and in just a few seconds, [ijsf] had 32768 bytes of ancient data that made this old synth tick.

Temperature Logger

Logging Engine Temperature For RC Models

[Rui] enjoys his remote-controlled helicopter hobby and he was looking for a way to better track the temperature of the helicopter’s engine. According to [Rui], engine temperature can affect the performance of the craft, as well as the longevity and durability of the engine. He ended up building his own temperature logger from scratch.

The data logger runs from a PIC 16F88 microcontroller mounted to a circuit board. The PIC reads temperature data from a LM35 temperature sensor. This device can detect temperatures up to 140 degrees Celsius. The temperature sensor is mounted to the engine using Arctic Alumina Silver paste. The paste acts as a glue, holding the sensor in place. The circuit also contains a Microchip 24LC512 EEPROM separated into four blocks. This allows [Rui] to easily make four separate data recordings. His data logger can record up to 15 minutes of data per memory block at two samples per second.

Three buttons on the circuit allow for control over the memory. One button selects which of the four memory banks are being accessed. A second button changes modes between reading, writing, and erasing. The third button actually starts or stops the reading or writing action. The board contains an RS232 port to read the data onto a computer. The circuit is powered via two AA batteries. Combined, these batteries don’t put out the full 5V required for the circuit. [Rui] included a DC-DC converter in order to boost the voltage up high enough.

Solder Any Expansion Directly To Your Computer’s Memory

Heat up that iron, you’re going to want to try this one: [Hugatry] is adding hardware to his laptop by tapping into the i2c lines on the memory module. We love this because the penalty for borking memory during the soldering process is much lower than when soldering directly to a motherboard!

Until we watched the video after the break we hadn’t realized that memory modules usually have an i2c EEPROM on them. This is actually a standard called Serial Presence Detect which allows the BIOS to poll the memory and configure automatically. It seems ironic that we knew the Raspberry Pi HAT standard uses this same trick but didn’t know it was on computer memory as well.

Hardware-wise this provides an easy method of soldering your own equipment to the bus. From there it becomes a software hack. Linux, of course, makes this quite easy and that is demonstrated by [Hugatry] with an LM75 temperature sensors. We would like to hear from our Windows and OSX using readers on how the i2c bus can be accessed within those OS’s.

Continue reading “Solder Any Expansion Directly To Your Computer’s Memory”

ROM dump

Raiders Of The Lost ROM

Once upon a time, arcades were all the rage. You could head down to your local arcade with a pocket full of quarters and try many different games. These days, video arcades are less popular. As a result, many old arcade games are becoming increasingly difficult to find. They are almost like the artifacts of an ancient age. They are slowly left to rot and are often lost or forgotten with time. Enter, MAME.

MAME (Multiple Arcade Machine Emulator) is a software project, the goal of which is to protect gaming history by preventing these arcade machines from being lost or forgotten. The MAME emulator currently supports over 7000 titles, but there are still more out there that require preservation. The hackers who work on preserving these games are like the digital Indiana Jones of the world. They learn about lost games and seek them out for preservation. In some cases, they must circumvent security measures in order to accurately preserve content. Nothing as scary as giant rolling boulders or poison darts, but security nonetheless.

Many of the arcade cabinets produced by a publisher called NMK used a particular sound processor labeled, “NMK004”. This chip contains both a protected internal code ROM and an unprotected external ROM that controls the sound hardware. The actual music data is stored on a separate unprotected EEPROM and is different for each game. The system reads the music data from the EEPROM and then processes it using the secret data inside the NMK004.

The security in place around the internal ROM has prevented hackers from dumping its contents for all this time. The result is that NMK games using this chip have poorly emulated sound when played using MAME, since no one knows exactly how the original chip processed audio. [trap15] found it ridiculous that after 20 years, no one had attempted to circumvent the security and dump the ROM. He took matters into his own hands.

The full story is a bit long and contains several twists and turns, but its well worth the read. The condensed version is that after a lot of trial and error and after writing many custom tools, [trap15] was able to finally dump the ROM. He was able to accomplish this using a very clever trick, speculated by others but never before attempted on this hardware. [trap15] exploited a vulnerability found in the unprotected external ROM in order to trick the system into playing back the protected internal ROM as though it were the sound data stored on the EEPROM. The system would read through the internal ROM as though it were a song and play it out through the speakers. [trap15] recorded the resulting audio back into his PC as a WAV file. He then had to write a custom tool to decode the WAV file back into usable data.

[trap15] has released all of his tools with documentation so other hackers can use them for their own adventures into hardware hacking. The project was a long time in the making and it’s a great example of reverse engineering and perseverance.

[Thanks Ryan]