Fancy Beer Pong Table Cleans Your Balls

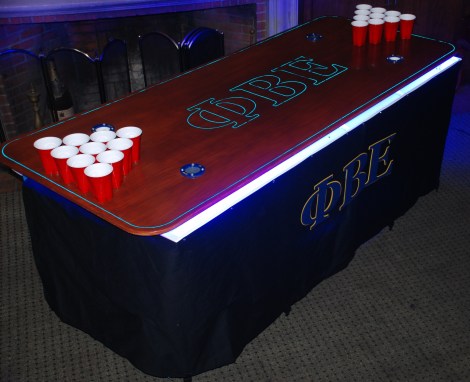
Beer Pong seems to have been around for some time but it only recently exploded in to a universally known game. But one thing has always bothered us. Who wants to drink the beer into which that grimy little ball has fallen? Leave it to the frat boys at MIT to come up with a solution. Their beer pong table automatically cleans your balls.

Of course the table looks great. It’s outfitted with laser cut felt lettering on the apron, and the top features EL wire highlights. But the two features that really set it apart aren’t hard to spot either. First, there are rain gutters along either side to help catch the spillage. Secondly, that blue ring is actually the input nozzle for the ball cleaner. By pushing the ball through the vinyl sleeve it enters a recirculating liquid cleanser, popping out of the portal on the left a second later. That’s about all the details we have on the system, but you can get a closer look at the inner workings in the clip after the break.

The thing to remember is that these guys NEVER run out of ping-pong balls. They’ve got thousands on hand ever since they built this launcher.


Continue reading “Fancy Beer Pong Table Cleans Your Balls”

Back Up The Band With Some RGB Stage Lights

Fresh off the 72-hour madness of the Red Bull Creation contest some of the folks a North Street Labs took on a stage lighting project. It’s for a local performing venue that just opened up, and despite the time crunch the team pulled off another great build.

Sixteen meters of LED strip make the electronics for the project a whole lot easier. The strips run up the center of a cabinets built as stand-alone columns which will end up at the back of the stage. Each cabinet has its own 5V 4A power supply (note the burnout issues they mention when using cheap eBay PSUs). Each column has its own Arduino Uno driving the LEDs, with an RS485 shield to connect back to a main Arduino Mega 2560 controller. It uses a PSX controller to switch between different lighting modes.

The seven towers boasting 688 LEDs isn’t all that’s shedding light on the show. There’s also about 300 feet of EL wire at work.

Continue reading “Back Up The Band With Some RGB Stage Lights”

LayerOne Badge Hacking Twofer

Here’s a pair of LayerOne Badge hacks that actually included the RC as intended by the badge designers.

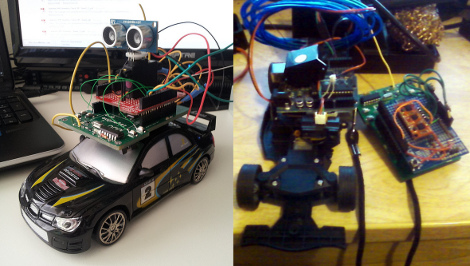
First up, we have the autonomous RC car built by [Arko]. He calls it Stanley Jr. as an homage to the Stanford DARPA Grand Challenge vehicle. It uses an Arduino shield to add a servo with an ultrasonic rangefinder on it. The lets the vehicle drive a bit, stop and scan the horizon, then drive some more. The hope is the rangefinder will keep it from running into anything. There’s a quick test run embedded after the break.

On the right is the badge hack which [Zjpahle] finished up after the contest was already over. He also chose to go with an Arduino shield, this time it’s an IMU board. But he added a standalone Arduino board to the vehicle which drives some EL wire (ground effects) and adds IR sensors to the front of the car. The IR sensors are for obstacle avoidance, and the IMU lets him tilt his badge for direction control.

We looked at the winner of the badge hacking competition on Wednesday. That hack didn’t involve the car, but used the badge as a Morse Code beacon.

Continue reading “LayerOne Badge Hacking Twofer”

Building A Sound Reactive EL Panel And Learning Something In The Process

We’ve seen a lot of builds using electroluminescent wire, usually in the realm of costumes and props. Unfortunately, most electrical engineers don’t deal with blinking and dimming EL wire and panels and any tinkerer trying to control electroluminescence doesn’t have a lot of resources on how to control EL stuff. [ch00f] wanted to fill this knowledge gap, so he build a sound reactive EL panel driver and learned a lot in the process.

Nobody really knows how electroluminescent wire and panels work on a molecular level, but [ch00f] did know that changing the direction of an electric field will cause the EL material to glow. Changing the frequency of this electric field will change the EL material’s brightness, so all [ch00f] had to do was make a variable-frequency EL driver – something that’s a lot harder than it sounds.

We won’t bore you with the details because we  couldn’t do [ch00f]’s write up any justice. We will skip to the end and tell you [ch00f] was able to make a sound reactive EL panel after a month of work that included making his own transformers and doing a whole bunch of math. You can check out the video of [ch00f]’s [Tony Stark]-esque EL panel after the break.

Continue reading “Building A Sound Reactive EL Panel And Learning Something In The Process”

EL Wire Piping On A Party Couch

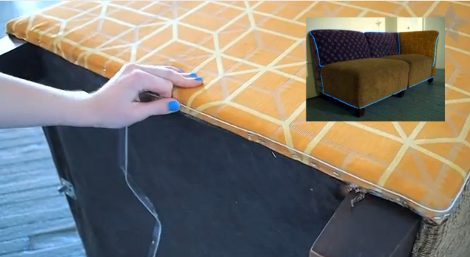
If you’ve been putting off that reupholstering project here’s a little incentive to get started. Adafruit now has some electroluminescent wire which is perfect for use as piping. They’ve outfitted a small sofa with the glowing material and we think it looks great whether switched on or not.

The installation process is really quite easy. The EL wire is covered with clear material that provides a continuous tab running the length of the wire. This can be stapled on like you see in the image above, or sewn into a fabric seam. So you could take an existing sofa cover, remove all the stitching, and sew it back together with the EL wire replacing the original piping. The video after the break shows how simple the process is.

This will be a nice complement to that Daft Punk table we’ve been meaning to build. Continue reading “EL Wire Piping On A Party Couch”

Sound-reactive EL Wire Box Makes Gift Giving Awesome

sound-reactive-el-wire-display

[Jonathan Thomson] was ruminating on EL wire displays and decided that most he has seen are boring, static fixtures or installations that simply flash EL wire on and off at a fixed rate. He thought that EL wire has far more potential than that, and set off to build something more exciting. Using a graphic equalizer T-shirt, with which we’re sure you are familiar, he put together a slick, sound-reactive EL wire display.

He started off by removing the EL panel and inverter from the aforementioned T-shirt, separating the display into two pieces. He set aside the panel and focused on wiring up the inverter’s ribbon cable to a set of EL wire strands he picked up for the project. Once he had everything hooked up, he put a design together on a cardboard box, which he intended to use for wrapping Christmas presents. With the holiday behind him, [Jonathan] broke down his original display and constructed another to offer up some fun birthday wishes.

While the EL inverter was originally built to display sounds detected by an onboard mic, [Jonathan] added a 3.5” stereo jack to his so that he can feed audio directly into the display using an MP3 player.

Continue reading to see the EL display in action, and be sure to check out his writeup if you are looking to spice up your gift giving this year.

Continue reading “Sound-reactive EL Wire Box Makes Gift Giving Awesome”

Sound Reactive Kanye Glasses!

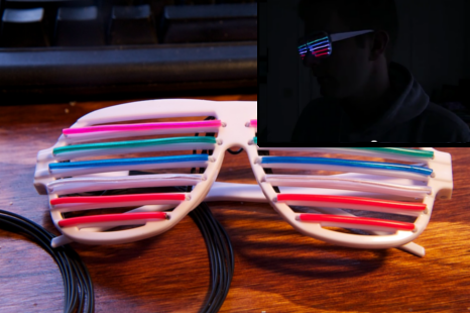
[Ch00f] has decided to ring in the new year with some el wire Kanye glasses. Technically the term for the glasses is either “shutter shades” or “slatted sunglasses”, invented around the 80s by [Alain Mikli] and originally given the nickname “Venetian Sunglasses”. Kanye West evidently got his own retro redesign by the original creator and the rest is history. That is enough Wikipedia for now. [Ch00f] has augmented the original design with six multicolor tracks of EL wire mounted to the shutters of the glasses. The EL wire is fed back through several discrete wires around the wearers ear and to two control boxes. As the video shows, the glasses function as a crude V/U meter based on the audio received by the driver circuit.

Instead of the typical microcontroller [Ch00f] (who has some kind of deep seated issues agaist the Arduino) decided to go full blown analog with the entire design. The audio signal is fed through various Op Amp circuits first amplifying the weak microphone signal then filtering with a low pass filter to focus on the bass frequencies. The filtered bass is then sent to an envelope detector to turn the audio wave into a DC voltage signal. Keeping with the Op Amp design [Ch00f] then uses a resistor ladder and six comparator circuits (with TRIACs on their outputs) to tune the trigger voltage levels of the EL bars. The TRIACs get to deal with the 100 or so volts for the EL strips so that [Ch00f] doesn’t have to party with six EL power supplies in his pocket. For those of you counting at home, that is a total of 13 Op Amps.

The results are fantastic, check the video below to see the glasses in action. Reportedly the circuit does freak out and lock all of the TRIACs in an on state, but a covert flip of the power switch fixes the issue for now. [Ch00f] admits that the project was rather rushed due to the impending new year’s eve party, but now that that is all over with we just need to get [Ch00f] to roll out a stereo version. If you need more [ch00f] we have covered a few of his projects before such as his Icebreaker POV toy hack and a ghetto accelerometer using a reflection sensor.

Thanks for the tips [Daniel] and [Sanchoooo], also via [reddit]. Happy new year!

Continue reading “Sound Reactive Kanye Glasses!”