Friday Hack Chat: Everything About The ESP

When the ESP-8266 first arrived, it was a marvel. For two dollars, you could buy a simple module that could serve as a bridge between WiFi networks and microcontroller projects. It understood the Hayes command set, it didn’t use much power, and, as noted before, it only cost two dollars. The idea of cheap and accessible Internet of Things things was right there for the taking.

Then hackers figured out what was actually going on inside the ESP-8266. It was a full-blown microcontroller. There was Lua stuff you could put on it. You could program it with the Arduino IDE. It had WiFi. This was the greatest microcontroller release in the last decade, and it came from a company no one had ever heard of.

Since then, the ESP ecosystem has bloomed, and there’s a new ESP on the block. The ESP-32 is an even more powerful WiFi and Bluetooth-enabled chip that’s just as easy to program, and it costs three dollars. Microcontrollers have never been cooler.

For this week’s Hack Chat, we’re going to be talking all about the ESP. Our guest for this Hack Chat should need no introduction, but if you’re unfamiliar, [Sprite_tm] plays video games on his keyboard and has installed Linux on a hard drive. He also works at Espressif, the company behind the ESP-8266 and ESP-32, where he’s applied his skills towards tiny Game Boys and miniature Macs.

During this week’s Hack Chat, we’re going to be covering everything about the ESP, including peripherals, ultra-low power consumption, SIP packages, and what’s coming up for the ESP family. You are, as always, welcome to submit your questions for [Sprite]; just add those as a comment on the Hack Chat page.

join-hack-chat

Our Hack Chats are live community events on the Hackaday.io Hack Chat group messaging. [Sprite]’s in China, so we’re not doing this one at the usual time: This week, the Hack Chat will happen at 7:00 am, Pacific, Friday, March 9th. Want to know what time this is happening in your neck of the woods? Have a countdown timer!

Click that speech bubble to the right, and you’ll be taken directly to the Hack Chat group on Hackaday.io.

You don’t have to wait until Friday; join whenever you want and you can see what the community is talking about.

Fridge Alarm Speaks, And Saves Power & Food

One of the most power-hungry devices in our homes, besides the air conditioner or heater, is our refrigerator and freezer. It’s especially so if the door doesn’t close all the way or the magnetic seal doesn’t seat properly. [Javier] took to solving a recurring problem with his personal fridge by attaching an alarm to the door to make sure that it doesn’t consume any more power than it absolutely needs.

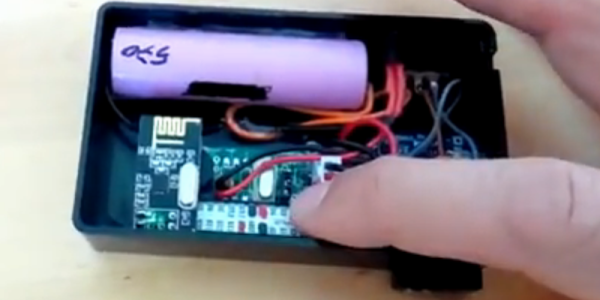
At its core the device is straightforward. A micro switch powers a small microcontroller only when the door is open. If the door is open for too long, the microcontroller swings into action. The device then powers up a small wireless card (which looks like a variant of the very well-documented ESP module), that communicates with his microwave of all things, which in turn alerts him with an audible, spoken alarm that the refrigerator hasn’t closed all the way. It’s all powered with a battery that will eventually need to be recharged.

While there are certainly easier ways to implement an alarm, the use of the spoken alarm is a nice touch for this project, and the power savings that can be realized are not insignificant. There’s also the added benefit that [Javier] can prevent his freezer from frosting over. If you’re in the mood for other great fridge hacks, there are other exciting, novel, and surely one-of-a-kind ways to trick out your refrigerator.

Continue reading “Fridge Alarm Speaks, And Saves Power & Food”

New Part Day: Pluggable ESP Modules

Almost exactly four years ago, we came across a really neat module for sale on SeeedStudios. It was a $5 WiFi chip, able to connect your microcontroller project to the Internet with just a handful of wires and a few AT commands. This was the ESP8266, and it has since spawned an entire ecosystem of connected devices.

Now, there’s a new version of the ESP8266 that simply showed up on the Seeed website. Officially, it’s called the, ‘ESP8285 01M Wi-Fi SoC Module’, but you might as well start calling it ‘the Pluggable ESP module’. It’s the smallest ESP8266 module yet at 18mm square, and this one is designed to be plugged into a card-edge connector. It’s eighteen pins of wonder and 1MB of Flash, all ready to be stuffed into the next Internet of Things Thing.

The documentation for this module is sparse, and there isn’t even a mention of it on the AI Thinker website. That said, we can make some reasonable assumptions about what’s going on in this chip and what it can do. This module appears to be based on the ESP8285 SoC. Basically, it’s an ESP8266 with built-in 1MB SPI Flash. There are a handful of GPIOs available, and you should be able to build anything with this module that you could with other ESP8266 modules.

The highlight here is, of course, the card-edge connector. This is a module designed to be dropped into an existing product. You can program the module before hand, and assembly is a snap. The problem, though, is sourcing the relevant connector. It doesn’t look like Seeed has bothered to put a link to the right connector in the product description, although sourcing it shouldn’t be that much of a problem. The only question is if the card edge connectors on this module are hard gold (for multiple mating cycles) or just ENIG. Either way, if you’re plugging these modules into connectors dozens of times, you’re probably doing something wrong.

A Simple, Easy To Use ESP32 Dev Board

The ESP32 is Espressif’s follow-up to their extraordinarily popular ESP8266 WiFi chip. It has a dual-core, 32-bit processor, WiFi, Bluetooth, ADCs, DACs, CAN, a Hall effect sensor, an Ethernet MAC, and a whole bunch of other goodies that make this chip the brains for the Internet of Everything. Everyone has been able to simply buy an ESP32 for a few months now, but the Hackaday tip line isn’t exactly overflowing with projects and products built around this wonderchip. Perhaps we need an ESP32 dev board or something.

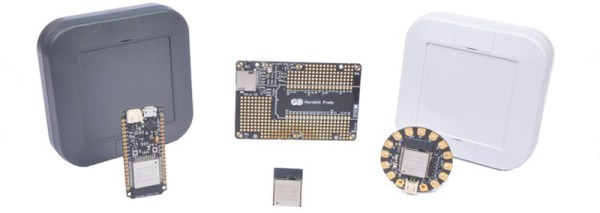
The Hornbill is the latest crowdfunding campaign from CrowdSupply. It’s an ESP32 dev board, packed with the latest goodies, a single cell LiPo charger, and a USB to serial chip that will probably work with most operating systems. The Hornbill comes in two varieties, a breadboardable module, with a breakout board that includes an SD card slot, sensors, an RGB LED, and a bunch of prototyping space. The second version is something like an Adafruit Flora with big pads for alligator clips.

While this isn’t the first ESP32 breakout we’ve seen — Adafruit, Sparkfun, and a hundred factories in China are pumping boards with this chip out — it is a very easy and inexpensive way to get into the ESP32 ecosystem.

Increase The Range Of An ESP8266 With Duct Tape

For the longest time now, I’ve wanted to build a real, proper radio telescope. To me, this means a large parabolic reflector, a feed horn made of brass sheet, coat hanger wire, and at least for the initial experiments, an RTL-SDR dongle. I’ve done the calculations, looked at old C-band antennas on Craigslist, and even designed a mount or two that would make pointing the dish possible. I’ve done enough planning to know the results wouldn’t be great. After months of work, the best I could ever hope for is a very low-resolution image of the galactic plane. If I get lucky, there might be a bright spot corresponding to Sagittarius A.

There are better ways to build a radio telescope in your back yard, but the thought of having a gigantic parabolic dish out back, peering into the heavens, has stuck with me. I’ve even designed a dish that can be taken apart easily and transported because building your own dish is far cooler than buying a West Virginia state flower from a guy on Craigslist.

Recently, I was asked to come up with a futuristic, space-ey prop for an upcoming video. My custom-built, easily transportable parabolic antenna immediately sprang to mind. The idea of a three-meter diameter parabolic dish was rejected for something a little more practical and a little less expensive, but I did go so far as to do a few more calculations, open up a CAD program, and start work on the actual design. As a test, I decided to 3D print a small model of this dish. In creating this model, I inadvertently created the perfect WiFi antenna for an ESP8266 module using nothing but 3D printed parts, a bit of epoxy, and duct tape.

Continue reading “Increase The Range Of An ESP8266 With Duct Tape”

Build Your Own YouTube Play Button

The only thing that matters in this world is the likes you get on social media platforms. To that end, YouTube has been sending out silver and gold play buttons to their most valuable creators. [Sean] hasn’t screamed into a microphone while playing Minecraft long enough to earn one of these play buttons, so he decided to build his own.

This play button isn’t just a bit of pot metal ensconced in a frame brought to you by Audible dot com; this YouTube play button actually does something useful. It’s a PCB with 144 LEDs working together as a display. There’s an Atmel SAMD21 microcontroller on board to drive the LEDs, and an ESP8266 to pull data down from the Internet. What data is worthy enough to go on an Arduinofied YouTube play button? The subscriber count for [Sean]’s channel, of course. Go subscribe, it might crash his Play button.

Admittedly, there were a few problems with this Play button PCB. Firstly, the ESP8266 can’t directly communicate with the YouTube API to pull down the subscriber count. That problem was fixed with a Raspberry Pi that could connect to the API, and programming the ESP to pull the data from the Pi. Second, this was [Sean]’s first experiment with double-sided SMD boards reflowed in a toaster oven. The first side to be assembled was easy, but to get the second side on, [Sean] turned to low-temp bismuth solder paste. Except for a small error in assembling the board, everything worked as planned.

It’s a great project, and if you want to check out what the better parts of YouTube look like, check out [Sean]’s video below. Don’t forget to rate, comment, like, unlike, or subscribe.

Continue reading “Build Your Own YouTube Play Button”

WarWalking With The ESP8266

[Steve] needed a tool to diagnose and fix his friend’s and family’s WiFi. A laptop would do, but WiFi modules and tiny OLED displays are cheap now. His solution was to build a War Walker, a tiny handheld device that would listen in WiFi access points, return the signal strength, and monitor the 2.4GHz environment around him.

The War Walker didn’t appear out of a vacuum. It’s based on the WarCollar Dope Scope, a tiny, portable device consisting of an off-the-shelf Chinese OLED display, an ESP8266 module, and a PCB that can charge batteries, provide a serial port, and ties the whole thing together with jellybean glue. The Dope Scope is a capable device, but it’s marketed towards the 1337 utilikilt-wearing, The Prodigy-blasting pentesters of the world. It is, therefore, a ripoff. [Steve] can build his version for $6 in materials.

The core of the build is an ESP-based carrier board built for NodeMCU. This board is available for $3.77 in quantity one, with free shipping. A $2 SPI OLED display is the user interface, and the rest of the circuit is just some perfboard and a few wires.

The software is based on platformio, and dumps all the WiFi info you could want over the serial port or displays it right on the OLED. It’s a brilliantly simple device for War Walking, and the addition of a small LiPo makes this a much better value than the same circuit with a larger pricetag.