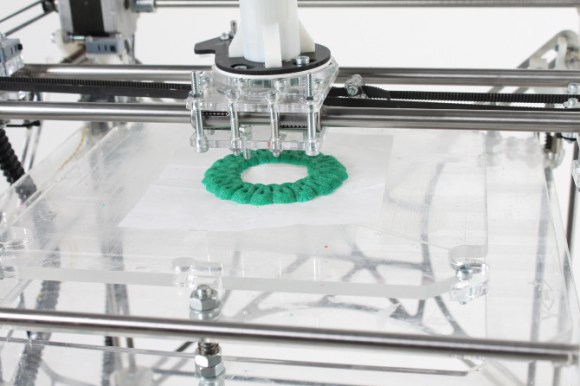
Finally, Turning Plastic Pellets Into 3D Printer Filament

Here’s the situation: a kilogram of 3D printer filament costs about $50. A kilogram of plastic pellets costs less than a tenth of that. Does anyone have a solution to this problem?

For years now, the general consensus was making your own 3D printer filament at home was nigh impossible, dealing with temperatures, pressures, and tolerances that home-built machines simply can’t handle. [Bradley] sent in a filament extruder he made because he was disturbed at this current mindset that desktop filament factories have huge technical issues that have yet to be overcome.

[Bradley]’s extruder is based on the Lyman Filament Extruder, a machine that has successfully demonstrated taking plastic pellets, forming them into a filament, and having this filament used in the production of 3D printed parts. [Bradley]’s improvements include a variable-speed motor, a larger hot end, and an automatic timing system to produce set quantities of printer filament.

Of course, since Inventables threw $40,000 at the problem of creating filament at home there were bound to be more than a few successful designs making their way out into the public. When we last covered the developments of home filament manufacturing, the Filabot seemed to be in the lead. Now with [Bradley] (and  [Lyman])’s machines turning out usable filament, it’s only a matter of time before the 40 grand prize is snatched.

Making Plastic Filament At Home

There’s one problem with the popularity of plastic-extruding 3D printers such as the RepRap and Makerbot; since they’ve become so popular, the price of plastic filament has skyrocketed over the past few years. Without a way to produce filament at a hackerspace or home lab, the price of 3D printed objects will remain fairly high. Project Spaghetti hopes to rectify that by building a machine to make plastic filament for 3D printers.

The folks behind Project Spaghetti – a loose amalgamation of makers going under the title of Open Source Printing, LLC – have successfully built a machine that is able to produce short lengths of plastic filament.

Early machines used a plunger to press small pellets of ABS plastic through a heated steel pipe to produce filament. There are a few problems with this approach, especially when the temperature is set to 480F, but the team was able to make a bit of filament with this design.

Although the team is using a piston to force melted plastic out of a nozzle, they do have a screw-drive ‘plan B’ in the works. This design should allow for continuous extrusion for theoretically endless reels of plastic filament, every RepRappers dream and a neat way to win 40 grand. Continue reading “Making Plastic Filament At Home”

Salvaged Robot Arm Makes A Big 3d Printer

Wow, building a precision 3d printer is amazingly easy if you can get your hands on an industrial-quality robot arm. [Dane] wrote in to tell us about this huge extruder printer made from an ’80s-era SCARA robot arm. It is capable of printing objects as large as 25″x12″x6.5″.

This 190 pound beast was acquired during a lab clean out. It was mechanically intact, but missing all of the control hardware. Building controllers was a bit of a challenge since the it’s designed with servo motors and precision feedback sensors. This is different from modern 3d printers which use stepper motors and no feedback sensors. A working controller was built up one component at a time, with a heated bed added to the mix to help prevent warping with large builds. We love the Frankenstein look of the controller hardware, which was mounted hodge-podge as each new module was brought online.

You can see some printing action in the clip after the break. A Linux box takes a design and spits out control instructions to the hardware.

Continue reading “Salvaged Robot Arm Makes A Big 3d Printer”

Win $40,000 For Squirting Plastic Out Of A Nozzle

3D printers such as the RepRap and Makerbot turn spools of plastic filament into just about any object imaginable. There’s a problem though: this filament costs about $40 a kilogram, and raw plastic pellets cost about 1/10th of that. Obviously, there’s a lot of room for improvement. The folks at Inventables are throwing $40,000 at the problem in a contest to build a machine that takes plastic pellets and turns it into usable plastic filament.

The object is simple: build a device that takes ABS or PLA pellets and turns them into a 1.75mm filament. The machine has to cost less than $250, be able to add colorant to the plastic, and be usable in a 3D printer. The winner gets $40,000, a laser cutter, a 3D printer, and a CNC milling machine courtesy of Inventables. Sign up on the official contest website and don’t be shy about sending your progress into the Hackaday tip line

If you’d like to get started, here’s a great page that goes over the basics of plastic extrusion, and a few attempts (1, 2) from [Adrian Bowyer] and [Forrest Higgs] that show exactly how hard this is. There’s also the Filabot that had a successful Kickstarter, but there’s apparently been no (or very limited) progress in the four months since the Kickstarter. I’ve even given this idea a go, but am currently stuck at manufacturing a proper auger. To put this in perspective, this is the moonshot of the current crop of 3D printers; a simple device to lower the barrier of entry to 3D printing is desperately needed, and we’ve got to give props to the Inventables crew for putting this contest together.

Chocolate Extrusion Printer Is Halfway To Making S’mores

Chocolate has got to be one of the worst choices as a printing medium. It’s extremely fussy when it comes to melting point, and even in the right state the flow of the material is not going to play nicely with high-resolution designs. With this in mind, we applaud the progress the student team from Carnegie Mellon University has made with WonkaBot,  their chocolate extrusion printer.

Unlike the syringe-based paste extruder from last month, this offering uses an auger to push chocolate through a heated printer head. They’re using it to print designs on graham crackers. We love the UI they came up with for the task. It uses a virtual graham cracker as a canvas on your laptop and allows you to use the touchpad or mouse to draw your design. That input is then converted to g-code and sent to the CNC machine for printing. See it in action after the break.

Continue reading “Chocolate Extrusion Printer Is Halfway To Making S’mores”

Print In Chocolate, Sugar, And Clay With A Universal Paste Extruder

With a glut of Easter candy acquired over the last week, you might be thinking what to do with mountains of chocolate and other sugary delights. How about sending them through a 3D printer with [RichRap]’s universal paste extruder?

[RichRap]’s extruder uses a common 10cc syringes slowly squeezed by an off-the-shelf stepper motor. Chocolate wasn’t the only goal for this build;  [RichRap] also tested out cake icing, corn chip dough, muffin and sponge cake batter with his new toy. The most interesting paste in our humble opinion is porcelain ceramic clay. [RichRap] was able to make some very nice 3D printed greenware, but we’ll withhold our judgement until the ceramic parts are fired later this week.

After the break you can check out the introduction video for the Universal Paste Extruder, as well as a quick glimpse of [RichRap]’s very cool porcelain clay prints. We’re very interested in the ceramics printed with this extruder, if only for printing reprap parts that will be exposed to plastic-melting temperatures.  Of course, all the files to build your own paste extruder are up on Thingiverse.

Tip ‘o the hat to [Josef Prusa] for sending this one in.

Continue reading “Print In Chocolate, Sugar, And Clay With A Universal Paste Extruder”

New Extruder 3D Prints Tasty Treats Using Chocolate

If you’ve never felt at home with a piping bag in your hands this chocolate extruder will come to your rescue. It can replace the plastic extruder head on your 3D printer (RepRap, Makerbot, most 3-axis CNC machines, etc.), letting you turn your digital creations into decadent reality.

The head uses a progressive cavity pump to feed the chocolate from a reservoir through the printing nozzle. It’s important to keep the chocolate warm or it will set up so when [Tomi Salo] designed the print head he included a heat shroud through which warm air can be circulated. He uses a shoe dryer to source the hot hair which is patched into the heat shroud with a length of tubing.

This extruder can be 3D printed but be careful what material you use. [Tomi] mentions that PLA is ‘sort of food-safe’ but ABS is not. We wonder if the design could be altered for milling out of aluminum or stainless? At any rate, if you’re going to give it a try you might find [Tomi’s] advice on working with chocolate useful.

[via @clothbot]