[fbustamante] got his hands on an old GP2X Wiz, one of those ARM-based portable media player/emulator things from a few years ago. This is a complete computer, and like the Pandora, it’ll do everything one of those Raspberry Pi laptops can do. The Wiz doesn’t have a keyboard, so [fbustamante] created his own. He etched his own PC, repurposed a keyboard controller from a USB keyboard, and stole the keycaps from an old Sharp digital organizer.
To the surprise of many, [Photonicinduction] is not dead. The drunk brit with a penchant for high voltage electrics and a very, very confused power company is back making videos again. His latest video is a puzzle. It’s a plastic block with a light bulb socket, a UK power outlet, and a switch. Plug in a light bulb, flip the switch, and it turns on. Plug a blender into the outlet, and that turns on too. No wires, so how is he doing it?
Introduced at CES last January, Monoprice – yes, the same place you get HDMI and Ethernet cables from – has released their $200 3D printer. This one is on our radar and there will be a review, but right away the specs are fantastic for a $200 printer. The build area is 120mm³, it has a heated bed, and appears to be not completely locked down like the DaVinci printers were a few years ago.
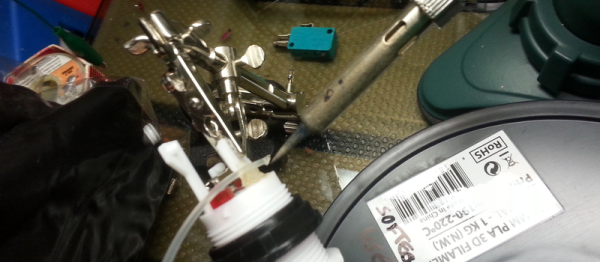
[Tim Trzepacz] is working on a pretty cool MIDI controller project over on Hackaday.io. It involves, naturally, a bunch of knobs and buttons. And it’s one of these nice arcade-style buttons that broke when he slammed on his car brakes and it went flying.
He tried gluing the plastic bits back together, but we all know how that works — temporarily. Next, he thought that maybe he could 3D-print a model of the arcade button’s housing. Besides being a lot of work, [Tim] didn’t have a reliable printer on hand. But he did have filament and a soldering iron.
The rest of the story is a slightly ugly mess, but it looks like it’ll work. (And it’s on the inside of the case, after all.) A working part is a good part.
The irony here is that the original choice of 3 mm ABS filament as a printing material is that it’s cheap and available because it’s commonly used in plastic welding. And there are more elegant ways to melt the plastic than with a soldering iron. And more ways to get it melted than direct heating, like ultrasonic welding and friction welding, for instance.
But we still like to see the occasional quickly hacked together effort, at least one per day. What’s your craziest plastic welding success or failure?
The Hackaday Overlords (or Hackaday family) are running a series of AMAs on SupplyFX. What is SupplyFX? It’s a social network for EEs. Who’s in the first AMA? [Brady Forrest], the guy who runs Highway1, a Bay Area hardware accelerator. They’re the accelerator responsible for the lustworthy Keyboardio, and the startup that is purely mechanical and has shipped zero lines of code, CoolChip. If you want to talk about hardware startups, [Brady] is your man. The AMA is tomorrow, May 16th, at 13:00 Pacific.
Makerbot is dead, or at least they will be soon. Whatever. Nothing of value was lost. Lulzbot, on the other hand, is going gangbusters. They saw eight hundred percent growth over the last two years. and $15M in revenue in 2015. They did this all with open source hardware and software, and using 3D printing in a manufacturing context. They’re the jewel of the Open Hardware movement, and a shining example of what Free Software can do.
The current generation of software defined radios started with the ubiquitous TV tuner dongles, and quickly graduated to the HackRF. You can only get so much bandwidth out of a USB 2.0 socket, and the newest and bestest SDR is the LimeSDR. They’re about halfway through their crowdfunding campaign (and halfway funded), and have finally changed out the USB A connector to a USB micro B connector. Good choice.
The ESP8266 is quickly becoming the go-to device for when you want a cheap way to put a sensor on the Internet. The only problem is programming it. No problem – here’s a bunch of Lua scripts that do 90% of everything. Need to read a PIR sensor? Light up a few LEDs? Put the data from a temperature and humidity on the Internet? There you have it.
The Vintage Computer Festival West is back on this year. We’ve gone to VCF East in New Jersey for a few years now, and had a few occasional outings to the southeast and midwest Vintage Computer Festivals over the years. This is the first time the west coast has had a Vintage Computer Festival in several years. It’s in Mountain View, on August 6th and 7th. Yes, that’s the same weekend as DEF CON.
E3D, makers of fine hot ends and 3D printer paraphernalia, have released a new kind of filament. It’s called Edge, it’s based on PET, and it prints as easily as PLA, with better mechanical properties than ABS. A few sample prints made from Edge were at this year’s Midwest RepRap Festival, and the Edge’s bridging ability is crazy. You need a heated bed for Edge and it’s sensitive to moisture, but it has some very interesting properties that can be cleverly exploited.
In other filament news, Colorfabb released a filament to print clear parts. Yes, that’s very weird. Clear parts require 100% infill, meaning it will use a lot of filament. It’s still very advanced wizardry, and I’m very interested in seeing the first print of a sanded and polished convex lens.
Holy Crap it’s the 3D printing edition of the links post.[Prusa] just released the latest version of the i3. It’s now bigger: 250x210x200mm build volume. The heated bed – [Prusa] was one of the first to experiment with PCB heated beds – is now vastly improved when looking at it through a FLIR. The Mk. 42 heated bed doesn’t have a hot center or cool corners. PEI sheet removes the need for blue painters tape, glass, aqua net, or glue sticks. The printer has self-test capabilities. The mechanics of the printer, especially the Z axis, are improved. [Prusa] will be selling this as a kit for ~19000 Czech Crowns or $699 USD, but he’s RepRap to the core. Buy a spool and start printing your next printer.
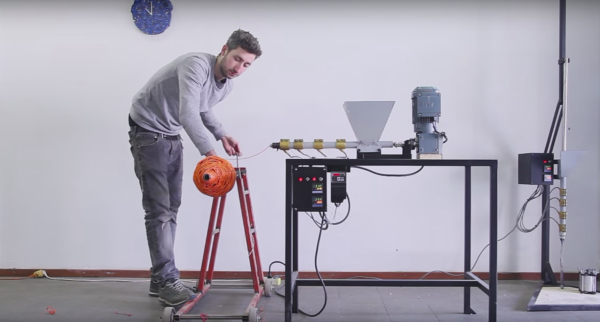
Walk on almost any beach or look on the side of most roads and you’ll see the bottles, bags, and cast-off scraps of a polymeric alphabet soup – HDPE, PET, ABS, PP, PS. Municipal recycling programs might help, but what would really solve the problem would be decentralized recycling, and these open-source plastics recycling machines might just jump-start that effort.
We looked at [Precious Plastic] two years back, and their open-source plans for small-scale plastic recycling machines have come a long way since then. They currently include a shredder, a compression molder, an injection molder, and a filament extruder. The plans specify some parts that need to be custom fabricated, like the shredder’s laser-cut stainless steel teeth, but most can be harvested from a scrapyard. As you can see from the videos after the break, metal and electrical fabrication skills are assumed, but the builds are well within the reach of most hackers. Plans for more machines are in the works, and there’s plenty of room to expand and improve upon the designs.
We think [Precious Plastic] is onto something here. Maybe a lot of small recyclers is a better approach than huge municipal efforts, which don’t seem to be doing much to help. Decentralized recycling can create markets that large-scale manufacturing can’t be bothered to tap, especially in the developing world. After all, we’ve already seen a plastic recycling factory built from recycled parts making cool stuff in Brazil.
Think laying down molten plastic on a 3D printer is as easy as squeezing plastic filament out of a hot tube? It’s not, and anyone who had a 3D printer in 2009 would tell you as such. There were hobbed bolts that stripped the plastic into a gooey paste, extremely large x carriages that made everything wobbly, and nothing worked as well as it does today.
Technology marches on, and this year’s Midwest RepRap Festival had people showing off the latest advances in pushing plastic, and something that hasn’t seen much use yet – dissolvable filament.
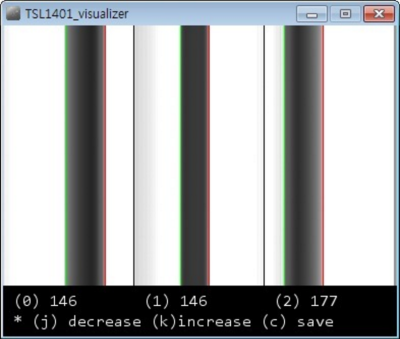
I keep up with the trends in 3D printing reasonably well. The other day my friend mentioned that filament thickness sensing had been added to the latest version of the Marlin firmware. I had no idea what it was, but it certainly sounded cool. I had to find out more.
In industrial settings, filament is made by pulling extruding molten plastic at a certain speed into a cooling bath. The nozzle for 2.85mm filament and 1.75 mm filament is actually the same size, but the filament is stretched more or less as it leaves the nozzle. By balancing these three variables the extrusion machine can produce any size filament desired. Like any mechanical system, it needs constant adjustment to maintain that balance. This is usually done by measuring the filament with a laser after it has cooled, and then feeding this information back into the system. The better filament manufacturers have multiple lasers and very fast feedback loops. Some of the best offer +-0.04mm or less variation in thickness between any two points on the filament. Some of the worst have larger errors such as +-.10mm. Because the plastic is fed into the extruder at a fixed linear speed, this makes a variation in the volume of the plastic coming out of the nozzle per second. With the best we see a 4.41% variation in the volume of plastic extruded. With the worst we start to see 10.51% or more.
Filament variation showing up as a cosmetic defect.
A printer is dumb. It works under the assumption that it is getting absolutely perfect filament. So when it gets 10.51% more plastic, it simply pushes it out and continues with its life. However, if the filament is off enough, this can actually show up as a visible defect on the print. Or in worse cases, cause the print to fail by over or under extrusion of plastic.
So, what does a filament thickness sensor do to correct this issue? To start to understand, we need to look at how the filament is dealt with by the software. When the slicer is compiling the G-code for a 3D print, it calculates the volume of plastic it needs in order to deposit a bead of plastic of a certain width and of a certain height per mm of movement. That was a mouthful. For example, when a printer printing 0.2mm layers moves 1mm it wants to put down a volume that’s 1.0mm long x 0.4mm wide x 0.2mm high. The filament being pushed into the nozzle has a volume per mm determined by the diameter of the filament.
The volume out per mm of filament in.
The equation we are trying to balance.
Our goal is to integrate the thickness sensor into these functions to see what the thickness sensor is doing. This is a linear equation, so there’s nothing fancy here. Now, the layer height, layer width, and length of the move are determined by settings and model geometry respectively. These are fixed numbers so we don’t care about them. That leaves us the diameter of the filament and the length of filament extruded. As we mentioned before, typically the filament is assumed to be a fixed diameter. So all the software has to calculate is the length of filament that needs to be extruded per mm of combined movement in the x and y so that our volumes match.
But, we know that one of these variables is actually changing per millimeter as well. The filament diameter! So now we have a problem. If the filament diameter is changing all the time, our equation will never balance! In order to fix this we can add a multiplier to our equation. Since we have no control over the width of the filament we can’t modify that value. However, if we know the width of the filament, and we know the value its supposed to be, we can change the length of the filament extruded. This is because unlike the filament, we have control over the stepper motor that drives the extruder. This value is called the extrusion multiplier, and its determination is what the thickness sensor is all about.
So all the filament sensor does is measure the filament’s current diameter. It takes expected diameter and divides it by the value it just measured to get a simple percentage. It feeds that number back into our system as the extruder multiplier and slows or speeds up the stepper motor as needed. Pretty simple.
The ideal filament the printer thinks it is seeing.
The printer is unable to compensate for the variations.
By adjusting with the extrusion multiplier the printer is able to approximate perfect filament.
Shadows on the sensor from [inornate]’s variation.There are a few thickness sensors being toyed with right now. The first, as far as I can tell; let me know if I am wrong in the comments, was by [flipper] on thingiverse. He is in his third version now. The sensor works by casting a shadow of the filament as it passes by onto an optical sensor. The firmware then counts the pixels and works backwards to get the diameter. This value is sent to the Marlin firmware on the printer which does the rest. As is usual and wonderful in the open source community, it wasn’t long before others started working on the problem too. [inoranate] improved on the idea by casting more shadows on the sensor. The technique is still brand new, but it will be interesting to see what benefits it reaps.
Now comes the next question,”Is it worth upgrading my printer with a thickness sensor?” If you typically run poor filament, or if you extrude your own, yes. The current sensors can only measure +- .02mm. So for the best filament, you won’t really see a difference, but for worse stuff, you might. The latest firmware of the Lyman filament extruder, for making your own filament, also supports these sensors, letting you feed back into your production system like the industrial machines. All in all a very interesting development in the world of 3D printers.
My printer has other issues that I’m still tuning out, but the warping in PLA and excessive surface roughness has all the signs of over extrusion.
I have an old Prusa i2 that, like an old car, has been getting some major part replacements lately after many many hours of service. Recently both the extruder and the extruder motor died. The extruder died of brass fill filament sintering to the inside of the nozzle (always flush your extruder of exotic filaments). The motor died at the wires of constant flexing. Regardless, I replaced the motors and found myself with an issue; the new motor and hotend (junk motor from the junk bin, and an E3D v6, which is fantastic) worked way better and was pushing out too much filament.
The hotend, driver gear, extruder mechanics, back pressure, motor, and plastic type all work together to set how much plastic you can push through the nozzle at once. Even the speed at which the plastic is going through the nozzle can change how much friction that plastic experiences. Most of these effects are somewhat negligible. The printer does, however, have a sort of baseline steps per mm of plastic you can set.
The goal is to have a steps per mm that is exactly matched to how much plastic the printer pushes out. If you say 10mm, 10mm of filament should be eaten by the extruder. This setting is the “steps per mm” in the firmware configuration. This number should be close to perfect. Once it is, you can tune it by setting the “extrusion multiplier” setting in most slicers when you switch materials, or have environmental differences to compensate for.
This little guy lets you tune the steps per mm exactly.
The problem comes in measuring the filament that is extruded. Filament comes off a spool and is pulled through an imprecisely held nozzle in an imprecisely made extruder assembly. On top of all that, the filament twists and curves. This makes it difficult to hold against a ruler or caliper and get a trustworthy measurement.
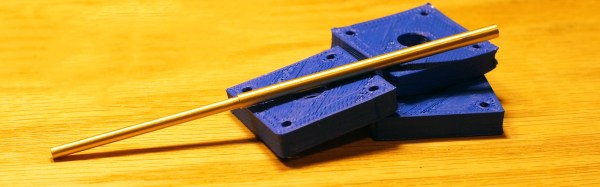
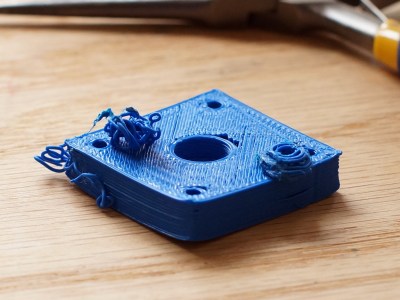
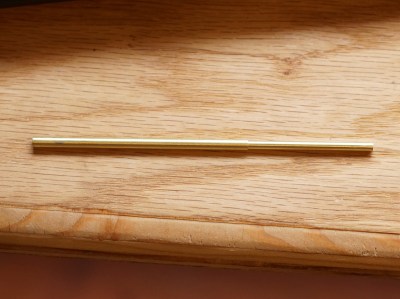
I have come up with a little measuring device you can make with some brass tubing, sandpaper, a saw (or pipe cutter), a pencil torch, solder, and some calipers. To start with, find two pieces of tubing. The first’s ID must fit closely with the filament size you use. The second tube must allow the inside tubing to slide inside of it closely. A close fit is essential.