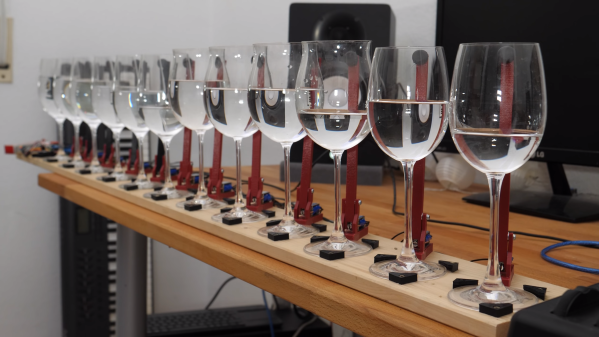
Pong In Real Life, Mechanical Pong

[Daniel Perdomo] and two of his friends have been working on a mechanical version of Pong for the past two years. We can safely say that the final result is beautiful. It’s quite ethereal to watch the pixe–cube move back and forth on the surface.

[Daniel] has worked in computer graphics for advertising for more than 20 years. However, he notes that neither he nor his friends had any experience in mechanics or electronics when they began. Thankfully, the internet (and, presumably, sites like Hackaday) provided them with the information needed.

The pong paddles and and pixel (ball?) sit onto of a glass surface. The moving parts are constrained to the mechanics with magnets. Underneath is a construction not unlike an Etch A Sketch for moving the ball while the paddles are just on a rail with a belt. The whole assembly is made from V-groove extrusion.

Our favorite part of the build is the scroll wheel for moving the paddle back and forth. For a nice smooth movement with some mass behind it, what’s better than a hard-drive platter? They printed out an encoder wheel pattern and glued it to the surface. The electronics are all hand-made. The brains appear to be some of the larger Arduinos. The 8-bit segments, rainbow LEDs, etc were build using strips glued in place with what looks like copper foil tape connecting buses. This is definitely a labor of love.

It really must be seen to be understood. The movement is smooth, and our brains almost want to remove a dimension when watching it. As for the next steps? They are hoping to spin it up into an arcade machine business, and are looking for people with money and experience to help them take it from a one-off prototype to a product. Video after the break.

Continue reading “Pong In Real Life, Mechanical Pong”

Hackaday Links: April 10, 2016

Spot the mirrored mac
Spot the mirrored Mac

Here is the best Mac mod we’ve ever seen. [Doogie] decided to take an Apple G5 Quad to the max. This means maintaining the liquid cooling setup, adding the max amount of RAM (16 GB), adding a Sonnet Tempo 6.0Gb PCI-e card and two Samsung 840 Pro SSDs, and an Nvidia Geforce 6600GT. The best part about this Mac? Instead of the classic anodized aluminum, [Doogie] polished the case to a mirror finish. Here’s a video of the entire build. The computer is currently serving up his webpage, and if you want to see how the server load test is going, you can check out the stats page here.

Hackaday links posts are where we put interesting kickstarters and crowdfunding projects, and this one is near the top. It’s a crowdfunding campaign for a glassblowing workshop in England. If this project is funded, people can come repair their scientific glassware, make new tubes, or take a glassblowing workshop. It’s not quite a crowdfunding campaign for a business (perhaps it should be?), but maybe someone out there has a glass lathe they can donate.

A few months ago, Microchip acquired Atmel for $3.56 Billion. There’s a lot of overlap in both company’s portfolios, leading many to wonder which products would be EOL’ed and removed from the market. This week, Microchip released a statement on the acquisition (PDF), and spelled out what to expect from the product line. It’s good news:

We know that stability and growth in manufacturing is an important consideration from a supply base, and it has been one of the key elements that Microchip has executed well throughout its 25+ year life. We will honor that concept in this integration activity as well. We also recognize that product End-of-Life may be one of your concerns in any acquisition, including this one. Microchip has a practice and track record of not putting products on End-of-Life, and it is our intent to continue to offer the complete portfolio of products from both companies.

On April 5th, Makerbot announced it has sold more than 100,000 3D printers worldwide. Sounds like quite an accomplishment, right? Wrong. From December 31, 2014 to April 5, 2016 – fifteen months – Makerbot has sold only 20,094 printers. Sales figures are hard to come by (I’m working on this), but Lulzbot is outselling Makerbot given one of their latest press releases and basic math. There will be more on this after Stratasys releases their 2015 yearly report (on May 9), but I’m calling this the beginning of the end for Makerbot.

Here’s a Kickstarter for a laser cutter. The first reward that will get you a laser cutter is €1.300, “a special 50% early bird Kickstarter discount off the estimated retail price.” That means this is a $3000 laser cutter. What does that get you? A five watt ‘shortwave’ laser, 20×16″ working area, and a software interface that actually looks rather good.

Homemade Bulletproof Glass, Built And Tested

Hackers tend to stash away lots of stuff that seems useless, right up until it saves the day. This includes not just junk in our parts bin but brains full of tips and tricks for the shop. With that in mind, you might want to file away a few of the tips in [AvE]’s video of how he made bulletproof glass for a rainy day.

By his own admission, [AvE]’s video is a little disjointed, and the topic of the bulletproof glass is only covered at the beginning and again briefly at the end. Most of the video concerns the machining of a stout stand for the glass for testing on the range. There’s plenty to learn from the machining, though, and [AvE] is always good for a laugh, so the video is worth a watch. The bulletproof glass itself is part of a long-term project that [AvE] is releasing first to his Patreon patrons – a ridiculously over-built flashlight dubbed “The Midnight Sun”. His first two tries at laminating the Lexan discs were less that optimal, as both brands of cyanoacrylate glue clouded the polycarbonate. Stay tuned to the end of the video for the secret of welding Lexan together into an optically clear sandwich.

As for testing under fire, [AvE] sent the rig off to buddy [TAOFLEDERMAUS] for the hot lead treatment. The video after the break shows that the glass is indeed bulletproof, as long as the bullet in question is a .22LR. Not so much for the 9mm, though – that was a clear punch-through. Still, pretty impressive performance for homebrew.

If you want something that can stop an arrow, there’s a lot of materials science to be learned from the ancient Greeks.

Continue reading “Homemade Bulletproof Glass, Built And Tested”

MIT’s Glass 3D Printer

How hot does your 3D printer’s hot end get? Most low cost printers heat up to 240°C (464°F) at the most because they contain PEEK which starts to get soft if you go much higher. Even a metal hot end with active cooling usually won’t go much higher than 400°C (752°F). Pretty hot, right? [MIT’s] new G3DP printer goes to 1900°F (over 1000°C) and prints optically clear glass.

By changing design and print parameters, G3DP can limit or control light transmission, reflection and refraction. The printer uses a dual heated chamber. The upper chamber acts as a 1900°F kiln while the lower chamber serves to anneal the structures. The print head is an alumina-zircon-silica nozzle.

Continue reading “MIT’s Glass 3D Printer”

Making T-Glase Crystal Clear

There are 3D printing filaments out there with a lot of interesting properties. Whether it’s the sanded-down MDF feel you get from Laywood, the stretchy and squishy but somehow indestructible feel of Ninjaflex, or just regular ‘ol PLA, there’s a filament out there for just about any use. Even optically clear printed objects. Yes, you can now do some post-processing on printed parts to make T-glase crystal clear.

The big advance allowing translucent parts to be made clear is a new product from Smooth-On that’s meant to be a protective and smoothing coating for 3D printed objects. With PLA, ABS, and powder printed parts, this coating turns objects shiny and smooth. Strangely – and I don’t think anyone planned this – it also has the same index of refraction as T-glase. This means coating an object printed with T-glase will render the layers invisible, smooth out the tiny bumps in the print, and turn a single-walled object clear.

There is a special technique to making clear objects with T-glase. The walls of the print must be a single layer. You’ll also want a perfect layer height on your print – you’re looking for cylindrical layers, not a nozzle that squirts out to the side.

The coating for the pictures above was applied on a makeshift lathe built out of an electric drill and a sanding pad. This gave the coating a nice, even layer until it dried. After a few tests, it was determined lenses could be printed with this technique. It might not be good enough for 3D printed eyeglasses, but it’s more than sufficient for creating windows for a model, portholes for an underwater ROV, or anything else where you want nothing but light inside an enclosure.

Cutting Glass With CNC

Breaking a pane of glass in half is easy – just score it, break it, and after practicing a few times, you’ll eventually get it right. What about cuts that are impossible with a normal glass cutter, like radiused corners and holes? For that, you’ll need CNC. Yes, you can cut glass on a CNC machine. All you need is a diamond burr or glass drilling bit, high speeds, low feeds, and lots and lots of coolant.

Cutting glass on a CNC machine doesn’t require any spectacularly specialist equipment. [Peter] is using an $800 Chinese mini CNC engraver for this project, but that’s not the only tool that was required. A fixture for holding a glass plate was also needed, but [Peter] quickly fabricated one out of acrylic.

Cutting glass with a CNC is something we’ve seen before. [Ben Krasnow] has been using diamond burrs, high speeds, low feeds, and lots of coolant to cut mirrors so expensive you don’t even want to guess.

While [Peter] isn’t getting the perfect finish [Ben] got a few years ago, he’s still milling holes and slots in glass. He’s wondering if it could be possible to mill an aspheric lens using this technique and a special spherical burr, something that would be very interesting to see, and could be a pretty good way to rough out telescope blanks.

The Science Of Strengthening Glass

Strengthen Glass

[Ben Krasnow] is at it again. This time he’s explaining a simple method for strengthening glass. As usual, he does a fantastic job of first demonstrating and explaining the problem and then following it up with a solution.

[Ben] first uses a simple rig to place a controlled amount of force against a glass microscope slide. His experiment shows that the slide shatters once about 30psi of force has been applied to the center of the slide.

[Ben] then goes on to explain that current methods for producing glass leave many tiny impurities, or cracks, in the glass. As the glass slide flexes, the inside edge is placed into a compression force while the outside edge is under tension. The glass is more easily able to handle the compression force. The tension is where things start to break down. The tension force eventually causes those tiny impurities to spread, resulting in the shattering glass.

One possible solution to this problem is to find a way to fill in those tiny impurities. According to [Ben], most glass has sodium added to it in order to lower the melting temperature. [Ben] explains that if you could replace some of these smaller sodium atoms with larger atoms, you could essentially “fill” many of the tiny impurities in the glass.

[Ben] does this himself by heating up a small vat of potassium nitrate. Once the powder becomes molten, he submerges the glass slides in the solution for several hours. During this time, some of the sodium atoms are replaced by potassium atoms due to the natural process of diffusion.

Once the slides have cooled down, [Ben] demonstrates that they become much stronger. When placed in the testing rig, the stronger slides do not break until the pressure gets between 60psi and 70psi. That’s twice as strong as the original glass. All that extra strength from such a simple process. Be sure to watch the full video below. Continue reading “The Science Of Strengthening Glass”