A Low-Cost Mini PCB Printer

The next great advancement in homebrew electronics is an easy way to turn copper clad board into functional circuit boards. This has been done since the 60s with etch resist pens, sheets of etch resist rub-on transfers, the ever-popular photocopy and clothes iron, and now with small CNC mills. It’s still a messy, slow, and expensive process. [johnowhitaker] and [esot.eric] are trying to solve the latter of these problems with a mini PCB printer made out of DVD drives.

Playing around with the guts of a DVD drive is something [john] and [eric] have been doing for a while now, and for good reason. There’s a lot of interesting tech in DVD drives, with motors, steppers, and gears able to make very, very accurate and precise movements. Most PCBs aren’t very big, either, so a laser cutter that can only traverse an area a few inches square isn’t that much of a downside in this case.

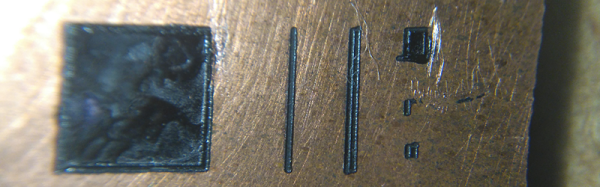
With a small diode laser mounted to a CNC gantry constructed out of DVD drives, the process of making a PCB is actually pretty simple. First, a slurry of laser printer toner and alcohol is applied to the board. Next, the laser on this PCB printer lases over the traces and copper fills, melting the toner. The board is removed, the excess toner wiped off, and the unwanted copper is melted away. Simple, even if it is a little messy.

Of course this method cannot do plated traces like your favorite Internet-based board house, but this does have a few advantages over any other traditional homebrew method. It’s cheap, since CD and DVD drive mechanisms are pretty much standardized between manufacturers. It’s also easy to add soldermask printing to this build, given that soldermasks can be cured with light. It’s a very cool build, and one that would find a home in thousands of garages and hackerspaces around the world.

The HackadayPrize2016 is Sponsored by:

Small And Inexpensive MEMS Gravimeter

A gravimeter, as the name suggests, measures gravity. These specialized accelerometers can find underground resources and measure volcanic activity. Unfortunately, traditional instruments are relatively large and expensive (nearly 20 pounds and $100,000). Of course, MEMS accelerometers are old hat, but none of them have been stable enough to be called gravimeters. Until now.

In a recent edition of Nature (pdf), researchers at the University of Glasgow have built a MEMS device that has the stability to work as a gravimeter. To demonstrate this, they used it to measure the tides over six days.

The device functions as a relative gravimeter. Essentially a tiny weight hangs from a tiny spring, and the device measures the pull of gravity on the spring. The design of the Glasgow device has a low resonate frequency (2.3 Hz).

Small and inexpensive devices could monitor volcanoes or fly on drones to find tunnels or buried oil and gas (a job currently done by low altitude aircraft). We’ve covered MEMS accelerometers before, although not at this stability level.  We’ve even seen an explanation from the Engineer Guy.

Hackaday Links: April 10, 2016

Spot the mirrored mac
Spot the mirrored Mac

Here is the best Mac mod we’ve ever seen. [Doogie] decided to take an Apple G5 Quad to the max. This means maintaining the liquid cooling setup, adding the max amount of RAM (16 GB), adding a Sonnet Tempo 6.0Gb PCI-e card and two Samsung 840 Pro SSDs, and an Nvidia Geforce 6600GT. The best part about this Mac? Instead of the classic anodized aluminum, [Doogie] polished the case to a mirror finish. Here’s a video of the entire build. The computer is currently serving up his webpage, and if you want to see how the server load test is going, you can check out the stats page here.

Hackaday links posts are where we put interesting kickstarters and crowdfunding projects, and this one is near the top. It’s a crowdfunding campaign for a glassblowing workshop in England. If this project is funded, people can come repair their scientific glassware, make new tubes, or take a glassblowing workshop. It’s not quite a crowdfunding campaign for a business (perhaps it should be?), but maybe someone out there has a glass lathe they can donate.

A few months ago, Microchip acquired Atmel for $3.56 Billion. There’s a lot of overlap in both company’s portfolios, leading many to wonder which products would be EOL’ed and removed from the market. This week, Microchip released a statement on the acquisition (PDF), and spelled out what to expect from the product line. It’s good news:

We know that stability and growth in manufacturing is an important consideration from a supply base, and it has been one of the key elements that Microchip has executed well throughout its 25+ year life. We will honor that concept in this integration activity as well. We also recognize that product End-of-Life may be one of your concerns in any acquisition, including this one. Microchip has a practice and track record of not putting products on End-of-Life, and it is our intent to continue to offer the complete portfolio of products from both companies.

On April 5th, Makerbot announced it has sold more than 100,000 3D printers worldwide. Sounds like quite an accomplishment, right? Wrong. From December 31, 2014 to April 5, 2016 – fifteen months – Makerbot has sold only 20,094 printers. Sales figures are hard to come by (I’m working on this), but Lulzbot is outselling Makerbot given one of their latest press releases and basic math. There will be more on this after Stratasys releases their 2015 yearly report (on May 9), but I’m calling this the beginning of the end for Makerbot.

Here’s a Kickstarter for a laser cutter. The first reward that will get you a laser cutter is €1.300, “a special 50% early bird Kickstarter discount off the estimated retail price.” That means this is a $3000 laser cutter. What does that get you? A five watt ‘shortwave’ laser, 20×16″ working area, and a software interface that actually looks rather good.

Make A BLDC Motor From Scraps You Can Find In The Garage

Think you’ve got what it takes to build a homebrew brushless motor? As [JaycubL] shows us, it turns out that a bldc motor may be living in pieces right under your nose, in scraps that so many of us would otherwise toss aside. To get our heads turning, [JaycubL] takes us into the theory of brushless DC motors operate. He then builds a homebrew brushless motor using screws, a plastic container, a few bearings, a metal rod, some magnets, and a dab of epoxy. Finally, he gives it a whirl with an off-the-shelf motor controller.

This isn’t [JaycubL’s] first dive into homebrew brushless motors. For the curious, he’s also assembled a fully-functional brushless outrunner motor with a paint can housing.

Sure, understanding the principles is one thing, but being able to take the leap into the real world and find the functional beginnings of a motor from your scrap bin is an entirely different story! [JaycubL’s], dare we say, finesse of understanding the principles behind motor design makes us wonder: how many other functional higher-level electrical and mechanical components can we bootstrap from bitter scrap? To get you started, we’ll point you in the direction of this CNC router that’s just a few steps away from one trip to the hardware store.

Thanks for the tip, [John]!

Continue reading “Make A BLDC Motor From Scraps You Can Find In The Garage”

“World’s Brightest” Flashlight

With the crazy extremes of light flux density that are possible these days, we’re putting quotation marks around “world’s brightest”, but it’s abundantly clear that this flashlight build is very much too bright. No, really. Why would you want a flashlight so bright that you have to wear sunglasses to look at anything that’s within a twenty foot radius?

Because you can. [Mads Nielsen] combined 18, one hundred Watt LED units with some giant machined heatsinks, fans to cool those heatsinks, lenses, and other hardware to make a device that turns electrons into photons at an alarming rate. Each chip-on-board LED package requires 32 Volts, and they’re pairwise in series so it’s a 64 V system. A boot converter pushes up the twelve LiPo battery packs up to the required voltage.

Even with the relatively high voltage, this thing sucks in 27 A, so the power supply is distributed among four of these boost converters. All of this means thick cables and a rather hefty power switch. When you’re designing something ridiculous, all of these little details come out of the woodwork. We’ve included part one of the four-part build video here, because they’re full of great detail. [Mads] has a lot more interesting LED-related info on his YouTube channel. You can watch the showing-off video on your own time.

Continue reading ““World’s Brightest” Flashlight”

Brazillian Class Creates Digital Board Game

A class in Brazil was given the assignment to make a board game. [Marcelo], presumably, heard his son lamenting how lame it was going to be if the board was just cardboard with some drawings on, and came to the rescue.

 fusion between Operation and one of those disease transmitters at the doctors office
A match meant to be.

Working with the class, they came up with the rules of the game. We’re not certain what those are, but it involves a regular game board, a flashing light circle with numbers, and a fusion between Operation and one of those disease transmitters commonly found at the doctor’s office. You can try to puzzle them out from the video after the break.

The brains of the board is an Arduino with an external EEPROM for all the sound effects and other data needed for this construction. Everything is laid out on a beautifully done home etched PCB. It’s too bad the other side of the board isn’t visible.

We’re sure the kids learned a lot working with [Marcelo]. It would have been nice if a traveling wizard came to some of our earlier classes in school and showed us just how much cool stuff you can do if you know electronics.

Continue reading “Brazillian Class Creates Digital Board Game”

Gameboy Case Lives On With A Pi Zero

After scoring a non-functioning Gameboy in mint condition for $10, [Chad] decided it was time for a fun electronics project, so he ordered an LCD and bought a Pi Zero.

He started with a 3.5″ LCD off eBay for about $25, and got it running with the Pi Zero. It’s only 320×240 resolution, but hey, we’re recreating a Gameboy — not a smartphone. The next step was rather finicky: cutting up the case to fit the new components in.

Using a collection of files he whittled down the screen opening in the case to make room for the LCD, a few hours later and it looked surprisingly good.

From there he started laying out the components inside of the case, trying to figure out the best layout for everything to fit nicely. To power the unit he’s using a lithium ion battery from a Samsung Note which should give him some serious play-time. It fits right in where the game card is suppose to go.

To add some extra control functionality he’s added the game-pad buttons from a SNES onto the back where the battery door is, he’s also got a USB port on the side, a MicroSD card slot, and even a new audio pre-amp with potentiometer for controlling the speaker volume.

In case you can’t find a mint condition Gameboy case like [Chad] did, you could just print one from scratch

Continue reading “Gameboy Case Lives On With A Pi Zero”