Mostly Non-Volatile Memory With Supercapacitors

Back in the days of old, computers used EPROMs to store their most vital data – usually character maps and a BASIC interpreter. The nature of these EPROMs meant you could write to them easily enough, but erasing them meant putting them under an ultraviolet light. Times have changed and now we have EEPROMs, which can be erased electronically, and Flash, the latest and greatest technology that would by any other name be called an EEPROM. [Nicholas] wanted an alternative to these 27xx-series EPROMs, and found his answer in supercapacitors.

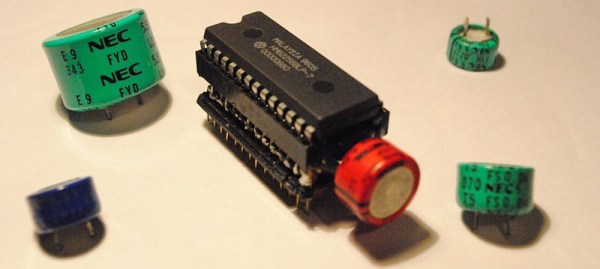
[Nick]’s creation is a mostly non-volatile memory built around an old 62256 32k SRAM. SRAM is completely unlike EPROMs or Flash, in that it requires power to keep all its bits in memory. Capacitor technology has improved dramatically since the 1980s, and by using a supercap and one of these RAM chips, [Nick] has created a substitute for a 27-series EPROM that keeps all its memory alive for days at a time.

The circuit requires a small bit of electronics tucked between the EPROM socket and the SRAM chip; just enough to turn the 12 Volts coming from the EPROM programming pin to the 5 Volts expected from the SRAM’s Write Enable pin. This is accomplished by a few LEDs in series, and a 0.1F 5.5V supercap which keeps the SRAM alive when the power is off.

As for why anyone would want to do this when modern technologies like Flash can be found, we can think of two reasons. For strange EPROM sizes, old SRAMs abound, but a suitable Flash chip in the right package (and the right voltage) might be very hard to find. Also, EEPROMs have a write lifetime; SRAMs can be written to an infinite number of times. It’s not the best solution in every case, but it is certainly interesting, and could be useful for more than a few vintage computing enthusiasts.

This project makes us think of another where an LED may have been supplying keep-alive power to some volatile memory.

Hacklet 79 – USB Projects

Universal Serial Bus was created to simplify interconnecting computers and peripherals. First released in 1996, hackers and makers were slow to accept this strange new protocol. Parallel and serial ports were simpler, worked great, and had decades of hacking with thousands of projects behind them. As the new standard caught on in the mainstream, RS-232 and parallel ports started disappearing. “Legacy free” PC’s became the norm. Hackers, Makers, and Engineers had no choice but to jump on the bandwagon, which they did with great gusto. Today everything has a USB port. From 8 bit microcontrollers to cell phones to children’s toys. This week’s Hacklet is about some of the best USB projects on Hackaday.io!

two partsWe start with [Michael Mogenson] and Two Component USB Temperature Data Logger, which may be the simplest USB device ever made. [Michael] isn’t kidding. This data logger consists of just a Microchip PIC16F1455 microcontroller and a USB connector. Microchip’s datasheet calls for a capacitor to smooth out power, but [Michael] made it work without the extra part. He used M-Stack by Signal 11 to implement the USB stack. Once connected to a PC, the PIC enumerates as a serial port device. It then sends its die temperature of the PIC once per second. It could do more, but that would probably require adding a few more components!

tester1Next up is [davedarko] with USB cable tester. Dave recently spent some time installing USB RFID readers. These devices were only a few meters away from the computer controlling them. Even so, the power and USB data cables had to run through pipes and in some cases under water. It wasn’t fun troubleshooting a device to find that it was a shorted USB cable causing the problem. [Dave’s] solution is a tiny coin cell powered board that tests each of the 4 wires in a standard USB 2.0 cable. The board runs on an ATtiny45 microcontroller. [Dave’s] current iteration has footprints for mini and micro USB connectors, along with the standard USB-A.


tester2[MobileWill] has a USB Tester of his own. This USB tester checks current consumption and rail voltage. It does this by connecting in-line with the device under test. It’s perfect for troubleshooting why your PC’s USB port goes into over-current protection every time you plug in your device. The tester is modular – you can use the base board with your own multimeter, or grab [Will’s] tester backpack and see the results right on the built-in OLED display. USB Tester is [Will’s] entry in the 2015 Hackaday Prize.


tbdFinally, we have [ajlitt] with Tiny Bit Dingus (TBD). TBD is a USB interface to 6 wires. Think of it as a tiny version of the bus pirate. This lilliputian board holds a Freescale KL27Z ARM processor, which has more than enough power to handle things like I2C, SPI, PWM, or just about any other way to send data or wiggle wires. [Ajlitt] started this project as an excuse to learn KiCAD and gain some experience with surface mount solder stencils. The result is an absolutely tiny board that is all but lost in a USB socket. Programming is handled with the mbed library, though you can always use Freescale’s native tools. Flashing code on the TBD is easy with kut, a chrome browser plugin.

If you want to see more USB projects, check out our new USB projects list. Did I miss your project? Don’t be shy, just drop me a message on Hackaday.io. That’s it for this week’s Hacklet, As always, see you next week. Same hack time, same hack channel, bringing you the best of Hackaday.io!

Juggling Robot Deftly Handles Balls

A well-designed robot can do any action a human can do. Whether this is an acrobatic performance, or just writing with a pen, there’s a robot out there for any single action a human can perform. This includes juggling, but never before has the human action of juggling been replicated at this scale. [Nathan] built a robot that can juggle seven balls simultaneously. That’s more balls in the air than any other juggling robot.

jugglebot
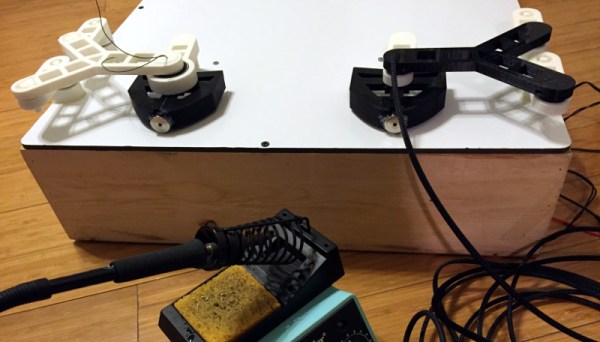
While the original plan was to build a low-cost version that could juggle balls by throwing them up in the air, this proved to be very difficult. Instead of giving up, [Nathan] simplified the problem by rolling the balls up a ramp. The entire build is documented in an imgur gallery, and there’s some interesting tech going on here. The 3D printed arms are controlled by beefy stepper motors running at 60V. To stop the balls from bouncing around in the arms, [Nathan] included and electromagnet to hold the balls in place for a fraction of a second during each cycle.

Juggling seven balls is amazing, but how about eight? This is the question every builder of a juggling robot will get, and it’s not quite as simple as adding another ball. The motion of juggling an even number of balls is completely different from juggling an odd number. That being said, [Nathan]’s robot does have four balls under its belt. It should probably get that looked at.

This isn’t [Nathan]’s first amazing 3D printed robot, and it probably won’t be the last, either: he recently built a Skittles sorting machine for the next time Van Halen comes to town. There’s an amazing amount of skill in all his projects, and he’s certainly an asset to the entire hackaday.io community.

Continue reading “Juggling Robot Deftly Handles Balls”

Hackaday Prize Semifinalist: Individualized Breathing Apparatus

Preterm infants frequently require ventilator support while they’re in the neonatal ICU, and this is usually done with a CPAP machine. The machine to infant interface is called a nasal cannula, a bit of plastic that connects an infant’s nose to the machine. Because there aren’t that many sizes of nasal cannula available, and preemies come in all sizes, there are inevitable problems. Ill-fitting nasal cannula can reduce the effectiveness of a CPAP, and can even cause significant damage to an infant’s septum.

For his Hackaday Prize entry, [Ben] is tackling this problem head on. He’s working on creating individualized nasal cannula for newborns using 3D modeling and printing, allowing nasal cannula of all shapes and sizes to be created in a matter of hours.

To create these customized cannula, [Ben] is 3D scanning an infant mannequin head to gather enough data to import it into a Processing sketch. A custom cannula is then created and printed with flexible 3D printer filament. In theory, it should work, apart from the considerations involved in building a medical device.

As for why custom plastic tubes matter, [Ben] works at the only NICU in Western Australia. Even though he only sees 8-10 CPAP ‘pressure injuries’ in his unit each year, these kids are extremely fragile and some parents have expressed a desire for something that isn’t as uncomfortable for their newborn than the off-the-shelf solution. Customizing these cannula from a quick 3D scan is a great way to do that, and a perfect example of the Hackaday Prize theme of ‘build something that matters.’

The 2015 Hackaday Prize is sponsored by:

Hacklet 77 – Projects That Tweet

Since it’s launch way back in 2006, Twitter has become a magnet for techies. Maybe it’s the simple interface, maybe it’s the 140 character limit. Whatever the reason, you can find plenty of hackers, makers, and engineers tweeting about their daily activities. It didn’t take long for folks to start incorporating Twitter into their projects. Ladyada’s Tweet-a-watt is a great early example of this. This week’s Hacklet is all about some of the best tweeting projects on Hackaday.io!

dogbarkWe start with [Henry Conklin] and A Twitter account for my dog. [Henry’s] dog [Oliver] loves to bark and finding a solution became his entry to The Hackaday Prize. Rather than bring Cesar Millan in, [Henry] decided to embrace [Oliver’s] vocalizations by sending them up to the cloud. A Raspberry Pi with a USB microphone uses some custom Python code to detect barks and ruffs. The Pi then sends this data to Twitter using the python-twitter library. The Pi is connected to the internet via a USB WiFi dongle. You can see the results of [Henry’s] work on [Oliver’s] own Twitter page!

dectalkerNext up is [troy.forster] and tweetie-pi. Rather than constantly check his phone or computer, [Troy] wanted a device to read his tweets. A bit of NodeJS code later, and tweetie-pi was born. A Raspberry Pi connected to the internet pulls data through the Twitter stream API. When tweets directed at a pre-configured username are found, the data is sent to a an Emic 2 text to speech module. The Emic reads in that classic DECtalker style voice we all know and love from the movies. [Troy] even added code to properly handle usernames and retweets.


homeauto[SirClover] joined the internet of things by creating Home automation system with Twitter, his entry in the 2014 Hackaday Prize. This home automation system is based around an Arduino Leonardo and an Ethernet shield. [SirClover] rolled his own custom PCB to handle relays, a Cds cell, and a 2×16 character LCD. The system can be accessed through a simple web interface. This allows the user to open or close blinds, turn on lights, all that great smart home stuff. Every time it executes a command, the home automation system reports status to Twitter.

das-cubeFinally we have [Jakob Andrén] with A danceable notification cube, which is [Jakob’s] entry in the 2015 Hackaday Prize. The cube itself is a translucent box that contains a metric crapton of LEDs. 148 Neopixels and 12 3W power LEDs to be exact. All these LEDs are driven by a Teensy 3.1, which serves as the main processor for the entire system. The Teensy reads position data from an MPU6040 IMU. This allows it to change brightness and color as the box is moved around – or “danced”. An ESP8266 provides the cube with data from the interwebs, specifically Facebook and Twitter. The cube lights up and flashes whenever it receives a message.

If you want to see more tweeting projects, check out our new projects that tweet list.  Did I miss your project? Don’t be shy, just drop me a message on Hackaday.io. That’s it for this week’s Hacklet, As always, see you next week. Same hack time, same hack channel, bringing you the best of Hackaday.io!

This Project Will Be Stolen

What do you get when you take a flight case from Harbor Freight, fill it up with random electronics junk, and send it off to a stranger on the Internet? The travelling hacker box. It’s a project I’m putting together on hackaday.io to emulate a swap meet through the mail.

The idea is simple – take a box of random electronics junk, and send it off to a random person on hackaday.io. This person will take a few items out of the box, replace those items with something sitting on their workbench, and send it off to the next person. This is repeated until the box is stolen.

Has something like this been done before? Yes, yes it has. The Great Internet Migratory Box of Electronics Junk was a thing back in the ‘aughts, with Hackaday (via Eliot) receiving a box (code name: Rangoon) from [John Park], before sending it off to [Bre Pettis]. The box subsequently disappeared. There were many migratory boxes of electronics junk, but most didn’t travel very far. Already the Travelling Hacker Box has 2,525 miles on its odometer, and plans are in the works for travelling 25,000 miles – the circumference of the Earth – before heading out of the United States.

If you’re wondering what’s in the box, here’s a mostly complete inventory. With the exception of a few items from the swag bag from the Open Hardware Summit last weekend, it’s mostly random electronics stuff I’ve had sitting around on my workbench and desk. The first recipient grabbed a few dev boards and replaced them with a Teensy LC and enough tubes to make a small amplifier.

The current plan for the Travelling Hacker Box is to bounce across the United States for the circumference of the Earth until departing for more exotic lands. There are people queued up to receive the box from across the world, and the box will eventually be hitting Europe, India, Africa, Asia, and Australia. Everyone is welcome to participate as it is passed from hacker to hacker as a migratory box of electronic toys.

A DIY Mobile Soldering Iron

Cordless soldering irons are, as a rule, terrible. A few months ago, you could pick up a cordless soldering iron from Radio Shack that was powered by AAA batteries. You can guess how well those worked. There are butane-fueled soldering irons out there that will heat up, but then you’re left without the requisite degree of temperature control.

[Xavier] didn’t want to compromise on a mobile soldering iron, so he made a desktop version portable. His mobile temperature controlled soldering iron uses the same electronics that are found in inexpensive Hakko clones, and is powered by a LiPo battery.

The soldering station controller comes directly from eBay, and a DC/DC boost converter accepts just about any DC power supply – including an XT60 connector for LiPo cells. A standard Hakko 907 iron plugs into the front, and a laser cut MDF enclosure makes everything look great. There were a few modifications to the soldering station controller that involved moving the buttons and temperature display, but this build really is as simple as wiring a few modules together.

With an off-the-shelf LiPo battery, the iron heats up fast, and it doesn’t have a long extension cord to trip over. With the right adapter, [Xavier] can use this soldering station directly from a car’s cigarette power port, a great feature that will be welcomed by anyone who has ever worked on the wiring in a car.

Continue reading “A DIY Mobile Soldering Iron”