Simplest Electricity Monitoring Solution Yet

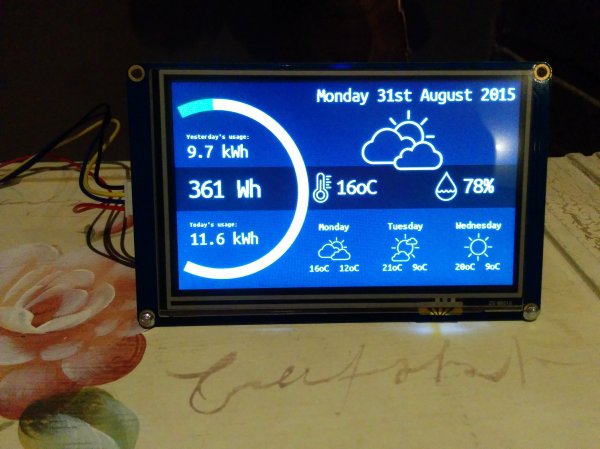
Monitoring your home’s energy use is the best way to get a handle on your utility bills. After all, you can’t manage what you can’t measure! The only problem is that most home energy monitoring systems are cumbersome, complicated, or expensive. At least, until now. [Kevin] has created a new electricity meter based on Particle Photons which should alleviate all of these problems.

The Particle Photon (we get confused on the naming scheme but believe this the new version of what used to be called the Spark Core) is a WiFi-enabled development board. [Kevin] is using two, one to drive the display and one to monitor the electricity usage. This part is simple enough, each watt-hour is accompanied by a pulse of an LED on the meter which is picked up by a TLS257 light-to-voltage sensor. The display is a Nextion TFT HMI (touch screen) which is pretty well suited for this application. The data is corralled by emoncms, part of the OpenEnergyMonitor platform, which ties everything together.

For a project that has been done more than a few times, this one does a great job of keeping the price down while maintaining a great aesthetic. Make sure to check out the video below to see it in action.

Continue reading “Simplest Electricity Monitoring Solution Yet”

RaspiDrums Uses Expensive Sensors

Piezoelectric sensors are great for monitoring mechanical impacts with a microcontroller. Whether you’re monitoring knocks on a door or watching a heartbeat, they are a cheap way to get the job done. They do have their downsides, though, so when [Jeremy] wanted to build an electronic drum set, he decided to use more expensive accelerometers to measure the percussive impacts instead.

Even though piezo sensors are cheap, they require a lot of work to get them working properly. The ADXL377 3-axis accelerometer that [Jeremy] found requires much less work, plus provides more reliable data due to a 1kHz low-pass filter at the output. In his setup, a Raspberry Pi handles all of the heavy lifting. An ADC on each drum sends data about each impact of the drum, and the Raspberry Pi outputs sound via the native Alsa driver and a USB sound card.

This project goes a long way to show how much simpler a project like this is once you find the right hardware for the job. [Jeremy]’s new electronic drums are very well documented as well if you are curious about using accelerometers on your newest project rather than piezo sensors. And, if you’re into drums be sure to see how you can have drums anywhere, or how you can build your own logic drums.

Continue reading “RaspiDrums Uses Expensive Sensors”

Core Memory For The Hard Core

[Brek] needed to store 64 bits of data from his GPS to serve as a last-known-position function. This memory must be non-volatile, sticking around when the GPS and power are off. Solutions like using a backup battery or employing a $0.25 EEPROM chip were obviously too pedestrian. [Brek] wanted to store his 64 bits in style and that means hand-wired core memory.

OK, we’re pretty sure that the solution came first, and then [Brek] found a fitting problem that could be solved, but you gotta give him props for a project well executed and well documented.

Continue reading “Core Memory For The Hard Core”

Building A Better Mousetrap With The Raspberry Pi

Build a better mousetrap, and the world will beat a path to your door, but what about a smarter mousetrap? [Alain] decided to find out by making a Raspberry Pi-powered, Internet-connected smart trap. The brains of the operation is a Pi running Arch Linux. Connected to that is a IR trigger, a servo to unlatch the sliding door, and a camera to see your new friend.

The housing of the trap is CNC cut foam PVC board, which is both easy to cut and to clean. Once the IR beam is broken the Pi turns the servo, which pulls a pin on the front door. Once your new friend is settled in a LED light turns on to illuminate the subject, a picture is taken and sent via email.

With automated alerts you don’t have to manually check the trap, and you also don’t have to worry about a trapped animal being inside for too long. Join us after the break for a demonstration video showing off all the features, and a real world example.

Continue reading “Building A Better Mousetrap With The Raspberry Pi”

Stuffing Everything On A DIP32 Package

Putting an full microcontroller platform in a DIP format is nothing new – the Teensy does it, the Arduino nano does it, and a dozen other boards do it. [Alex] and [Alexey] aren’t content with just a simple microcontroller breakout board so they’re adding a radio, an OLED, an SD card reader, and even more RAM to the basic Arduino platform, all in a small, easy to use package.

The DIPDuino, as [Alex] and [Alexy] are calling it features an ATmega1284 processor. To this, they’re adding a 128×32 pixel OLED, a micro SD slot, and 1Mbit of SRAM. The microcontroller is a variant that includes a 2.4 GHz Zigbee radio that allows for wireless connections to other DIPDuinos.

What are [Alex] and [Alexey] going to do with their cool little board? They’re planning on using the OLED for a watch, improve their software so the firmware can be updated from the SD card, and one of [Alex]’s friends wants to build a RepRap controller with one of these. There’s a lot of potential with this board, and we’re interested in seeing where the guys take the project from here.

Two-Axis Solar Tracker

Solar panels are an amazing piece of engineering, but without exactly the right conditions they can be pretty fickle. One of the most important conditions is that the panel be pointed at the sun, and precise aiming of the panel can be done with a solar tracker. Solar trackers can improve the energy harvesting ability of a solar panel by a substantial margin, and now [Jay] has a two-axis tracker that is also portable.

The core of the project is a Raspberry Pi, chosen after [Jay] found that an Arduino didn’t have enough memory for all of the functionality that he wanted. The Pi and the motor control electronics were stuffed into a Pelican case for weatherproofing. The actual solar tracking is done entirely in software, only requiring a latitude and longitude in order to know where the sun is. This is much easier (and cheaper) than relying on GPS or an optical system for information about the location of the sun.

Be sure to check out the video below of the solar tracker in action. Even without the panel (or the sun, for that matter) the tracker is able to precisely locate the panel for maximum energy efficiency. And, if you’d like to get even MORE power from your solar panel, you should check out a maximum power point tracking system as well.

Continue reading “Two-Axis Solar Tracker”

10 Best Product Finalists Announced

The Best Product competition within the 2015 Hackaday Prize highlights the work it takes for any hardware developer or startup to move from prototype to a manufacturable product. To compete, each entry had to go well beyond the standard requirements of the Hackaday Prize with more in-depth documentation, and by shipping three working beta units to Hackaday for judging.

The 10 Finalists featured below are all exceptional and will compete for the next four weeks to be named The Best Product. In addition to the top spot, they will secure a $100,000 cash prize, a six month residency in the Supplyframe Design Lab in Pasadena, California, and help with making connections needed to move their product forward. This is the perfect contest for product engineers, hardware startups, or anyone else who can design the next great thing.

We spent last week judging all the entries for the Best Product contest, and the results are in. Who are the winners? Which products are moving on to the next round of judging? See the full details of all Best Product finalists or browse a summary of each below, presented in no particular order whatsoever.

Continue reading “10 Best Product Finalists Announced”