Inside The Secret World Of Crimping

At some point in your electrical pursuits, you’ll need to make a connector. Maybe you’re designing something that will connect to another device, or maybe the spaghetti mess of wires coming out of your Raspberry Pi has become a pain to deal with. Whatever the reason, a proper connector can solve a lot of headaches in electronics projects.

Your first thought might be to run to your favorite component distributor and order the connectors, terminals, and crimping tool. Unfortunately, those tools can cost thousands of dollars. Maybe you’ll just solder the connectors instead? Don’t! It makes for easily damaged connections.

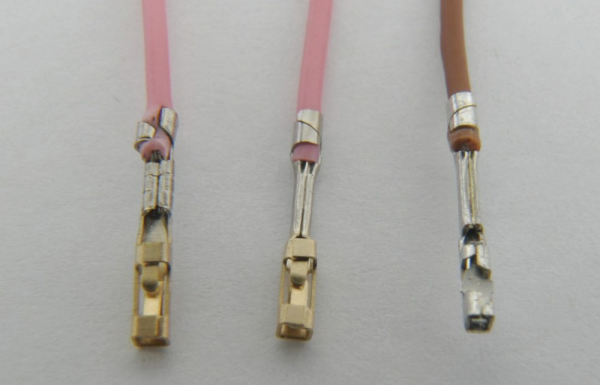
Fortunately, [Matt Millman] has a great guide on wire-to-board connectors. This guide will explain why you should never solder crimp terminals and then get into working with some of the most common wire-to-board connector families.

For example, the Mini-PV series (which often get called “Dupont”) are one of the most ubiquitous connectors in hobbyist electronics. They’re the connector on those rainbow colored jumper wire sets, and connect perfectly to 0.1″ pin headers. The connectors and terminals are cheap, but the official HT-0095 crimp tool costs over $1500. Most crimp tools make a mess of these terminals since they require a cylindrical jaw to crimp correctly. By using a combination of two unofficial tools, you can crimp these connectors properly for under $60.

If you want to learn more about the art of wiring, the NASA Workmanship Standards are an interesting read.

[Thanks to MarkMLl for the tip!]

Simple Hand Tools Turn Brass And Steel Into An Amazing Astrolabe

There’s something enchanting about ancient tools and instruments. The idea that our forebears were able to fashion precision mechanisms with nothing but the simplest hand tools is fascinating. And watching someone recreate the feat, such as by building an astrolabe by hand, can be very appealing too.

The astrolabe is an ancient astronomical tool of incredible versatility, allowing the user to do everything from calculating when the sun will rise to predicting the positions of dozens of stars in the night sky. That it accomplishes all this with only a few moving parts makes it all the more fascinating. [Uri Tuchman] began the astrolabe build shown in the video below with only a few hand tools. He quickly had his fill of the manual fretsaw work, though, and whipped up a simple scroll saw powered by an old sewing machine foot treadle to speed up his work. The real treat though is the hand engraving, a skill that [Uri] has clearly mastered. We couldn’t help musing that a CNC router could do the same thing so much more quickly, but watching [Uri] do it was so much more satisfying. Everything about the build really makes a statement, from the contrasting brass and steel parts to the choice of complex Arabic script for the markings. [Uri] has another video that goes over astrolabe basics and his design process that’s well worth watching too.

While it’s nowhere near as complicated an instrument, this astrolabe puts us in the mood to watch the entire Clickspring clock build again. And [Chris] is working on his own ancient instrument build at the moment, recreating the Antikythera mechanism. We can’t wait to binge-watch that one too.

Continue reading “Simple Hand Tools Turn Brass And Steel Into An Amazing Astrolabe”

DIY Rotary Tool

DIY Rotary Tool

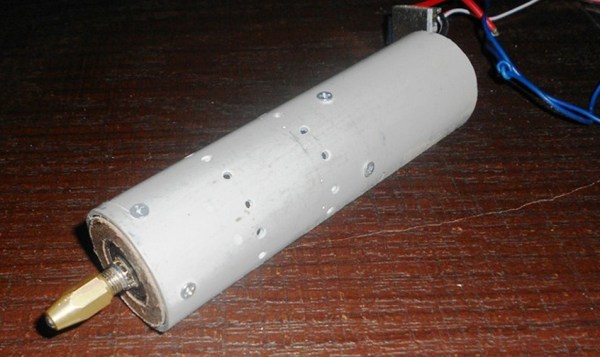
[Shashank] has a modest tool collection but is missing a rotary tool. He needed one for a project he was working on but didn’t think that it would get much use after the current project was completed. So instead of buying a rotary tool, he decided to make one to get the job done.

The project started out with a 40mm PVC pipe that would serve a the main body of the tool. Two MDF disks were cut to fit inside the pipe. One was used for mounting an RC vehicle brushless motor and the other was bored out to accept a pair of bearings. The bearings supported a modified pin vise that acts as the chuck for securing rotary tool bits. A 20-amp ESC and a servo tester control the motor’s speed and can get the motor up to 18,000 rpm.

Although this worked for a while, [Shashank] admits it did fall apart after about 20 hours of use. The MDF bearing mounts crumbled, thought to be a result of vibration due to mis-assignment between the motor and pin vise. He suggests using aluminum for the bearing mounts and a flexible coupling to connect the motor to the pin vise. If you’re interested in making your own rotary tool but don’t have any spare motors kicking around,  this 3D printed vacuum-powered rotary tool may be for you.

Deep Woods Cabin; One Man, His Tools, And A Camera On A Tripod

We remember watching Alone in the Woods years ago on Public Television. It’s a story of a self-sufficient man named [Dick Proenneke] who loved the outdoors and decided to live alone in the Alaskan wilderness. It’s a remarkable story made more so by the film footage he made to document his experience. That teaser doesn’t do it justice, so check out the web page summaries as well and consider picking up a copy of the films for yourself.

The films include hiking, hunting, observing nature, and building this sweet pad which even [Steve] would be proud of. The first summer he left his native Iowa and scouted for cabin locations near Twin Lakes, Alaska. After finding a suitable location he felled enough trees to build the entire 11′ by 14′ structure and headed back home for the winter.

The next summer he packed in the tools seen above, and got to work. His build includes a stone fire-place as well as a door, windows, and a moss-covered roof. He did return to the continental US one more time, but ended up going back to Alaska to spend another 30 years in the cabin.

Continue reading “Deep Woods Cabin; One Man, His Tools, And A Camera On A Tripod”

Building A Robot Without Using A Machine Shop

We usually avoid the prospect of buying new tools just for one project. In the long run we’re sure we’d use them again, but sometimes even with that outlook you can’t afford it. Case in point is our life-long-lust for a laser cutter; we just can’t justify the upfront cost but we sure would use it constantly if we had one.

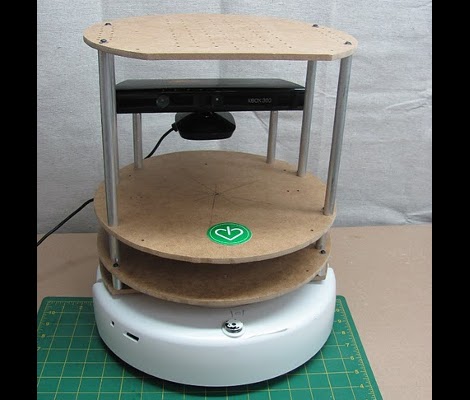
If you do find that you’re interested in taking on a project that calls for laser cut parts, [I Heart Robotics] shows you how to do it with a few simple hand tools. The bot seen above is their TurtleBot. You can cut your own parts using a laser cutter, you can buy a kit from them, or you can bust out a ruler, compass, drill, coping saw, printer, and tape to make the pieces by hand.

It’s a simple enough concept. Print out the templates, tape them to your hard board, then start drilling and sawing. You won’t get the precision a machine tool can, but in some cases you don’t need to be all that perfect.

[via Adafruit]

Machining Replacement Parts With Hand Tools

Jeff is a huge music fan, and like many of us likes old technology, so it seemed a bit silly (to him) that he did not have a turn table. His dad had a spare in the basement. A neat old Braun model from the 1970’s that was broken.

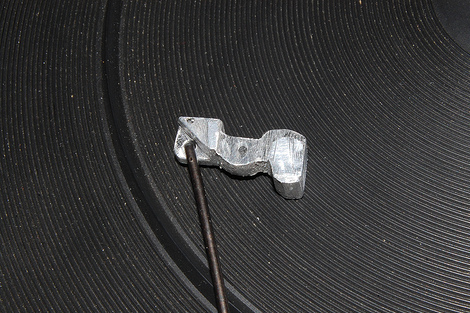
Opening the unit up he found that part of the arm mechanism was broken, and thanks to the age of the turntable and the wonders of mass production chances of finding a replacement were slim to none. Not being discouraged he busted out the hand tools and fabricated the replacement out of some aluminum. The end result is a perfectly functioning turntable that will serve many more hours pushing out warm jams.

Check out the fourm post above to get details and pictures, and we just wanted to tell [Jeff], awesome job!