ir_power_meter

Monitor Your Home’s Power Usage On The Cheap

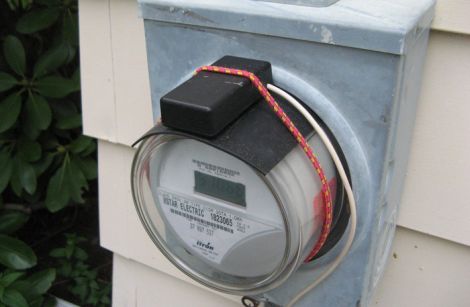
[Paul] was pretty sure that he and his family used a lot of electricity throughout the day. Admittedly, he enjoys his creature comforts, but was wiling to try living a little greener. The problem was, he had no idea how much electricity he was using at a given time.

While some power companies offer devices allowing homeowners to monitor their energy usage, [Paul’s] did not. After a bit of research however, he was ready to build a power monitoring system of his own. He found that his meter emits a small infrared pulse every time a watt-hour of electricity is consumed, so his system counts how many flashes occur to measure usage.

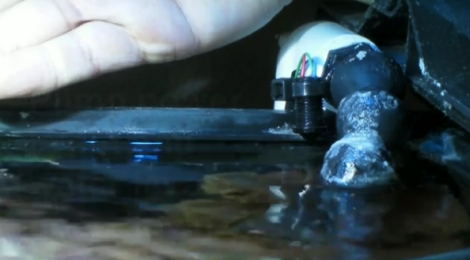
The counting circuit is pretty simple consisting of only an AVR, a resistor, a capacitor, and a phototransistor. The data is fed to a computer where the results are graphed with gnuplot.

It’s quite a useful little hack, and undoubtedly far cheaper than purchasing a whole house power monitor.

A Friendly Spiderbot Named Chopsticks

chopsticks_the_spiderbot

After seeing his fair share of hexapod-style bots on the Internet, [Russell] decided he wanted to build one of his own. One of the downsides to building these robots is the cost. He often saw them constructed from laser cut parts and very expensive servos. Rather than blow hundreds upon hundreds of dollars on the bot, [Russell] decided he could a lightweight bot on the cheap using chopsticks and polymorph modeling plastic.

His octopod robot is aptly called “Chopsticks” and utilizes 28 different servos to control its motions. 24 servos are used for its legs, 3 more are reserved for head movements, while a single additional servo manipulates the robot’s mandibles. The robot’s legs and main structure are composed of chopsticks, while the polymorph is used for feet, servo mounts, and pretty much anywhere else chopsticks just wouldn’t do.

[Russell] even added a set of eye stalks to complete the spider theme, arming them with IR compound eyes for object tracking. The robot is quite interactive as you can see in the video below.

Keep reading to see a video of Chopsticks, or swing by his Let’s Make Robots site if you get a chance – he has a pretty detailed construction journal as well as plenty of videos showing his spider bot in action.

Continue reading “A Friendly Spiderbot Named Chopsticks”

Meet Mr. Clappidoo

mr_clappidoo

[Laurence] tinkers around the house quite a bit, making all sorts of fun interactive toys for his children to play with. Mr. Clappidoo is a toy that he finished a while back, which bears a striking resemblance to one of his projects we recently showed you, Papydoo. This is not a coincidence, as Papydoo was created after Mr. Clappidoo was built, borrowing many features from his predecessor.

Who is your daddy and what does he do?

It’s a good thing you asked. Mr. Clappidoo uses an IR motion sensor to detect nearby objects, waking up and interacting with whatever crosses his path. He is capable of four different random moods ranging from angry to flirty. He projects these moods by changing the color of his LED-lit eyes as well as playing simple sounds. A balsa wood chest makes up Clappidoo’s body, and he repeatedly claps his lid mouth open and shut using a small servo, hence the name.

Like his other projects, [Lawrence] has focused his efforts to ensure that the three AA batteries used to power Clappidoo last as long as possible. He says that with moderate usage the device can run off the same set of batteries for a few months before needing replacement.

It’s a fun little contraption, sure to please the kids. Stick around for a quick video of Clappidoo in action.

Continue reading “Meet Mr. Clappidoo”

Simple IR Bounce Tachometer

[Rajendra Bhatt] writes in to let us know about a nice simple IR bounce tachometer. The project uses a startUSB for PIC board and a 16×2 character LCD with a very basic Infrared bounce circuit.  Measuring either a reflective or non reflective spot in the rotating object, in this case a bit of white paper, the micro is supposedly capable of measuring up to 99,960 RPM (we think the paper might fly off at this point) with a resolution of 60 RPM. This is the same concept as a beam-break style tachometer but keeps all your electronics on one end of the spinning hazard.

The article also goes into detail about setting the PIC18F2550’s Timer0 register to enable 16-bit resolution.  The PIC is configured to turn on the infrared LED for one second, measure the number of pulses (through timer registers), and multiply that value by 60.  We would be more careful with the TMR0H and TMR0L counters as they have to be read and written in a certain order to preserve their values, but you’d need to be measuring upwards of 15,360 rpm to run into that error.

It is a quality writeup for anyone interested in learning about the start USB for PIC board, tachometers, or a new project. Thanks [Raj]!

DSLR Infrared Camera Conversion

ir_conversion

[Jerry] recently got a shiny new DSLR camera and was looking to do something with the old Pentax DSLR it replaced. Having performed a few point and shoot IR conversions in the past, he was pretty confident he could tackle this conversion without too much trouble.

He located the service manual for the camera and got busy taking it apart. He had to desolder the main board to get to the CCD block, where the sensor, IR cut filter, and the shake reduction motors are all located. The IR cut filter was pried off without too much trouble as it is only secured with a clip and an adhesive foam gasket.

Once things were disassembled, the real work began. He had a little trouble cutting the IR filter he purchased, so it took a little bit of elbow grease to get things exactly the way he wanted. Once he got the filter in place, he carefully re-mounted the sensor block to ensure that it was set at the proper height.

Once things were fully reassembled, he tried taking a few test shots, but found that there were some focus issues due to the IR filter being thicker than the original IR cut filter. A few manual tweaks in the camera’s debug menu and he was in business.

Be sure to check out his photo stream to take a look at some of the pictures he snapped with his new IR camera.

Chatbox Wireless IM Client

[Utpal Solanki] wanted to do some text chatting from the comfort of the couch. He built this wireless chat client that he calls Chatbox using a microcontroller, a character LCD screen, and a keypad that he built himself.

The device communicates via an Infrared emitter and receiver. It pairs up with an Arduino using an IR shield that [Utpal] built. The handheld unit flashes a pair of white LEDs whenever it receives a message from the Arduino. You can then hit the Inbox button and scroll through to read what was received. To reply  just type on the keypad the same way you would with a cellphone, then hit the send button to shoot that message back to the Arduino.

On the computer side of things the messages are being relayed to and from the Arduino over a USB connection. Early on in the video demonstration (embedded after the break) [Utpal] shows his Chat Box program communicating via the handheld unit in the same way that other messenger programs work.

Looks to us like he’s built his own non-pink version of what the IM-ME was originally intended to do.

Continue reading “Chatbox Wireless IM Client”

aquarium_pump_shutoff

Aquarium Overflow Sensor Saves Your Fish And Your Floors

If you’ve ever had a water leak in your home, you know the sinking feeling that comes over you as you walk through the door to the sound of running water. [Greg] knows this feeling quite well, having returned home to a sopping wet floor and an overflowing reef aquarium on more than one occasion.

Both of the overflows he experienced were due to a clogged drain in his display, but there was little he could do as far as walling off the drain from potential blockages. With all of the delicate creatures living in the tank, the only possible solution that came to mind was monitoring the aquarium’s water level.

Unfortunately he had no idea how to get this done aside from using probes (which would rust in the salt water) or expensive off the shelf systems. [erich_7719] from the All About Circuits forums helped [Greg] out and designed a circuit for him which would monitor the water level using an IR sensor. The circuit simply shuts off the pump if the water level gets precariously high. As you can see in the video below it works quite well, and as a safety measure, requires a manual restart of the pump once the high water sensor has been tripped.

If you have a need for the same sort of setup, swing by his site for a detailed schematic as well as a bill of materials.

Continue reading “Aquarium Overflow Sensor Saves Your Fish And Your Floors”