The laser module shown cutting shapes out of a piece of cardboard that's lying on the CNC's work surface

Giant CNC Partners With Powerful Laser Diode

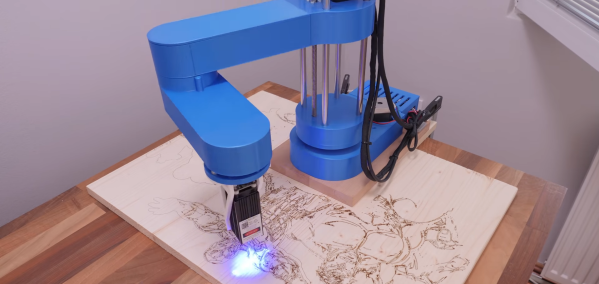
[Jeshua Lacock] from 3DTOPO owns a large-format CNC (4’x8′, or 1.2×2.4 m), that he strongly feels is lacking laser-cutting capabilities. The frame is there, and a 150 W CO2 laser tube has been sitting in a box for ages – what else could you need? Sadly, at such a scale, aligning the mirrors is a tough and finicky job – and misalignment can be literally blinding. After reading tales about cutters of such size going out of alignment when someone as much as walked nearby, he dropped the idea – and equipped the CNC head with a high-power laser diode module instead. Having done mirror adjustment on a few CO2 tube-equipped lasers, we can see where he’s coming from.

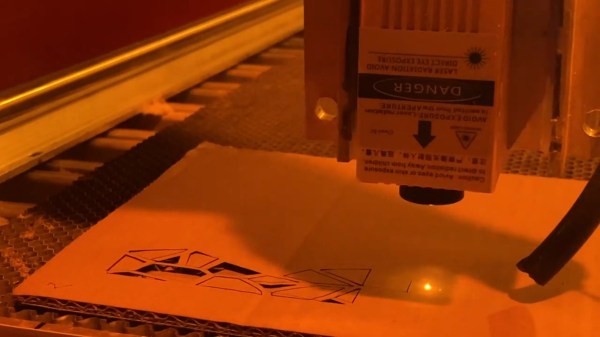
Typically, the laser modules you see bolted onto CNC heads are firmly under three watts, which is usually only enough for engraving. With a module that provides 5 watts of optical power, [Jeshua] can cut cardboard and thin plywood as well he tells us even 10 W optical power modules are available, just that he didn’t go for one. We reckon that 20 W effective power diodes are not that far into our future, which is getting very close to the potential of the blue box “40 W but actually 35 W but actually way less” K40 laser cutters we cherish. [Jeshua]’s cutter is not breaking speed limits, but it’s built on what’s already there, and the diode is comparatively inexpensive. Equipped with a small honeycomb surface and what seems to be air assist, it’s shown in the video cutting an ornamental piece out of cardboard!

We hackers have been equipping CNCs with laser diodes for a while, but on a way smaller scale and with less powerful diodes – this is definitely a step up! As a hacker, you should have at least some laser cutting options at your disposal, and this overview of CO2 cutters and their availability can get you started. We’ve also given you detailed breakdowns about different sides of laser cutting, be it the must-have of safety, or the nice-to-have of air assist.

Continue reading “Giant CNC Partners With Powerful Laser Diode”

A 3D-printed mini laser engraver made from DVD-RW drive motors.

Mini Laser Engraver Could Carve Out A Place On Your Desk

Got a couple of old DVD-RW drives lying around, just collecting dust? Of course you do. If not, you likely know where to find a pair so you can build this totally adorable and fully dangerous laser engraver for your desk. Check out the complete build video after the break.

[Smart Tronix] doesn’t just tell you to salvage the stepper motors out of the drives — they show you how it’s done and even take the time to explain in writing what stepper motors are and why you would want to use them in this project, which is a remix of [maggie_shah]’s design over on Thingiverse. As you might expect, the two steppers are wired up to an Arduino Uno through a CNC shield with a pair of A4988 motor drivers. These form the two axes of movement — the 250mW laser is attached to x, and the platform moves back and forth on the y axis. We’d love to have one of these to mess around with. Nothing that fits on that platform would be safe! Just don’t forget the proper laser blocking safety glasses!

Need something much bigger that won’t take up a lot of space? Roll up your sleeves and build a SCARA arm to hold your laser.

Continue reading “Mini Laser Engraver Could Carve Out A Place On Your Desk”

front view of a purple acrylic slide rule with white ink scale markings.

Design And Build Your Own Circular Slide Rule

You have to really like slide rules to build your own, including the necessary artwork. Apparently [Dylan Thinnes] is a big fan, based on this project he began working on a few months back. The result is a set of algorithms that automatically generates most of the scales that were common on slide rules back in the day. For example:

K       Cubic scale, x^3
A,B     Squared scale, x^2
C,D     Basic scale, x
CI,DI   Inverted scale, 1/x
CF,DF   Folded scale, x*pi
LLn     Log-log scales, e^a*x
LL0n    Log-log scales, e^-a*x
L       Log scale, log10(x), linear
S       Sine and cosines scale, sin(x)
T       Tangent scale, tan(x)

If you’ve ever tried to manually draw an axis using a computer program — attempting to automatically set reasonable tick marks, grids, and labels — you can appreciate that this is a non-trivial problem. [Dylan] tackled things from the bottom up, developing several utility functions that work in concert to iteratively build up each scale. One advantage of this approach, he says, is that you can quite easily build almost any scale you want. We’re going to take his word on that, because the project is not easily accessible to the average programmer. As [Dylan] notes:

At the moment it’s still a library w/ no documentation, and written in a relatively obscure language called Haskell, so it’s really only for the particularly determined.

The project is published on his GitHub repository, and sample scales and demo program are available. Without knowledge of obscure languages and being only mildly determined, one can at least generate some sample scales — just downloading the Haskell environment, a few dependencies, and clone [Dylan]’s repository. The output is an SVG file which can be scaled to any desired size. In this follow-up Reddit post he discusses the fabrication techniques used for the acrylic circular slide rule shown in the lead photo.

It’s always been possible to make your own slide rules using pre-generated artwork — for example, the Slide Rule Museum website has a slew of various scales available in graphic format. But if you want to make a custom scale, or make one of that’s meters long, check out [Dylan]’s project and give it a whirl. For another take on making slide rules, check out this project that we covered last year.

Small Footprint Scara Laser Engraver Has Massive Build Area

One of the limitations of the conventional Cartesian CNC platforms is that the working area will usually be smaller than its footprint. SCARA arms are one of the options to get around this, as demonstrated by [How To Mechatronics], with his SCARA laser engraver.

This robot arm is modified from the original build we featured a while back, which had a gripper mounted. It uses mainly standard 3D printer components with 3D printed frame parts. The arms lengths are sized to fold over the base and take up little table horizontal space when not in use. It can work in a large semi-circular area around itself, and if a proper locating and homing method is implemented, it can be moved around and engrave a large area section by section.

One of the challenges of SCARA arms is rigidity. As the cantilevered arm extends, it tends to lean over under its weight. In [How To Mechatronics]’s case, it showed up as skewed engravings, which he managed to mitigate to some degree in the Marlin firmware.

Another possible solution is to reduce the weight of the arms by moving the motors to the base, as was done with the Pybot or dual-arm SCARA printers like the RepRap Morgan.

Continue reading “Small Footprint Scara Laser Engraver Has Massive Build Area”

Hacking An Air Assist For The Ortur Laser

Getting great results from a laser cutter takes a bit of effort to make sure all of the settings are just right. But even then, if the air between the material and the laser source is full of smoke and debris it will interfere with the laser beam and throw off the results. The solution is to add air assist which continuously clears that area.

Earlier this year I bought an Ortur laser engraver/cutter and have been hacking on it to improve the stock capabilities. last month I talked about putting a board under the machine and making the laser move up and down easily. But I still didn’t have an air assist. Since then I found a great way to add it that will work for many laser cutter setups.

I didn’t design any of these modifications, but I did alter them to fit my particular circumstances. You can find my very simple modifications to other designs on Thingiverse. You’ll also find links to the original designs and you’ll need them for extra parts and instructions, too. It is great to be able to start with work from talented people and build on each other’s ideas.

Continue reading “Hacking An Air Assist For The Ortur Laser”

Hacking The Ortur Laser With Spoil Board, Z-Height, And Air Assist

Last month in my hands-on review of the Ortur Laser I hinted that I had done a few things to make it work a little better. I made three significant changes in particular: I anchored the machine to a spoil board with markings, I added a moving Z axis to adjust focus by moving the entire laser head, and I added an air assist.

Turns out, you can find designs for all of these things all over the Internet and I did, in fact, use other people’s designs. The problem is the designs often conflict with one another or don’t exactly work for your setup. So what I’ll tell you about is the combination that worked for me and what I had to do to get it all working together. The air assist is going to take a post all by itself, but some of the attempts at air assist led to some of the other changes I made, so we’ll talk about it some in this post, as well.

One of the modifications — the spoil board mount — I simply downloaded and the link for that is below. However, I modified the moving Z axis and air assist parts and you can find my very simple modifications on Thingiverse. You’ll also find links to the original designs and you’ll need them for extra parts and instructions, too.

Continue reading “Hacking The Ortur Laser With Spoil Board, Z-Height, And Air Assist”

Hands On With The Ortur Laser Cutter

I couldn’t write very much without a computer. Early in my career, I wrote with a typewriter. Unless you are pretty close to perfect — I’m not — it is very frustrating to make edits on typewritten stuff. The equivalent in the real world, for me, has been 3D printers and CNC machines. I can visualize a lot of things that I’m not careful enough to build with normal tools. Despite my 7th-grade shop teacher’s best efforts, everything I did turned out to be a toothpick or a number 7. But I can get my ideas into CAD and from there the machines do the rest. That’s why I was excited to get a laser cutter this past Christmas. You might wonder why I’d need a laser cutter if I have the other tools. Then again, if you read Hackaday, you probably don’t need me to explain why you need a new gadget. I’ve had my eye on a laser for a good long time, but recent developments made it more attractive. I thought I’d share with you some of what I’ve found getting started with the Ortur laser cutter. The cutter is easy to put together and costs somewhere in the $200-$400 range depending on what you get with it. I thought I’d take some time to share what I’ve learned about it.

Why a Laser?

If you haven’t had experience with a laser cutter or engraver before, you might think it is a very specific instrument. Sure, the Ortur is good at engraving some things (but not all things). It can cut some things, too, but not as many things as a big serious laser cutter. However, creative people find lots of ways to use cutting and engraving to produce things you might not expect.

Continue reading “Hands On With The Ortur Laser Cutter”