Homebrew Phase Laser Rangefinder

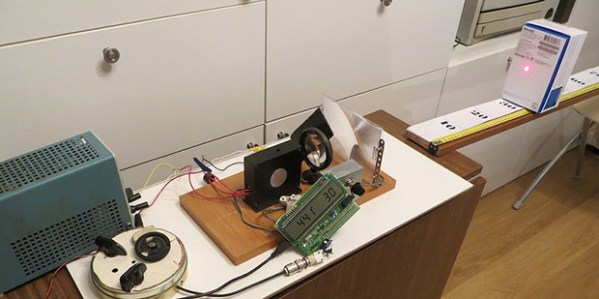
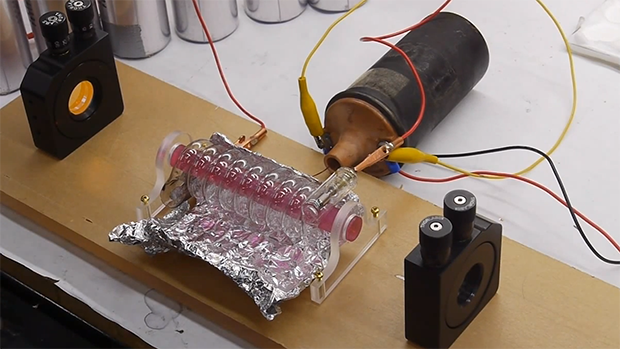
Just when you thought ARM micros couldn’t get any cooler, another project comes along to blow you away. [Ilia] created a phase laser rangefinder (.ru, Google translatitron) using nothing but a laser diode, a pair of magnifying glasses, a few components and an STM32F4 Discovery dev board.

The theory behind this build is using a laser’s phase to determine how far away an object is. By modulating the laser diode’s output at a few hundred Mhz, the reflection from the laser can be compared, giving a fairly reasonable estimate of how far away the target is. This method has a few drawbacks; once the reflection is more than 360 degrees out of phase, the distance ‘loops around’ to being right in front of the detector.

The laser diode used does not have any modulation, of course, but by using an STM32F4 ARM chip, [Ilia]was able to modulate the amplitude of the laser with the help of a driver board hacked out of a 74HC04 chip and a few resistors. Not ideal, but it works.

The receiver for the unit uses a photodiode feeding into the same microcontroller. With an impressive amount of DMA and PLL wizardry (the STM32F4 is really cool, you know), the phase of both the transmission and reflection can be compared, giving a distance measurement.

It’s all an impressive amount of work with a hacked together set of optics, a cheap dev board, and a few components just lying around. For any sort of application in a robot or sensor suite this project would fall apart. As a demonstration of the theory of phase laser rangefinding, though, its top notch.

You can check out a video of [Ilia]’s rangefinder below. Be sure to full screen it and check out the distance measurement on the LCD. It’s pretty impressive.

Thanks [Володимир] for the link.

Continue reading “Homebrew Phase Laser Rangefinder”

From Schematic To PCB In Four Hours

lpkf_metrix

Last super bowl Sunday, instead of checking the game, [Mattw] decided to extend a design and make a PCB of a trinket clone. [Mattw] altered a trinket clone design by [Morgan Penfield Redfield] to shrink it down, perforated the USB connector to allow for easy removal and put most of the parts on a single layer.

After finalizing the design, [Mattw] put it into the LPKF Protolaser S that Seattle’s Metrix Create Space has. For those of you who don’t know, the LPKF protolaser uses a laser to directly ablate off the copper from the boards.  This makes prototyping much faster without the need for a lot of nasty chemicals.

About six minutes in the Protolaser, some component placement by hand followed by a run through their reflow oven and [Mattw] had three boards ready to be tested. All told, about 4 hours from start to finish.

The end circuit looks great and the LPKF protolaser gives us a case of serious tool envy. If you’re like us and don’t have access to the fancy laser you might try our hand at this high-resolutino photo-etch process.

[via reddit]

Lazing With A Ruby

ruby

[Ben Krasnow], builder of amazingly complex and technical devices, is finally starting work on his ruby laser. He’s been collecting parts for this project for the past few years, but only recently has he started recreating the first visible light laser.

While the design and manufacture of the first ruby laser was astonishingly complex, the basic idea behind it is pretty simple. [Ben]’s laser uses a synthetic ruby rhod with the ends ground optically flat. This rod is placed inside a flash tube. When the flash tube lights up, the rod absorbs the light and re-emits it as a coherent beam for several milliseconds. This beam bounces between two mirrors – one fully reflective and another partially reflective – and emits a constant stream of coherent photons. It’s tremendously more complex than simply connecting a laser diode to a power source, but replicating a build that graced the covers of Time and Newsweek only fifty years ago is pretty impressive

Right now, [Ben] has most of the mechanical and optical parts of his ruby laser on his workbench. The next step is constructing a huge capacitor bank to charge the flash tube every millisecond or so. What [Ben] will end up using his laser for remains up in the air, but if we come across some erbium or neodymium rods we’ll be sure to send them his way.

Continue reading “Lazing With A Ruby”

Touching Conversations: Email Snippets Scroll By On Electro-Embroidery Piece

electroembroidery

[Wei Chieh Shih] really moves the needle when it comes to wearable technology. His textile design project entitled I Am Very Happy I Hope You Are Too is a striking marriage of masterful hand embroidery, delicate circuitry, and careful programming.

[Wei] is using an Arduino micro to drive a matrix of surface-mount LEDs in the Hello, World video, which is a ramp-up to the scrolling text version that’s in progress now finished. That full version is part of his residency project at Arquetopia in Oaxaca, Mexico and displays snippets of emails from his past relationships. It’s huge, with multiple matrices as large as 8×25 pixels!

No build notes could be found for this or any of [Wei]’s similar projects, like this awesomely dangerous 200 laser diode jacket or this eerily beautiful light installation on Taiwan’s north beach. Based on the pictures, our speculation is that he is using ordinary 6-strand embroidery floss to make stem or half cross-stitches on all the paths. He then runs very thin, flexible conductor underneath the channel of stitches and solders the wires to the component pads.

If [Wei] wants another way to wear his heart on his sleeve, he could investigate these dynamic LED clothing hacks.

Update: [Wei] has completed this project, and has more information available at his Behance site.

Continue reading “Touching Conversations: Email Snippets Scroll By On Electro-Embroidery Piece”

Attacknid Becomes Laser Death Drone

Laser Drone

[styroPyro] liked his Attacknid, but decided it needed just a bit more blue death ray laser. We’ve seen [styroPyro’s] high-powered laser hacks before, but this time he’s taken to hacking one of [Jaimie Mantzel’s] Attacknid robots. According to one of the top comments on [styroPyro’s] video—a comment by Attacknid inventor [Jaimie] himself—the robots were meant to be hacked, and [Jamie] is ecstatic.

[styropyro] removed the disk shooter from his Attacknid and used the fire control circuit to activate a 2 watt blue laser. A low powered, red laser pointer serves as a laser sight, allowing you to aim at your target before unleashing the beefy blue laser. As the video shows, 2 watts is a heck of a lot of power. The Attacknid easily pops balloons and sets fire to flash paper. As usual, we urge you to use caution when handling 2 watt lasers, which fall under Class 4: aka the most dangerous class of lasers. Goggles, skin protection, and safety interlocks are the order of the day. [styroPyro] has been working with high power lasers for a few years, and seems to know what he’s doing. That said, we’ll leave the burning lasers to the professionals.

Continue reading “Attacknid Becomes Laser Death Drone”

Raspi Mini Laser Engraver

If you’ve got a lot of spare parts lying around, you may be able to cobble together your own laser engraver without too much trouble. We’ve already seen small engraver builds that use an Arduino, but [Jeremy] tipped us off to [Xiang Zhai’s] version, which provides an in-depth guide to building one with a Raspberry Pi.

[Xiang] began by opening up two spare DVD writeable drives, salvaging not only their laser diodes but the stepper motors and their accompanying hardware, as well as a handful of small magnets near each diode. To assemble the laser, he sourced an inexpensive laser diode module from eBay and used a vise to push the diode into the head of the housing. With the laser snugly in place and the appropriate connecting wires soldered on, [Xiang] whipped up a laser driver circuit, which the Raspi will later control. [Xiang] worked out the stepper motors’ configuration by following [Groover’s] engraver build-(we featured it a few years back)-attaching the plate that holds the material to be engraved onto one axis and the laser assembly to the other.

Check out [Xiang’s] project blog for details explaining the h-bridge circuits as well as the Python code for the Raspi. As always, if you’re attempting any build involving a laser, please use all necessary precautions! And if you need more information on using DVD burners for their diodes, check out this hack from earlier in the summer