Before you zip to the comments to scream “not a hack,” watch a few minutes of this teardown video. This 48 minute detailed walkthrough of a one-off art piece shows every aspect of the project: every requirement, design decision, implementation challenge, and mistake. Some notable details:
PCBs that are 1 meter wide (all one piece!)
350,000 white LEDs
Carbon fiber enclosures
1-wire serial bus (like the WS2812 only not quite) with 12 bit resolution (TLC5973)
Customized cable test jigs, PCB test jigs, and test modes
An exploration on ESD issues in production
It’s not often that one sees teardowns of professional projects like this, and there’s quite a bit to learn from in here, besides it being a beautiful piece of art. See more about the Caviar House “Emergence” project at the Heathrow Airport, along with stunning pictures and video of the display in action.
If you’re thinking about how you’d control 350,000 individual LEDs with 12 bit grayscale and have it look smooth, check out the processor requirements behind the megascroller, which only handles 98,000 LEDs. More recently, we asked how many LEDs are too many, and the answer was quite a bit lower than 350k.
As much as we like addressable LEDs for their obedience, why do we always have to control everything? At least participants of the MusicMaker Hacklab, which was part of the Artefact Festival in February this year, have learned, that sometimes we should just sit down with our electronics and listen.
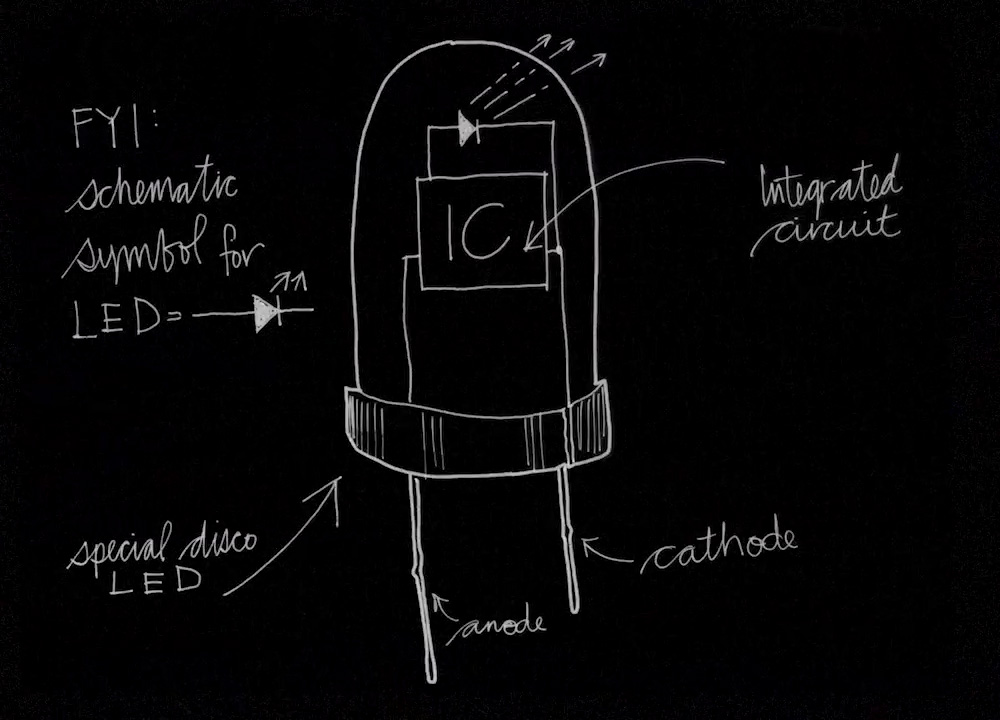
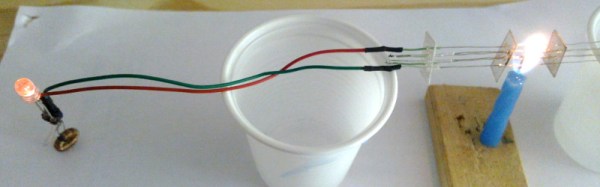
With the end of the Artefact Festival approaching, they still had this leftover color-changing LED from an otherwise scavenged toy reverb microphone. When powered by a 9 V battery, the LED would start a tiny light show, flashing, fading and mixing the very best out of its three primary colors. Acoustically, however, it spent most of its time in silent dignity.
As you may know, this kind of LED contains a tiny integrated circuit. This IC pulse-width-modulates the current through the light-emitting junctions in preprogrammed patterns, thus creating the colorful light effects.
To give the LED a voice, the participants added a 1 kΩ series resistor to the LED’s “anode”, which effectively translates variations in the current passing through the LED into measurable variations of voltage. This signal could then be fed into a small speaker or a mixing console. The LED expressed its gratitude for the life-changing modification by chanting its very own disco song.
This particular IC seems to operate at a switching frequency of about 1.1 kHz and the resulting square wave signal noticeably dominates the mix. However, not everything we hear there may be explained solely by the PWM. There are those rhythmic “thump” noises, shifts in pitch and amplitude of the sound and more to analyze and learn from. Not wanting to spoil your fun of making sense of the beeps and cracks (feel free to spoil as much as you want in the comments!), we just say enjoy the video and thanks to the people of the STUK Belgium for sharing their findings.
[Hans Peter] had reached the moment of popping the question. Going down on one knee and proposing to his girlfriend, the full romantic works.
He’s a brave man, [Hans]. For instead of heading for the jeweller’s and laying down his savings on something with a diamond the size of a quail’s egg he decided that his ring should contain something very much of him. So he decided to 3D print a ring and embed a slowly pulsing LED in it. He does mention that this ring is a temporary solution, so perhaps his soon-to-be-Mrs will receive something sparkly and expensive in due course.
To fit his LED and flasher in such a small space he used a PIC10F320 microcontroller that comes in a SOT-23-6 package. This was chosen because it has a handy PWM output to pulse the LED rather than flash it. This he assembled dead-bug style with an 0603 LED, and a couple of hearing aid batteries to power the unit. He has some concerns about how long the hearing aid batteries will power the device, so as he wrote he had better hurry and get on his knees. (He informs us in his tip email that she said yes.)
With the crazy extremes of light flux density that are possible these days, we’re putting quotation marks around “world’s brightest”, but it’s abundantly clear that this flashlight build is very much too bright. No, really. Why would you want a flashlight so bright that you have to wear sunglasses to look at anything that’s within a twenty foot radius?
Because you can. [Mads Nielsen] combined 18, one hundred Watt LED units with some giant machined heatsinks, fans to cool those heatsinks, lenses, and other hardware to make a device that turns electrons into photons at an alarming rate. Each chip-on-board LED package requires 32 Volts, and they’re pairwise in series so it’s a 64 V system. A boot converter pushes up the twelve LiPo battery packs up to the required voltage.
Even with the relatively high voltage, this thing sucks in 27 A, so the power supply is distributed among four of these boost converters. All of this means thick cables and a rather hefty power switch. When you’re designing something ridiculous, all of these little details come out of the woodwork. We’ve included part one of the four-part build video here, because they’re full of great detail. [Mads] has a lot more interesting LED-related info on his YouTube channel. You can watch the showing-off video on your own time.
When [Vance] joined his local hackspace he sought a project to take advantage of the new tools at his disposal. His solution: an attractive LED colour wheel clock using neopixels driven by an NTP-synchronised ESP8266. Each neopixel illuminates a segment of the clock face through frosted diffuser, the hours are tracked as a red light, the minutes blue, and the seconds green. As each color passes another they are mixed, creating a changing colorscape. 12 neopixels are used, and the whole clock is mounted in a laser cut enclosure.
After an initial prototype on a piece of stripboard he created a PCB in KiCad, complete with space for a 3.3v regulator. This and the source code can be found on the project’s GitHub repository.
The resulting clock is a very high quality build as well as being attractive and useful in its own right. The video shows the color mixing in action, or at least the cyan and yellow products of it. Continue reading “Neopixel Bedroom Clock Uses ESP8266”→
Pelican makes a great remote lighting system. Unfortunately, it’s the kind of great that comes with a “Request Quote” button instead of “Add to Cart”. It’s designed to be thrown in the back of a tank and guaranteed to work at the end of the day. [mep1811]’s system is not that system. It’s the store-in-a-Rubbermaid-tote and throw in the back of the family Honda kind of great, but it’s made from stuff you can buy anywhere.
The build is contained by a water resistant plastic box. Two sealed lead acids and a battery charger sit inside. The system is hooked together with simple car outlets — also known as the worst accidental electrical connector standard of all time. For the lights, [mep1811] simply made mounts for chinese LED spots and bought some inexpensive camera tripods. With a full charge, he says it runs for forty hours.
In the end it’s not a complicated hack, but its simplicity adds a certain amount of ruggedness, and it will definitely do the trick in a power outage.
If you have ever entertained yourself by reading comprehensive electronic-theory textbooks you’ll have seen references to technologies that sound really interesting but which you will rarely hold in your hand. They may be dead-ends that have been superseded by more recent innovations, or they may be technologies that have found uses but in other fields from those in which they originally showed promise. What if you could take these crazy parts and actually build something?
If you’ve used a thermocouple thermometer or a semiconductor thermoelectric generator then you’ll have encountered the thermoelectric effect. Perhaps you’ve even operated a Peltier cooling element in this mode. When a circuit is made with two junctions between different types of conductor with a temperature difference between the two junctions, a current will flow in the circuit which is dependent on both the scale of the temperature difference and the properties of the conductors.
A thermopile is a collection of these thermoelectric junction circuits between metal conductors, arranged in series to increase the voltage. [Fedetft]’s thermopile uses chromel and alumel wires taken from a K-type thermocouple. He’s made six sets of junctions, and supported them with small pieces of mica sheet. Using the heat from a candle he found he could generate about 200mV with it, at about 3.7mW.
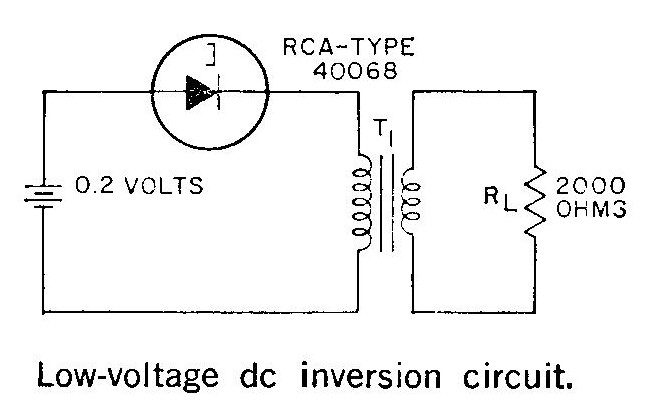
The RCA tunnel diode inverter circuit
Such a tiny source of electricity would be of little use to light an LED directly, so he needed to build an inverter. And that’s where the tunnel diode comes in. Tunnel diodes have a negative-resistance region that can be used to amplify and oscillate at extremely high frequencies in extremely simple circuits, yet they’re not exactly a device you’d encounter very often in 2016. [Fedetft] has a Russian tunnel diode, and he’s used it with a toroidal transformer in an inverter circuit he found in an RCA tunnel diode manual from 1963. It’s a two-component Joule Thief. The RCA manual is a good read in itself for those curious about tunnel diodes.
The resulting circuit produces a 15kHz oscillation with 4.5v peaks, and has just enough power to light an LED.
While it might seem pointless to barely light an LED from a brightly lit candle, the important part of [Fedetft]’s project is to gain some understanding of two of those technological backwaters from the textbooks. And we applaud that.