Home Brew Augmented Reality

In July of 2016 a game was released that quickly spread to every corner of the planet. Pokemon Go was an Augmented Reality game that used a smart phone’s GPS location and camera to place virtual creatures into the person’s real location. The game was praised for its creativity and was one of the most popular and profitable apps in 2016. It’s been download over 500 million times since.

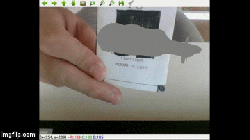
Most of its users were probably unaware that they were flirting with a new and upcoming technology called Augmented Reality. A few day ago, [floz] submitted to us a blog from a student who is clearly very aware of what this technology is and what it can do. So aware in fact that they made their own Augmented Reality system with Python and OpenCV.

In the first part of a multi-part series – the student (we don’t know their name) walks you through the basic structure of making a virtual object appear on a real world object through a camera. He 0r she gets into some fairly dense math, so you might want to wait until you have a spare hour or two before digging into this one.

Thanks to [floz] for the tip!

ESP8266 Home Monitor Is Stylishly Simplistic

It’s often said that “Less is More”, and we think that the chic ESP8266 environmental monitor posted by Thingiverse user [bkpsu] definitely fits the bill. Dubbed “Kube”, the device is a 3D printed white cube with an OLED display in the center, which [bkpsu] says was designed specifically for the approval of his wife. Weirdly, she didn’t like the look of bare PCBs on the wall.

Multiple Kubes allow for whole-house monitoring.

Inside, things are a little more complex. The Kube uses the NodeMCU development board, and a custom breakout that [bkpsu] designed to interface with the display and sensors. For temperature and humidity monitoring, the Kube is using the ever-popular DHT22, and [bkpsu] mentions that he has future plans for things like motion sensors and direct control of RGB LED strips. All the data collected by the Kube is piped into openHAB via MQTT.

On the very detailed Thingiverse page, [bkpsu] gives background information on his design goals for the project, tips for printing out a high-quality case, a parts list with Amazon links, and pinout information for getting it all wired up. The PCB is even available on OSH Park for those who want a Kube of their own.

Even with all the stick home monitoring and automation products on the market today, many hackers simply can’t bring themselves to buying a turn-key commercial product. But we think with the results hackers have been getting rolling their own solutions, they just might be on to something.

Distributed Air Quality Monitoring Via Taxi Fleet

When [James] moved to Lima, Peru, he brought his jogging habit with him. His morning jaunts to the coast involve crossing a few busy streets that are often occupied by old, smoke-belching diesel trucks. [James] noticed that his throat would tickle a bit when he got back home. A recent study linking air pollution to dementia risk made him wonder how cities could monitor air quality on a street-by-street basis, rather than relying on a few scattered stations. Lima has a lot of taxis, so why wire them up with sensors and monitor the air quality in real-time?

This taxi data logger’s chief purpose is collect airborne particulate counts and illustrate the pollution level with a Google Maps overlay. [James] used a light-scattering particle sensor and a Raspi 3 to send the data to the cloud via Android Things. Since the Pi only has one native UART, [James] used it for the particle sensor and connected the data-heavy GPS module through an FTDI serial adapter. There’s also a GPS to locate the cab and a temperature/humidity/pressure sensor to get a fuller environmental picture.

Take a ride past the break to go on the walk through, and stick around for the testing video if you want to drive around Lima for a bit. Interested in monitoring your own personal air quality? Here’s a DIY version that uses a dust sensor.

Continue reading “Distributed Air Quality Monitoring Via Taxi Fleet”

Acetone Smoothing Results In Working Motor

Here’s something only ’90s kids will remember. In 1998, the Air Hogs Sky Shark, a free-flying model airplane powered by compressed air was released. This plane featured foam stabilizers, wings, a molded fuselage that served as a reservoir, and a novel engine powered by compressed air. The complete Sky Shark setup included an air pump. All you had to do was plug the plane into the pump, try to break the pressure gauge, and let the plane fly off into a tree or a neighbor’s rooftop. It’s still a relatively interesting mechanism, and although we’re not going to see compressed air drones anytime soon it’s still a cool toy.

Since [Tom Stanton] is working at the intersection of small-scale aeronautics and 3D printing, he thought he would take a swing at building his own 3D printed air motor. This is an interesting challenge — the engine needs to be air-tight, and it needs to produce some sort of usable power. Is a standard printer up to the task? Somewhat surprisingly, yes.

The design of [Tom]’s motor is more or less the same as what is found in the Air Hogs motor from twenty years ago. A piston is attached to a crank, which is attached to a flywheel, in this case a propeller. Above the cylinder, a ball valve keeps the air from rushing in. A spring is mounted to the top of the piston which pushes the ball out of the way, allowing air into the cylinder. At the bottom of the stroke, the ball closes the valve and air escapes out of the bottom of the cylinder. Simple stuff, really, but can it be printed?

Instead of the usual printer [Tom] uses for his builds, he pulled out an old delta slightly modified for higher quality prints. Really, this is just a 0.2 mm nozzle and a few tweaks to the print settings, but the air motor [Tom] designed came out pretty well and was smoothed to a fine finish with acetone.

After assembling the motor, [Tom] hooked it up to a soda bottle serving as a compressed air reservoir. The motor worked, although it’s doubtful a plane powered with this motor would fly for very long. You can check out [Tom]’s video below.

Continue reading “Acetone Smoothing Results In Working Motor”

Can Commodity RC Controllers Stay Relevant?

Visualize some radio controlled airplane fanatic of yesteryear, with the requisite giant controller hanging from a strap, neck craned to see the buzzing dot silhouetted against the sky. It’s kind of a stereotype, isn’t it? Those big transmitters were heavy, expensive, and hard to modify, but that was just part of the challenge. Additionally, the form factor has to a degree remained rigid: the box with gimbals — or for the 3-channel controller, the pistol-grip with the big pot that looks like a cheesy race car wheel.

With so much changing in RC capabilities, and the rise of custom electronics across so many different applications, can commodity RC controllers stay relevant? We’re facing an age where the people who invest most heavily in RC equipment are also the ones most likely to want, and know how to work with customization for their rapidly evolving gear. It only makes sense that someone will rise up to satisfy that need.

Continue reading “Can Commodity RC Controllers Stay Relevant?”

An Interview With Alex Williams, Grand Prize Winner

Alex Williams pulled off an incredible engineering project. He developed an Autonomous Underwater Vehicle (AUV) which uses a buoyancy engine rather than propellers as its propulsion mechanism and made the entire project Open Source and Open Hardware.

The design aims to make extended duration missions a possibility by using very little power to move the vessel. What’s as remarkable as the project itself is that Alex made a goal for himself to document the project to the level that it is fully reproducible. His success in both of these areas is what makes the Open Source Underwater Glider the perfect Grand Prize winner for the 2017 Hackaday Prize.

We got to sit down with Alex the morning after he won to talk about the project and the path he took to get here.

Continue reading “An Interview With Alex Williams, Grand Prize Winner”

The King Of All Game Genies In An Arduino

While Nintendo is making a killing on nostalgic old consoles, there is a small but dedicated group of hackers still working with the original equipment. Since the original NES was rolled out in the 80s, though, there are a few shortcomings with the technology. Now, though, we have Arduinos, cheap memory, and interesting toolchains. What can we do with this? Absolutely anything we want, like playing modern video games on this antiquated system. [uXe] added dual-port memory to his ancient NES console, opening up the door to using the NES as a sort of video terminal for an Arduino. Of course, this is now also the King of All Game Genies and an interesting weekend project to boot.

Most NES cartridges have two bits of memory, the PRG and CHR ROMs. [uXe] is breaking out the cartridge connector onto an exceptionally wide rainbow ribbon cable, and bringing it into a custom Arduino Mega shield loaded up with two 16K dual-port RAM chips. These RAM chips effectively replace the PRG and CHR ROMs Since these are dual-port RAM chips, they can be written to by the Arduino and read by the NES simultaneously.

The NES sees one port of the RAM and can read and write from it while the Arduino still has access to make changes to the other post while that’s happening. A trick like this opens up a whole world of possibilities, most obviously with tiling and other graphics tricks that can push beyond the console’s original capabilities. [uXe] is currently playing Arduboy games on the NES — a really neat trick to pull off. Well done [uXe]!

Be sure to check out the video below of the NES running some games from the Arduboy system. It seems to integrate seamlessly into the hardware, so if you’ve always had a burning desire to fix crappy graphics on some of your favorite games, or run some special piece of software on an NES, now might just be your time to shine.

Continue reading “The King Of All Game Genies In An Arduino”