Fail Of The Week: Hair Dryer As Light Switch

Home electrical, it’s really not that hard. But when you’re dealing with the puzzles left for your by someone else things can get really weird. [Daniel’s] sister and her husband ran into this recently. The video demonstration of their fail includes a lot of premature laughter, but it’s worth hanging in there… you’ll quickly see why she can’t contain her amusement.

The project at hand is a replacing a bathroom fan with a simple light fixture. Once the swap was made the light switch works just as anticipated. But a second switch which used to control a different light now behaves strangely. It doesn’t activate the original light, but instead switches the new fixture. Even stranger is that the original switch apparently now acts as a bizarre dimmer when the second switch is on. That’s odd, but the coup d’état of the fail is when they plug in a hair dryer and switching it on illuminates the light but doesn’t activate the hair dryer.

As with all Fail of the Week segments, the goal here is not to criticize but to commiserate. What do you think is causing this? We can’t wait to see what you come up with. Posting simple diagrams is encouraged (you can use HTML img tags in the comments). Ladies and gentlemen, start your conjecture.

Continue reading “Fail Of The Week: Hair Dryer As Light Switch”

Dremel Light Ring

Light Ring Allows Precise Dremeling

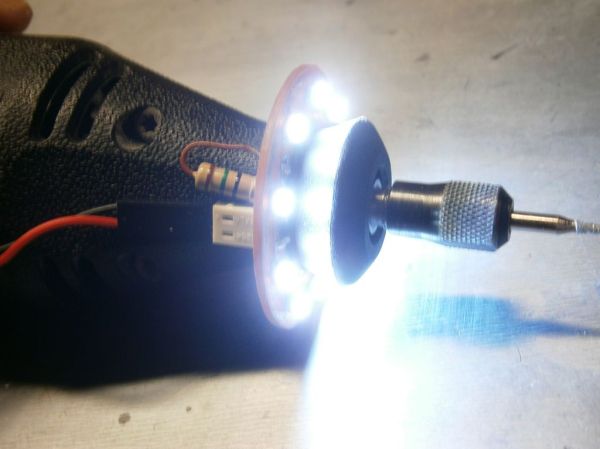
Whether you are working at home, in the office or in the shop, proper lighting is pretty important. Not having proper lighting is a contributor to fatigue and visual discomforts. Prolonged straining of the eyes can result in headaches, eye twitching, blurred vision and even neck pain. [pinomelean] likes to make chemically etched PCB boards and he was having a hard time seeing while drilling those boards for the through-hole components. So, he did what any good hacker would do and came up with a solution: a light ring for his Dremel.

Yes, [pinomelean] does prefer to drill his PCB holes by hand with a Dremel. Since he was already a competent PCB board maker, he decided that it would be an appropriate method to make a light ring. The light ring itself is round with a center hole just over 0.750″ in diameter. This hole slides over the 3/4-12 threaded end that most Dremels have for attaching accessories. The stock Dremel decorative  ‘nut’ secures the light ring PCB to the tool. There are pads for 9 surface mount LEDs and through holes for a current-limiting resistor and pins to connect a power supply, which in this case is an old phone charger. In the end the project worked out great and [pinomelean] can clearly see where those holes are being drilled!

If you’re interested in making one of these light rings, [pinomelean] graciously made his board layout available in his Instructable. If you think one would go well with a soldering iron, check this out.

Mood Lighting With LEDs And An Arduino

Regular candles can be awfully boring at times. They can only produce one color and the flicker is so… predictable. They can’t even be controlled by an infrared remote control, not to mention the obvious fire hazard. Now, however, [Jose] has come up with an LED candle that solves all of these problems. (Original link to the project in Spanish.)

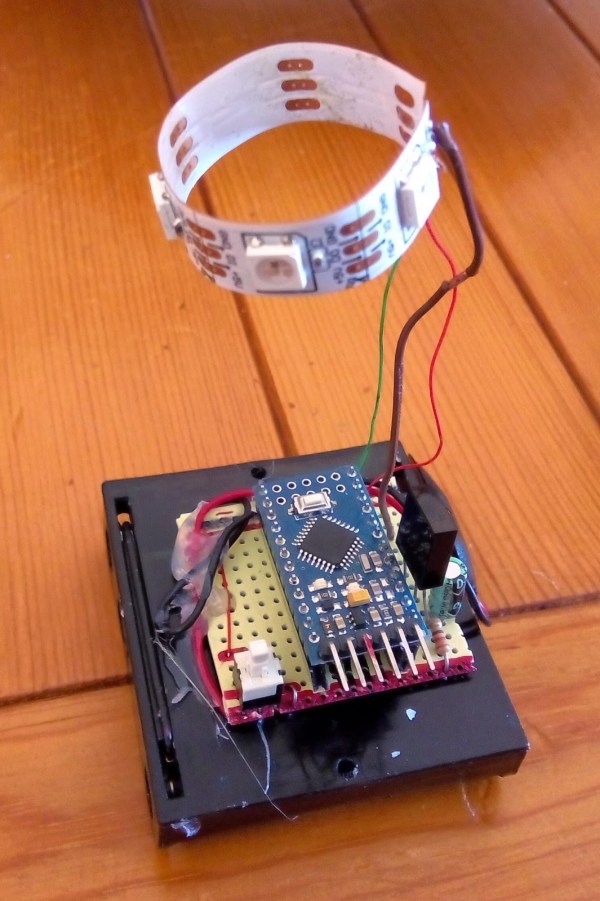
The heart of the project is an Arduino Pro Mini, which is especially suited for this project because of its size. [Jose] put the small form-factor microcontroller in the base of a homemade wax enclosure and wired it to a Neopixel WS2812b LED strip. The strip can produce any color, and has some programmed patterns including flicker, fade, rainbow, and fire.

The artificial candle is controlled with an infrared remote control, and all of the code for the project is available on the project site if you want to build your own. [Jose] has been featured here before for his innovative Arduino-driven RGB lighting projects, and this is another great project which builds on that theme!


The $50 DMX Tester

DMX

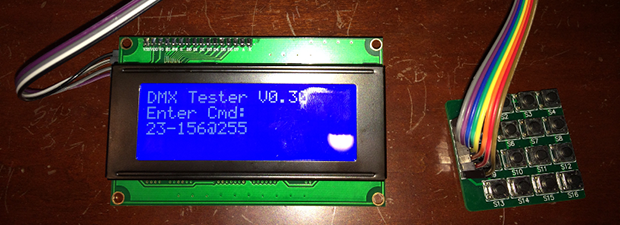
Despite being around for about as long as MIDI, DMX, the industry standard for controlling stage lighting and smoke machines, is still an astonishing expensive protocol to work with. Where MIDI can be banged out with a simple microcontroller – with odd bit rate requirements, no less, DMX testers cost hundreds of dollars. Of course this means the market is wide open for a DIY DMX tester, and over on the projects site [Tony] has just the thing.

For the hardware, [Tony] is using few 4×4 matrix keypads for user input, and a character LCD for the display. With this, he can set any of the 512 lighting channels in a DMX setup to any one of the 256 intensity values. Setting a range of channels to any intensity is a snap, with an extremely cut down command protocol. All the processing is handled by an Arduino, which seems more than capable of handling the DMX protocol thanks to the Conceptionetics DMX library.

While it’s not a full-blown lighting console you’d find in the back of a theatre, it’s more than sufficient to test a lighting rig. It also seems pretty simple to use, just the thing if you’re trying to wrap your brain around some theatrical lighting.

Autonomous Lighting With Intelligence

myra_light_01_29

Getting into home automation usually starts with lighting, like hacking your lights to automatically turn on when motion is detected, timer controls, or even tying everything into an app on your smart phone. [Ken] took things to a completely different level, by giving his lighting intelligence.

The system is called ‘Myra’, and it works by detecting what you’re doing in the room, and based on this, robotic lights will optimally adjust to the activity. For example, if you’re walking through the room, the system will attempt to illuminate your path as you walk. Other activities are detected as well, like reading a book, watching TV, or just standing still.

At the heart of the ‘Myra’ system is an RGBD Sensor (Microsoft Kinect/Asus Xtion). The space in the room is processed by a PC running an application to determine the current ‘activity’. Wireless robotic lights are strategically placed around the room; each with a 2-servo system and standalone Arduino. The PC sends out commands to each light with an angle for the two axis and the intensity of the light. The lights receive this command wirelessly via a 315MHz receiver, and the Arduino then ‘aims’ the beam according to the command.

This isn’t the first time we’ve seen [Ken’s] work; a couple of years ago we saw his extremely unique ‘real life’ weather display.  The ‘Myra’ system is still a work in progress, so we can’t wait to see how it all ends up.  Be sure to check out the video after the break for a demo of the system.

Continue reading “Autonomous Lighting With Intelligence”

TP-Link Router Turned Into A DALI Automated Lighting Controller

dali-control-in-tplink-router

The members of Shackspace continue to put up impressive hacks based around the tiny TP-Link routers. This time around [Timm] has shoehorned a DALI controller inside the router case. This is a protocol we don’t remember hearing about before. The Digital Addressable Lighting Interface is a control network for commercial lighting. That way people responsible for taking care of large buildings can shut off all the lights at night (to name just one use). The new room at Shackspace has this style of controllers in its lights.

The two brown wires coming into the router make up the data bus for the DALI system. It connects to the add-on PCB which uses an Atmel AT90PWM316 microcontroller. The chip is specifically designed for DALI networks which made the rest of the project quite easy. It talks to the lights, the router talks to it, bob’s your uncle, and you’ve got network controlled lighting. Get this in a big enough building and you can play some Tetris.

In case you were wondering. Yes, this project has already been added to their TP-Link firmware generator.

Fiber Optic Chandelier With Wireless Controls

After seeing a cool fiberoptic chandelier on Ebay for over $1,000, [Apex Logic] figured he could build one himself that would not only be cheaper, but have more features. Some of the features he was after were for it to be wirelessly controlled, have the ability for full RGB control, and of course to have a custom look. He pulled it off quite nicely as you can see in the video below. He has a wireless controller with 3 sliders representing RGB that you can catch a glimpse of in the second video below.

His page with the build details and the code seems to have suffered some ill fate this morning. Here it is, for when it returns.

[via Adafruit]

Continue reading “Fiber Optic Chandelier With Wireless Controls”