The Raspi GameBoy For The Rest Of Us

We’ve seen quite a few casemods that stuff a Raspberry Pi into a Game Boy with all the required to turn it into a very cool portable Pi and retro gaming device. Most of these builds use a modified 20-year-old Game Boy for the enclosure, and if you have an attachment to your old green screened friend, you might not want to cut it up for a Pi project. [Noe] over at Adafruit has a solution – a 3D printed Game Boy enclosure that turns a Pi and TFT screen into a barely pocketable Raspberry Pi, with all the buttons and batteries required for taking an installation of RetroPi on the road.

The PiGRRL, as this build is called, uses the Adafruit touchscreen TFT kit for the Pi, effectively turning the Pi into a very tiny tablet. This allows for normal desktop interaction with the Pi, and it’s also small enough to fit in the smallest of enclosures.

The 3D printed enclosure is the star of the show here, allowing complete access to most of the Pi’s ports, while allowing enough space in the rest of the enclosure for a largish battery, charging circuit, and buttons taken from an SNES controller.

The end result is a very usable portable Pi that just happens to be in the perfect form factor for loading up a few ROMs and playing some classic video games. Video below.

Continue reading “The Raspi GameBoy For The Rest Of Us”

Hackaday Links: June 15, 2014

hackaday-links-chain

Love the classic brick Game Boy, but hate the low-contrast LCD, terrible battery life, and the inability to play Pokemon Emerald? This one’s just for you. It’s the ultimate DMG Game Boy – a Game Boy Advance SP stuffed (is it stuffed if it’s taking up more room?) into the classic Game Boy enclosure. Forum thread.

Zooming in to a microchip. It starts off with a DSLR and ends up on a scanning electron microscope. This is an older chip, and the CPU you’re using right now probably has much smaller features.

Every movie and every TV show set in space invariably has space helmets with LEDs pointing towards the face. Think how annoying that would be for an astronaut. Here’s how you add LEDs to a space helmet for a nice theatrical effect. Just don’t use it on a real EVA.

Everyone’s favorite crowdfunded space probe can apparently be detected with an 8-foot dish. That’s the same size as an old C-band dish, a.k.a West Virginia wildflowers. We know some of you have one of these out there, so go make a ~2GHz feed horn, grab a USB TV dongle, write it up, and send it in.

Alright, MAME cabinets. Say you want to go old-school and have a CRT. Some arcade games use a vertically oriented display, while other, slightly more modern games use a horizontally mounted display. How do you fix this? Get a big bearing, of course. This one allows a 19″ CRT to be rotated 90 degrees – all you need, really, if you’re switching between Pacman and Mortal Kombat.

Hey mechanical keyboard enthusiasts! Here’s some Hackaday Cherry MX keycaps. Informal interest check in the comments below. Suggestions welcome.

Digital Pinball With Force Feedback

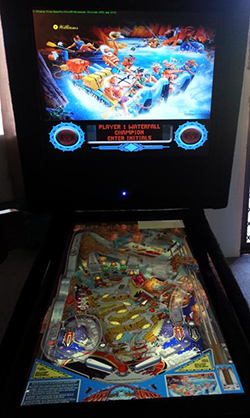
pinball Hang around Hackaday long enough and you’ll hear about MAME, and all the other ways to emulate vintage arcade machines on a computer. The builds are usually fantastic, with real arcade buttons, MDF cabinets, and side graphics with just the right retro flair to make any connoisseur of ancient video games happy. MAME is only emulating old video games, though, and not physical systems like the digital pinball system [ronnied] put up on the Projects site.
[ronnied] was inspired by a real life, full-size White Water pinball machine at his previous job, and decided it was high time for him to acquire – somehow – a pinball machine of his own. He had a spare computer sitting around, an old 16:9 monitor for the main playfield, and was donated a smaller 4:3 monitor for the backglass. With an MDF cabinet, PinMAME, and a little bit of work, [ronnied] had his own machine capable of recreating hundreds of classic machines.

The build didn’t stop at just a few arcade buttons and a screen; [ronnied] added a 3-axis accelerometer for a tilt mechanism, solenoids and a plunger torn from a real pinball machine for a more realistic interface, and a Williams knocker for a very loud bit of haptic feedback. We’ve seen solenoids, buzzers, and knockers in pinball emulators before, and the vibrations and buzzing that comes with these electromechanical add ons make all the difference; without them, it’s pretty much the same as playing a pinball emulator on a computer. With them, it’s pretty easy to convince yourself you’re playing a real machine.

Videos of the mechanisms below.

Continue reading “Digital Pinball With Force Feedback”

Mini Ms. Pacman

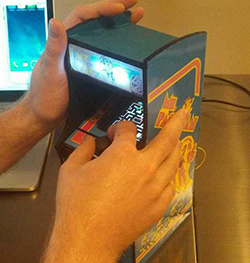
MsThe bragging rights of owning a vintage arcade machine are awesome, but the practicality of it – restoring what is likely a very abused machine, and the sheer physical space one requires – doesn’t appeal to a lot of people. [Jason] has a much better solution to anyone who wants a vintage arcade machine, but doesn’t want the buyer’s remorse that comes with the phrase, “now where do we put it?” It’s a miniaturized Ms. Pacman, mostly scale in every detail.

The cabinet is constructed out of 1/8″ plywood, decorated with printed out graphics properly scaled down from the full-size machine. Inside is a BeagleBone Black with a 4.3″ touchscreen, USB speakers, and a battery-backed power supply.

The control system is rather interesting. Although [Jason] is using an analog joystick, the resistive touch screen monopolizes the ADC on the BeagleBone. The solution to this problem would be to write a driver, or if you’re [Jason], crack the joystick open and scratch away the resistive contact until you have a digital joystick. A nice solution, considering Ms. Pacman doesn’t use an analog joystick anyway.

Pictures over on [Jason]’s G+ page, along with a vertical video that G+ displays properly. Thanks, Google.

Hackaday Links: November 3, 2013

hackaday-links-chain

[Michael] just missed the deadline for the Trinket Contest but we still think his tablet is pretty cool. He says it predates the iPad and uses a custom aluminum case, a SoC he ripped from a Gecko Edubook, powered by eight NiMH batteries. Check out the front, the guts, and the sides.

Speaking of portable power sources, After doing a teardown of a 12V 6800 mAh Li-Po battery [Howard] strapped some prototyping equipment to either side of it and now he’s got a prototyping power supply that’s easy to take with him.

Blinky goodness doesn’t have to look hacked together (even if it is). This Raspberry Pi logo looks like a professional sign! It was cut from foam and plastic, primed and painted, then stuffed with addressable LED strips.

While we’re on the topic of refined RPi projects, check out this Raspberry Pi MAME cabinet. It’s a bit bigger than the Galaga cabinet we saw recently but still small enough to keep around the house without getting in the way.

If you’re a fan of automotive hacks you should check out this effort to build an Electronic Diesel Control.

We’ve been saving the gnarliest link for last. [Matthew] laments that his missed Halloween to show off this project. But we don’t think an almost-entirely wooden spider-like walker needs to be paired with a holiday. It’s very cool and somewhat operational, but still needs help working out all of the kinks. Our favorite moment in the video is when [Matthew] exclaims “It wants to live!”.

Hackaday Links: October 20, 2013

hackaday-links-chain

Winter is coming. We’ve see those gloves in stores made specifically to work with your smartphone. [hardsoftlucid] isn’t buying it. He made his own version using… well, you just have to see it.

Here’s an eBookmark for a real book. What? Well, you know how an eReader does a great job of keeping your place between reading sessions? This is an electronic bookmark for paper books which uses LEDs to show you where you last left off reading. [via Adafruit]

[Thomas Brittain] wrote in to share his BLE Module and Pulse sensor updates. Both were featured in a recent Fail of the Week column and the latest iteration takes them from fail to functioning!

You may be able to get a free XMOS xCORE starter kit. The company is giving away 2500 of them. [Thanks Tony]

After learning about custom labels for microcontroller pinouts from [John Meachum] we’re happy to get one more helpful tip: a breadboard trench is a great place to hide axial decoupling capacitors.

A bit of cutting, solder, and configuring lets you turn a simple gamepad into a 4-controller interface for MAME.

Many of the Hackaday Staff are into Minecraft (between Let’s Play videos, running servers, and building computers in-game it’s a wonder we get anything done around here). We restrained ourselves by not making this video of a Restone circuit Blender animation on your desktop into a full front page feature. [via Reddit]


Hacking Coin Collection

Coin Acceptor

Devices that collect coins for payment typically use standardized coin acceptors like the one shown here. These devices use a protocol called ccTalk to let the system know what coins were inserted. [Balda] has built tools for implementing the ccTalk protocol to let you play around with the devices. He also gave a talk at DEF CON (PDF) about the protocol.

[Balda] got started with ccTalk because he wanted to add a coin acceptor to a MAME cabinet, and had a coin acceptor. His latest project converts ccTalk to standard keyboard keystrokes using a Teensy. The MAME cabinet can then interpret these and add to the player’s credits.

There’s two interesting sides to this project. By providing tools to work with ccTalk, it’s much easier to take a used coin acceptor off eBay and integrate it into your own projects. On the other hand, these acceptors are used everywhere, and the tools could allow you to spoof coins, or even change settings on the acceptor.