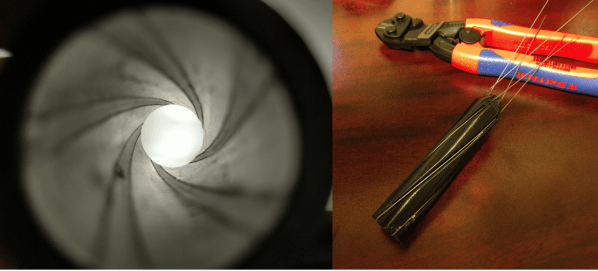
Hackaday Links: July 3, 2016

This week, Popular Mechanics published cutaway diagrams of ships that will be seen in Star Trek: Beyond, released later this month. This is your cue for spoilers for the remainder of this paragraph. The USS Franklin looks suspiciously like – and was likely built after – the NX-01, the titular ship of Star Trek: Enterprise. The Abrams-verse Franklin was the first Warp 4 ship, yet the prime universe NX-01 was the first Warp 5 ship, with previous ships having trouble reaching Warp 2. We must now consider the Abrams-verse Trek is not a parallel universe to prime-universe Trek and should therefore be considered a completely separate canon (yes, even the destruction of Vulcan. If you see the new Star Trek movie, the NX-01 launched in 2151, and your suggested viewing beforehand is ST:ENT, S02E24, First Flight.

The Mechaduino is a Hackaday Prize entry that turns steppers into closed-loop servos. It’s a phenomenal idea, and now it’s a Kickstarter.

Walk into a dollar store, and you’ll find stupid solar powered electronic flower pots. They’re bits of plastic that shake a plastic flower back and forth when placed in the sun. They’re selling millions, and I have no idea why. [Scott] put a jolly wrencher on one of these flower pots. Really, this is just an exercise in 3D printing, but [Scott] printed the jolly wrencher. We don’t see a lot of that, due to how difficult it is to render the wrencher in OpenSCAD.

In just a few hours, Juno will perform an insertion burn around Jupiter. Does this mean pretty pictures? Not quite yet. This is the closest a spacecraft has ever gotten to Jupiter, and over thirty or forty orbits, Juno will fly between Jupiter’s massive radiation belts. Here’s the NASA trailer.

This video recently caught the Internet’s attention. It’s squares and circles that when put next to a mirror look like circles and squares. Yes, it’s weird. People have 3D printers, so of course these ambiguous objects were quickly reverse engineered and printed. Here’s how they work

It looks like Brexit has caught up to Mouser. Here’s their country select dialog for eu.mouser.com. Thanks [Tom] for the screencap.

ImplicitCAD: Programmatic CAD Built With 3D Printing In Mind

Cornerstone of many useful things: This Prusa i3 part was modeled in OpenSCAD.

Programmatic CAD, in particular the OpenSCAD language and IDE, has accompanied the maker movement for a while now. After its introduction in 2009, it quickly found its way into the 3D printing toolbox of many makers and eventually became what could be called an Industry Standard among open hardware labs, makerspaces and tinkerers. The Prusa i3, one of the most popular DIY 3D printers, was designed in OpenSCAD, and even Makerbot, the company that sold 100.000 3D printers, uses the language for its “Customizer” – an online tool that allows users to customize 3D printable models with minimal effort.

OpenSCAD is indeed a wonderful tool, and we have been using it a lot. We have become used to its quirks and accepted working with polygon mesh approximations of the models we are trying to design. We have made our peace with excessive rendering times, scripting workarounds and the pain of creating fillets, and we have learned to keep our aesthetic expectations low. We are happy with the fact that there is a way to programmatically create and share virtually any object, but sometimes we wish there was a better way in the open source world. Hint: there is.

Continue reading “ImplicitCAD: Programmatic CAD Built With 3D Printing In Mind”

Using Photogrammetry To Design 3D Printed Parts

[Stefan] is building a fixed wing drone, and with that comes the need for special mounts and adapters for a GoPro. The usual way of creating an adapter is pulling out a ruler, caliper, measuring everything, making a 3D model, and sending it off to a 3D printer. Instead of doing things the usual way, [Stefan] is using photogrammetric 3D reconstruction to build a camera adapter that fits perfectly in his plane and holds a camera securely.

ScanPhotogrammetry requires taking a few dozen pictures with a camera, using software to turn these 2D images into a 3D model, and building the new part from that model. The software [Stefan] is using is Pix4D, a piece of software that is coincidentally used to create large-scale 3D models from drone footage.

With the 2D images turned into a 3D model, [Stefan] imported the .obj file into MeshLab where the model could be cropped, smoothed, and the file size reduced. From there, creating the adapter was as simple as a little bit of OpenSCAD and sending the adapter model off to a 3D printer.

Just last week we saw photogrammetry used in another 3D object scanner. The results from both of these projects show real promise for modeling, especially with objects that are difficult to measure by hand.

Making Parametric Models In Fusion 360

We all know and love OpenSCAD for its sweet sweet parametrical goodness. However, it’s possible to get some of that same goodness out of Fusion 360. To do this we will be making a mathematical model of our object and then we’ll change variables to get different geometry. It’s simpler than it sounds.

Even if you don’t use Fusion 360 it’s good to have an idea of how different design tools work. This is web-based 3D Modeling software produced by Autodesk. One of the nice features is that it lets me share my models with others. I’ll do that in just a minute as I walk you through modeling a simple object. Another way to describe what we’re going to learn is: How to think when modeling in Fusion 360.

Continue reading “Making Parametric Models In Fusion 360”

We Didn’t Know The Sun Could Do Digital

You don’t get much more old school than a sundial, and more new school than 3D printing. So, it is nice to see these two combined in this impressive project: the 3D printed digital sundial. We have seen a few sundial projects before, ranging from LED variants to 3D printed ones, but this one from [Julldozer] takes it to a new level.

In the video, he carefully explains how he designed the sundial. Rather than simply create it as a static 3D model, he used OpenSCAD to build it algorithmically, using the program to create the matrix for each of the numbers he wanted the sundial to show, then to combine these at the appropriate angle into a single, 3D printable model. He has open-sourced the project, releasing the OpenSCAD script for anyone who wants to tinker or build their own. It is an extremely impressive project, and there is more to come: this is the first in a new podcast series called Mojoptix from [Julldozer] that will cover similar projects. We will definitely be keeping an eye on this series.

Continue reading “We Didn’t Know The Sun Could Do Digital”

Fitting 3D Prints On Eagle Boards

One of the hardest things you’ll ever do is mesh your electronic design with a mechanical design. Getting holes for switches in the right place is a pain, and if you do it enough, you’ll realize the beauty of panel mount jacks. This is especially true when using Eagle to design a PCB, but with a few tricks, it’s possible to build 3D printable pieces directly from Eagle designs.

[Tyler] built a clock with a bunch of LEDs. While the clock worked great, there was a lot of light leakage around the segments of his custom seven-segment numbers. The solution is a light mask, and [Tyler] figured out how to make one in Eagle.

The first step is to draw a new layer on the Eagle board that defines the light mask. This is exported as an EPS file in the CAM processor that gives him a 2D drawing. At least it’s to scale.

The next step is to install Inkscape and install paths2openscad. This turns the two-dimensional drawing into a 2D object that can be rendered in OpenSCAD and exported as a 3D printable STL file.

Does the project work? The results are great – the entire light mask is a single-wall print, and since this light mask doesn’t need any mechanical strength, it should hold up well. The clock looks much better than before, and [Tyler] has a new technique for making 3D objects for his 2D PCBs.

BlocksCAD Is Browser-Based 3D Modeling That Teaches You CAD

Considering all of the projects the Raspberry Pi is used for now, the fact that it was originally envisioned to be an educational tool is sometimes forgotten. One of the tools commonly available with it is Scratch, a programming language that is easy to learn and can be seen as a gateway into other computer science realms. Building on this principle, MIT has come up with a new block-based educational tool called BlocksCAD.

BlocksCAD is essentially Scratch combined with OpenSCAD and allows the user to use blocks (similar to Scratch) to build a 3D model. The interface is fairly intuitive, and with some practice even complex shapes can be created using the tools available. Also, everything runs in a browser like the 3D modeling tool we featured a few days ago, so there isn’t anything to download or install.

The key to this project (like the key to Scratch) is that the user isn’t bogged down by syntax, which is often one of the largest hurdles for anyone who is just starting to learn to program. Since it’s possible to avoid syntax but still develop 3D models, this new tool should help anyone interested in the field of 3D modeling or CAD get a start without getting scared away too easily. Of course, if you do end up deep in the field of computer science and want to learn more about this project, the developers have opened up the source code as well.

Thanks for the tip, [Matt]!