Hotshot 3D Printed Hovercraft Is Devastatingly Fast

These days, it’s pretty cheap and easy to build your own little RC hovercraft. [ValRC] demonstrates just that with a hovercraft build that is surprisingly nimble, and fast to boot.

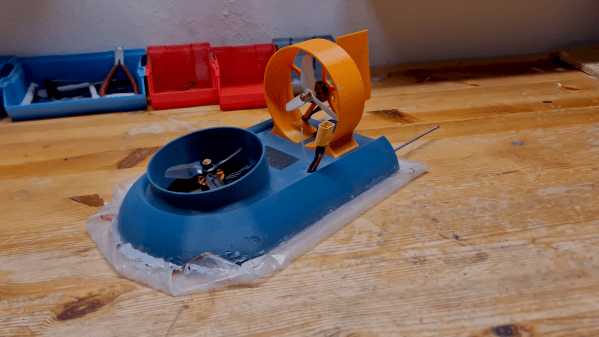
The build started with a design [ValRC] found online. It was simple enough to print and assemble, needing only a pair of a brushless motors, a speed controller, a receiver, and a servo to run the show. The design uses a plastic bag as a skirt, assembled around a 3D printed frame. That proved to be the hardest part of the build, as hot glue didn’t want to play nice with the thin garbage bag.

Even despite the challenges, once assembled, the hovercraft performed well. It readily slid around on a cushion of air, drifting across asphalt with abandon. Upgrades included a better rudder and a skirt made of thicker and more resilient plastic.  The final craft looked mesmerizing as it glided over the smooth concrete of a parking garage with ease.

A hovercraft is, honestly, one of the cooler printable projects for beginners. All you need is a simple design, some powerful motors, and you’re good to go.

Continue reading “Hotshot 3D Printed Hovercraft Is Devastatingly Fast”

Harvesting Electricity From High-Voltage Transmission Lines Using Fences

When you have a bunch of 230 kV transmission lines running over your property, why not use them for some scientific experiments? This is where the [Double M Innovations] YouTube channel comes into play, including a recent video where the idea of harvesting electricity from HV transmission lines using regular fences is put to an initial test.

The nearly final measurement by [Double M Innovations].
The nearly final voltage measurement by [Double M Innovations].
A rather hefty 88 µF, 1200 V capacitor, a full bridge rectifier, and 73 meters (240 feet) of coax cable to a spot underneath the aforementioned HV transmission lines. The cable was then put up at a height consistent with that of fencing at about 1.2 m (4 ft), making sure that no contact with the ground occurred anywhere. One end of the copper shield of the coax was connected to the full bridge rectifier, with the opposite AC side connected to a metal stake driven into the ground. From this the capacitor was being charged.

As for the results, they were rather concerning and flashy, with the 1000 VAC-rated multimeter going out of range on the AC side of the bridge rectifier, and the capacitor slowly charging up to 1000 V before the experiment was stopped.

Based on the capacity of the capacitor and the final measured voltage of 907 VDC, roughly 36.2 Joule would have been collected, giving some idea of the power one could collect from a few kilometers of fencing wire underneath such HV lines, and why you probably want to ground them if energy collecting is not your focus.

As for whether storing the power inductively coupled on fence wire can be legally used is probably something best discussed with your local energy company.

Continue reading “Harvesting Electricity From High-Voltage Transmission Lines Using Fences”

Ground-Effect Vehicle To Carry Passengers Around Hawaii

Although Hawaii used to have a ferry service to access the various islands in the archipelago, due to environmental and political issues, air travel is now the only way to island-hop. Various companies have tried to fill this transportation gap, but have all been stymied for one reason or another. The latest to attempt to solve this problem is a unique one, however. The Hawaii Seaglider Initiative is currently testing a ground-effect vehicle for inter-island passenger service that hopes to use the unique characteristics of this type of aircraft to reduce costs and limit environmental concerns.

The Seaglider, with backing from the Hawaii state government and various corporate interests like Hawaiian Airlines, is actually an amalgamation of three different types of vehicle. It’s capable of operating like a normal, hulled boat at low speeds but has a hydrofoil for operating at higher speeds. Beyond that, its wings give it enough lift to leave the water but stay in ground-effect flight, flying low to the water to reduce drag and improve lift when compared to an aircraft flying out of the ground effect. The efficiency gains from this type of flight are enough that the Seaglider can use electric motors and batteries to make the trips from island to island.

While the ferry is not yet in service, flight testing of the vehicle is scheduled for this year. Ground-effect vehicles of this type do have a large number of obstacles to overcome, whether they’re huge military vehicles like the Ekranoplanes of the Soviet Union or even small remote-controlled crafts, including difficulty with rough seas and having to operate in a harsh salt water environment.

A Look At 3D Printed Professional LED Signage

Customer perception is everything when you’re running a business, particularly in retail. High-quality signage can go a long way into creating a good impression in this respect. [king process] decided to show us how professional-grade LED signage is made in a Korean shop that specializes in the work.

The signs we’re shown are custom builds that are matched to the shape of a company’s logo. No rectangular printed lightboxes here, this is fully custom stuff. To that end, a 3D printer is the perfect tool for the job, as it lets the shop produce signs in any shape desired with no need for custom tooling.

The 3D printers that build up the signs have seriously large build volumes, though more so in the X and Y dimensions rather than the Z. We see a whole fleet of printers working away to allow multiple signs to be produced quickly. The first step is to produce the outline of a sign, which serves as a base for the build. Cavities in the sign are then filled with a translucent silicone solution to act as diffuser material. Once cured, these various sections are colored by hand as required. LED strips are then installed on a backing plate to illuminate the sections of the sign.

The final result is a sign with clean, bright glowing lines. It’s vaguely reminiscent of a neon sign, but without any of the limitations of the glass tubes influencing how it looks. It’s also neat to see the techniques a professional shop uses to make things right the first time, without dinging or marring any of the parts along the way.

Indeed, it seems the classical neon sign is, these days, bested by a variety of alternative technologies.

Continue reading “A Look At 3D Printed Professional LED Signage”

A General-Purpose PID Controller

For those new to fields like robotics or aerospace, it can seem at first glance that a problem like moving a robot arm or flying an RC airplane might be simple problems to solve. It turns out, however, that control of systems like these can get complicated quickly; so much so that these types of problems have spawned their own dedicated branch of engineering. As controls engineers delve into this field, one of their initial encounters with a control system is often with the PID controller, and this open source project delivers two of these general-purpose controllers in one box.

The dual-channel PID controller was originally meant as a humidity and temperature controller and was based on existing software for an ATmega328. But after years of tinkering, adding new features, and moving the controller to an ESP32 platform, [knifter] has essentially a brand new piece of software for this controller. Configuring the controller itself is done before the software is compiled, and it includes a GUI since one of the design goals of the project was ease-of-use. He’s used it to control humidity, temperature and CO2 levels in his own work at the University of Amsterdam, but imagines that it could see further use outside of his use cases in things like reflow ovens which need simple on/off control or for motors which can be controlled through an H-bridge.

The PID controller itself seems fairly robust, and includes a number of features that seasoned controls engineers would look for in their PID controllers. There are additionally some other open-source PID controllers to take a look at like this one built for an Arduino, and if you’re still looking for interesting use cases for these types of controllers one of our favorites is this PID controller built into a charcoal grill.

In Praise Of “Simple” Projects

When I start off on a “simple” project, experience shows that it’s got about a 10% chance of actually remaining simple. Sometimes it’s because Plan A never works out the way I think it will, due to either naivety or simply the random blockers that always get in the way and need surmounting. But a decent percentage of the time, it’s because something really cool happens along the way. Indeed, my favorite kind of “simple” projects are those that open up your eyes to a new world of possibilities or experiments that, taken together, are nothing like simple anymore.

Al Williams and I were talking about water rockets on the podcast the other day, and I realized that this was a perfect example of an open-ended simple project. It sounds really easy: you put some water in a soda bottle, pressurize it a bit with air, and then let it go. Water gets pushed down, bottle flies up. Done?

Oh no! The first step into more sophistication is the aerodynamics. But honestly, if you make something vaguely rocket-shaped with fins, it’ll probably work. Then you probably need a parachute release mechanism. And then some data logging? An accelerometer and barometer? A small video camera? That gets you to the level of [ARRO]’s work that spawned our discussion.

But it wasn’t ten minutes into our discussion that Al had already suggested making the pressure vessel with carbon fiber and doctoring the water mix to make it denser. You’d not be surprised that these and other elaborations have been tried out. Or you could go multi-stage, or vector-thrust, or…

In short, water rockets are one of those “simple” projects. You can get one basically working in a weekend day, and then if you’re so inclined, you could spend an entire summer of weekends chasing down the finer points, building larger and larger tubes, and refining payloads. What’s your favorite “simple” project?

A Hydroelectric Dam, Built Out Of LEGO

Hydroelectric dams are usually major infrastructure projects that costs tens of millions of dollars to construct. But they don’t have to be — you can build your own at home, using LEGO, as [Build it with Bricks] demonstrates!

The build is set up in an aquarium with a pump, which serves to simulate flow through a river system. The LEGO dam is installed in the middle of the aquarium, blocking the flow. It has a sluice gate in the lower section to feed water to a turbine for power generation. The gate is moved via a rack and pinion. It’s driven by a LEGO motor on a long shaft to keep it a safe distance from the wet stuff. The dam also gets a spillway to allow for overflow to be handled elegantly. Meanwhile, a second motor acts as a generator, fitted with a fairly basic turbine.

Hilariously, the first build fails spectacularly as the hydrostatic pressure of the water destroys the LEGO wall. A wider base and some reinforcements help solve the problem. There’s a better turbine, too.  It’s all pretty leaky, but LEGO was never designed to be water tight. As you might imagine, it doesn’t generate a lot of power, but it’s enough to just barely light some LEDs.

It’s a fun way to learn about hydroelectric power, even if it’s not making major amounts of electricity. Video after the break.

Continue reading “A Hydroelectric Dam, Built Out Of LEGO”