Portable Workbench Crams An Entire Workspace Into One Box

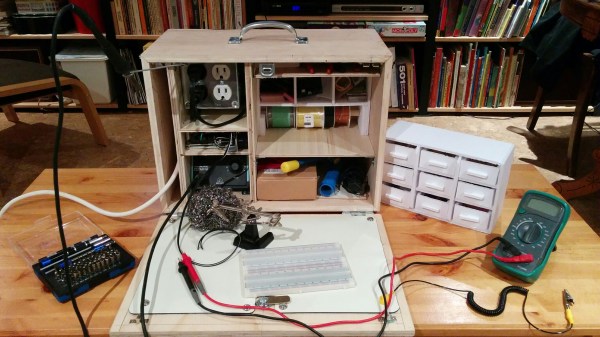
Making on the go is sometimes required in today’s busy lives, and if you find yourself traveling — say, off to university like [ZSNRA] — then a convenient solution is required. To that end, a portable electronics workbench was built in the shape of a relatively nondescript plywood box.

Plywood and foam-core are the main materials used in building this maker’s bug-out box, with two fir runners along the bottom so the case is not resting on the hinges. Inside, [ZSNRA] has packed a staggering amount of hardware which results in an 11kg suitcase.

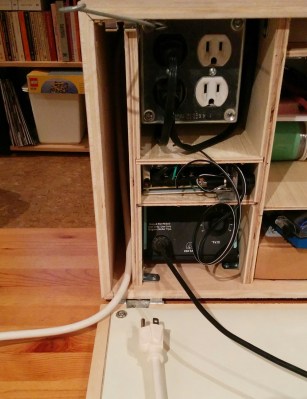
Power StackHere goes — deep breath now: wires, solder, resistors, transistors, capacitors, diodes, clips, switches, logic chips, non-logic chips, an Arduino, ATmegas, fuses, pliers, wire strippers and cutters, angle cutters, tweezers, a 66-piece screwdriver set, a desoldering pump, 12 needle files, a hacksaw blade, a multi meter, oscilloscope, power source, four outlets built into the case(!), steel wool, a third hand, a soldering station, two handbooks, and a breadboard.

Whew.


The work surface is an ESD mat on the inside of the case’s front face that is comfortable enough to work with, though we are surprised that it doesn’t also fold out somehow to create an even larger work-space.

For an elegant — if slightly less mobile — workbench solution, check out The Tempel. Now if you’re looking for ideas on how and what to carry we still think [Kenji Larsen] has the ultimate hacking kit.

[Thanks for the tip, Zaphod! via /r/electronics]

Hacklet 125 – DIY Laptops

In the old days of the 1970’s, the only way to get your own computer was to build one from scratch. Thanks to an army of hackers like [Woz], PC’s are no commodity objects that can be bought for a couple of hundred dollars. The magic of building your own still is there though – especially when we’re talking about portable machines. Laptops, notebooks, netbooks take quite a bit of skill to assemble. Stuffing a keyboard, screen, and battery into a small clamshell case takes a bit of planning. Our last look at DIY laptops was exactly 100 Hacklets ago, so it’s time for a refresh. This week we’re checking out some of the best DIY laptops and portable computers on Hackaday.io!

piberryWe start with [Sahas Dinesh Chitlange] and Pi-Berry Laptop. [Sahas] found just the right mix of simple and elegant with this build. A Raspberry Pi 2 is the brains of the operation. The Pi sits in a case built from a mix of MDF and regular wood. The display is a 10.1″ HDMI LCD. The keyboard was pulled from a tablet case. Power was easy — a USB power bank provides enough for 4-5 hours of runtime. [Sahas] covered his laptop in Italian leather for a polished look. He planned out his parts layout well enough that the power-hungry Pi stays cool without a fan.

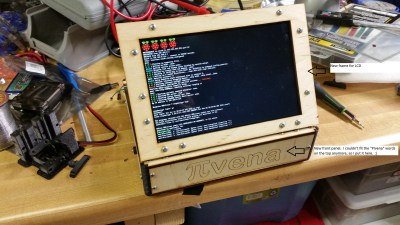
pivenaNext up is [Tim] with PIvena. [Tim] took his inspriation from [Bunnie Huang’s] Novena open laptop. Rather than roll his own ARM board, [Tim] went with a Raspberry Pi. His original design was for the Raspberry Pi model B. Last time we looked at PIvena, the model B+ was still pretty new. As we hoped, [Tim] modified his design to accept the new Pi layouts. This means it will physically work with the B+, Pi 2, and Pi 3 boards. [Tim] didn’t stop there though. He also upgraded from an 800 x 480 LCD to an 1200 x 800 LCD. He managed to do that while keeping the same bolt pattern on the travel cover. Nice work [Tim]!

elloNext we have [KnivD] with ELLO 2M. The most striking thing about ELLO 2M is the construction. The entire laptop is made from 6 PCBs which sandwich all the other parts. The keyboard is PCB material with keys routed out. The processor is a Microchip PIC32MX470-120. Software is loaded from one of 3 microSD cards. The 7 inch touchscreen LCD and 4500 mAh LiPo battery are nestled in between PCB layers. A true hacker, [KnivD] included a generous pin grid for debugging add-on circuits. The whole setup looks great with white silkscreen. As [Mark Sherman] mentioned in the comments, this machine reminds us of a modern-day TRS-80 Model 100.

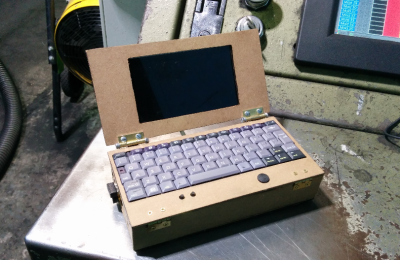
pipdaFinally we have [pdrift86] with Mini rpi2 laptop. Palmtop might be a better name for this. [pdrift86] took his inspiration (and his keyboard) from the old HP Jornada Personal Digital Assistant (PDA). The housing is Masonite, cut from a clipboard. A Raspberry Pi 2 hides inside, along with a 4 cell 18650 Li-Ion battery. The screen is a 5″ LCD with a composite input. The display isn’t a touchscreen, so a Playstation Portable analog stick is on-board, and will eventually be connected for mouse control. [pdrift86] even managed to sneak the Pi camera on the back of his machine, so it can take pictures cellphone style.

If you want to see more DIY laptop projects, check out our new DIY Laptops notebooks, and portables list. Notice a project I might have missed? Don’t be shy, just drop me a message on Hackaday.io. That’s it for this week’s Hacklet, As always, see you next week. Same hack time, same hack channel, bringing you the best of Hackaday.io!

How To Make Your Weller Wireless

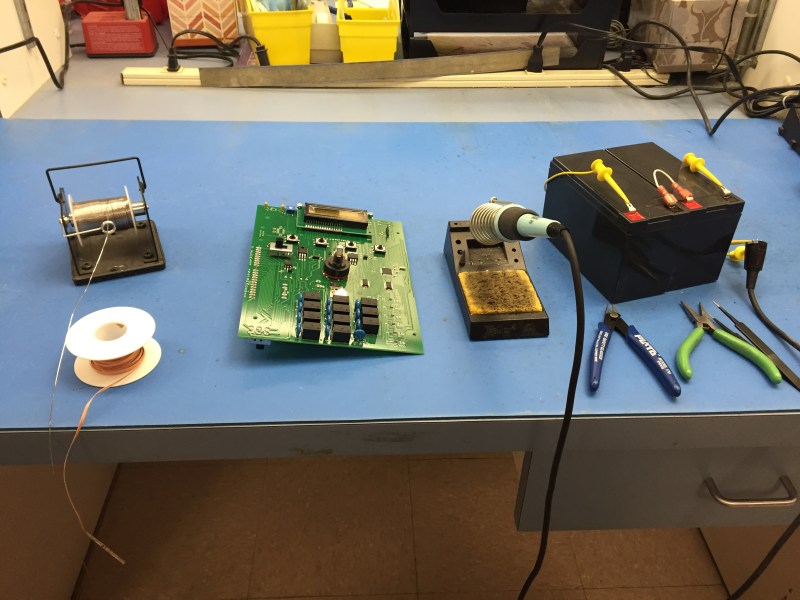
On occasion I have encountered portable soldering irons and my impressions of them have ranged from nearly usable to total rubbish. While using a popular butane powered model and pondering if it was really any better than a copper wire and a candle a thought occurred to me. A regular old Weller station runs on 24 volts AC and performs all of its temperature regulation in a magnetically activated thermostatic fashion and all of that goodness occurs within the hand piece itself. It stood to reason that it could perform just as well with a DC source.

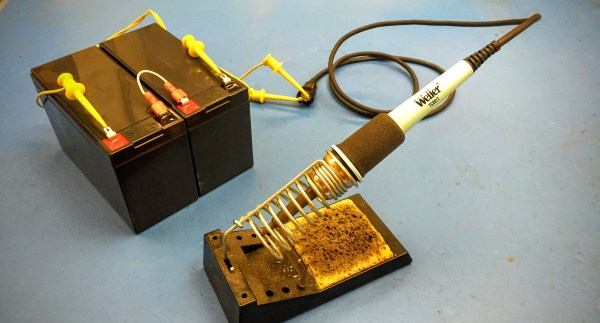
In this instance we are ignoring the negative effects of switching DC current over AC current on mechanical contacts. After all we are “In the Trenches” wherever we might have need for such a device. Using a couple of gel cell 12 volt 7 amp hour batteries freshly removed from a UPS I strung them up, and there you have it, a totally battery operated  iron with performance equal to that of the one at my bench.

Connecting SMPS to the Weller Iron
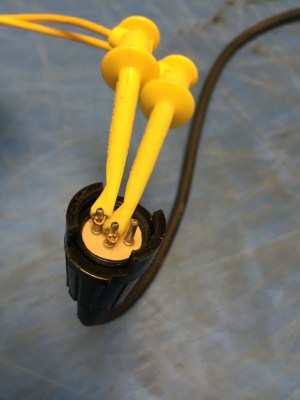
Connecting Power to the Weller Iron

Right at 24 volts the iron Thermocycles at the same rate as it would be while using the bench top supply for it. Just sitting under no load it cycles about every ten seconds and there was no perceptible difference in heat capacity or performance. A fully charged pair of batteries will last all day. The on state current draw from a full charge (13.5 volts on each of the batteries) yielded about a 2 amp draw. As the voltage began to decrease the current off cycle would get shorter as one would expect, but no drop in heat transfer was noticed until the batteries were well depleted and that took most of a work day.

For this instance I used the hand piece from the venerable Weller WTCPT station. For ongoing use I would not recommend this due to the use of a mechanical contact within the unit and switching of DC can reduced the life of most mechanical switches. Currently I am awaiting the arrival of some cheap eBay Hakko handpieces; I am sure they are knockoffs, but fine to experiment with a simple PWM with a feedback loop controller as the basic Hakko design also utilizes a 24 volt source. An automatic shut off timer would also be handy to avoid premature battery abuse due to a forgetful operator.

IMG_2505

Hackaday Prize Entry: Helping Millions See Clearly

Slit lamps are prohibitively expensive in the third world areas of India where they are most needed. An invention that’s been around for over a hundred years, the slit lamp is a simple-in-concept way to see and diagnose a large array of ocular issues.

Since they are relatively old by technological standards, the principles behind them have become more and more understood as time has gone on. While a nice lab version with a corneal microscope is certainly better, innovations in manufacturing have brought the theoretical minimum cost of the device way down, or at least that’s what [Kewal Chand Swami] hopes.

His design aims for portability and cost reduction. It must be able to travel to remote locations and it must be significantly cheaper than the lab versions. It uses off-the-shelf lenses in a 3D printed housing with a simple LED torch, the kind you can buy for a dollar at the check-out stand.

The assembly slides onto the user’s head and is held there with straps. The doctor can adjust where the slit the lamp shines and also look through a microscope to diagnose the issue. Hopefully devices like this will see similar community support to the prosthetic projects we’ve covered.

Incredible Luminosity In A Portable Package

If you’ve ever wanted to bring the brightest day into the blackest night, this flashlight shall give you sight. With a 100W LED array powered by up to 32V, this thing is exceedingly bright — it clocks in at about 9000 lumens! But the best part is that all every little detail of the build was documented along the way so that we can tag along for the ride.

The all-aluminium case houses the LEDs and their heat sink, voltage regulator and display, the AD and DC adapter and converter boards and their connectors, and fans to ensure adequate ventilation. It’s powered by a custom-assembled 6400 mAh 11.1V lipo battery or DC 20V 10Amp power supply via XLR for rugged, locking connection. The battery pack connection was vacuum formed for quick-swapping, and the pack itself will sound off an alert if any of the three batteries inside the pack run out of power. A nifty added feature is the ability to check the remaining charge — especially useful if you’re looking to bring this uncommonly powerful flashlight along on camping trips or other excursions.

Continue reading “Incredible Luminosity In A Portable Package”

Save A Couple Thousand Dollars With A DIY Remote Lighting System

When you don’t need the durability of a professional system, this DIY remote lighting system will do.

Pelican makes a great remote lighting system. Unfortunately, it’s the kind of great that comes with a “Request Quote” button instead of “Add to Cart”. It’s designed to be thrown in the back of a tank and guaranteed to work at the end of the day. [mep1811]’s system is not that system. It’s the store-in-a-Rubbermaid-tote and throw in the back of the family Honda kind of great, but it’s made from stuff you can buy anywhere.

The build is contained by a water resistant plastic box. Two sealed lead acids and a battery charger sit inside. The system is hooked together with simple car outlets — also known as the worst accidental electrical connector standard of all time. For the lights, [mep1811] simply made mounts for chinese LED spots and bought some inexpensive camera tripods. With a full charge, he says it runs for forty hours.

In the end it’s not a complicated hack, but its simplicity adds a certain amount of ruggedness, and it will definitely do the trick in a power outage.

Commodore 64 Mods Make A Mobile Computer

Some Commodore C64 owners and enthusiasts keep tinkering with their precious units, adding upgrades all the time. [wpqrek]’s latest upgrade to his C64 makes it totally portable – he added DC-DC converters to allow it to run off external battery sources.

He installed two separate DC-DC converters – one for 5V and another for 9V inside the enclosure. He opted for these high-efficiency converters because he planned to use batteries to power the device and wanted to maximize the juice he was extracting. He wired up a barrel jack socket to accept a 12V input, and another XT60 socket where he could attach a LiPo battery. A common 2200mAh RC battery is enough to power his C64 for 1.5 hours. To ensure the LiPo battery doesn’t get fully discharged, he’s added a simple buzzer circuit that starts beeping at around 3.3V.

How does just adding an external battery help make it portable? Well, he’s already added a small LCD display and a couple of other mods, that we featured in an earlier post. These earlier mod’s didn’t make the unit truly portable. Adding the latest hack does. Check out the video after the break.

Continue reading “Commodore 64 Mods Make A Mobile Computer”