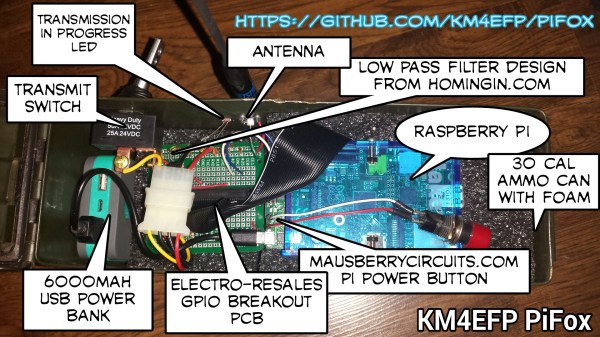
Meet ‘Raspberri’, Your Personal Voice Controlled Assistant

raspda

We’ve all seen the old movie scene where the executive calls his assistant on the intercom for some task or other. [Jan] may not be an executive, and he may not have an assistant. He does have Raspberri, his voice controlled personal digital assistant. Raspberri started life as a vintage Televox intercom box. [Jan] found it at a second-hand store, and snapped it up in hopes of using it in a future project. That project eventually happened when [Jan] got a Raspberry Pi and learned how to use it. He decided to build the Televox and Pi together, creating his own electronic assistant.

[Jan] started by adding a cheap USB sound card and WiFi module to his Pi. He also added a small 3 Watt audio amp board. The Televox used a single speaker as both audio input and output. [Jan] didn’t want to make any modifications to the case, so he kept this arrangement. Using a single speaker would mean dead shorting the audio amplifier and the sound card’s microphone input. To avoid this, [Jan] added a DPDT relay controlled by the original push-to-talk button on the Televox. The relay switches between the microphone input and the audio output on the USB sound card. Everything fit nicely inside the Televox case.

With the hardware complete [Jan] turned his attention to software. He went with PiAUISuite for voice input. Voice output is handled by a simple shell script which uses google voice to convert text to speech. For intermediate processing, such as scraping a weather website for data, [Jan] created custom python scripts. The end result is pretty darn good. There is a bit of lag between saying the command and receiving an answer. This may be due to transferring the audio files over WiFi. However,  [Jan] can always get away with saying his assistant was out getting him more coffee!

Continue reading “Meet ‘Raspberri’, Your Personal Voice Controlled Assistant”

Thumbs-Down Songs On Pandora With Your Mind

[Steven] likes music. Like many of us, he uses Pandora to enjoy the familiar and to discover new music. Now, Pandora means well, but she gets it wrong sometimes. [Steven] has had a Mindwave Mobile EEG headset lying around for a while and decided to put it to good use. With the aid of a Raspberry Pi and a bluetooth module, he built a brainwave-controlled Pandora track advancing system.

The idea is to recognize that you dislike a song based on your brainwaves. The Mindwave gives data for many different brainwaves as well as approximating your attention and meditation levels. Since [Steven] isn’t well-versed in brainwavery, he used Bayesian estimation to generate two multivariate Gaussian models. One represents good music, and the other represents bad music. The resulting algorithm is about 70% accurate, so [Steven]’s Python script waits for four “bad music” estimations in a row before advancing the track.

[Steven] streams Pandora through pianobar and has a modified version of the control-pianobar script in his GitHub repo His script will also alert you if the headset isn’t getting good skin contact, a variable that the Mindwave reports on a scale of 0 to 200.

Stick around for a demo of [Steven] controlling Pandora with his mind. If you don’t have an EEG headset, you can still control Pandora with a Pi, pianobar, and some nice clicky buttons.

Continue reading “Thumbs-Down Songs On Pandora With Your Mind”

Pi-Powered Radio Over IP

Pi

[KP4TR] connected a Raspberry Pi to a small, cheap handheld radio, allowing anyone within a few miles of his house to connect to amateur radio operators all around the world.

For the hardware, [KP4TR] is using a Raspi, a Baofeng BF-888s 400MHz – 470MHz walkie-talkie radio, a USB sound card, and a pair of transformers for the 5V and 3.7V lines. All this is tucked away in a remakably vintage-looking plate and standoff enclosure, complete with acorn nuts and an RGB LED connected to the Raspi’s GPIO to indicate whether the radio is transmitting or receiving.

The software used is SVXLink, a Linux port of the Echolink software. This app allows hams the world over to connect to very distant radios over the Internet.

You can check out the video demos of the system below.

Continue reading “Pi-Powered Radio Over IP”

RasPi “Inception” CD-ROM Case Mod

raspiInception

At first glance, [John’s] CD-ROM RasPi case may not seem all that unique, but we like both the implementation as well as the end-result functionality it provides. His goal was to use the Pi as a torrent downloader, and to store the downloaded files on a shared network drive. The Pi drive would slide into a bay in the server’s case—hence the Inception reference: a computer in a computer—allowing downloads while putting another step between the server and the outside world keeping, as well as guaranteeing that the network share would be available, because the server and the Pi would use the same power source.

[John] gutted the CD-ROM’s internals to leave only the PCB, which he stripped of most everything save for the power connector in the back. He then used the base of his old RasPi case as a standoff, mounting it to the top of the CD-ROM’s PCB. He soldered the power lines to the ROM’s power connector and temporarily hooked up a 5V adapter until he gets the server running. The final step was to carve out the back of the case for access to the Ethernet and USB ports, which [John] accomplished with a dremel, a hacksaw and a file. The front of the case still looks like a stock CD-ROM drive, and [John] has plans for future mods: re-purposing the LED to show network activity and modifying the buttons to serve as a reset, pause, or start for torrent downloads.

FFT On The Raspi’s GPU

fft

The Raspberry Pi has been around for two years now, and still there’s little the hardware hacker can actually do with the integrated GPU. That just changed, as the Raspberry Pi foundation just announced a library for Fourier transforms using the GPU.

For those of you who haven’t yet taken your DSP course, fourier transforms take a function (or audio signal, radio signal, or what have you) and output the fundamental frequency. It’s damn useful for everything from software defined radios to guitar pedals, and the new GPU_FFT library is about ten times faster at this task than the Raspi’s CPU.

You can get a copy of  the GPU_FFT library by running rpi-update on your pi. If you happen to build anything interesting – something with a software defined radio or even a guitar pedal – you’re more than welcome to send it in to the Hackaday tips line. We’d love to see what you’re up to.

Mephisto III Internet Radio

Avid Hackaday reader [Matthias] told us he takes a lot of inspiration from our site. That’s quite a compliment, because his work is both inspiring and beautiful. [Matthias] wanted to build a UI using JavaFX, so he made a really nice-looking Raspberry Pi-based Internet radio. We featured his previous radio build a few months ago when he modified an old Bakelite unit.

The Mephisto III is enclosed in a handsome oak cabinet built by [Matthias]’ father. Like his previous build, this one uses the Google Music interface to play MP3s and streams radio from the web. He also added weather and a clock, which is a nice touch. In addition to the Raspi and a USB WLAN stick, [Matthias] is using two relays. One relay powers the amplifier and the other enables the display. [Matthias] is impressed with the JavaFX API, but found that the performance of the Raspberry Pi is insufficient for smooth multithreading. He considered switching to a BeagleBone Black, but it has no component out.

If you want to be able to listen to vinyl, too, check out this killer media center. If you have lost your taste for Pi, build yourself a web radio from a tiny router.

[Thanks Matthias]

Here’s Pi In Your Eye – HUD Goggles

[John Ohno] has found what is perhaps the best possible use for steampunk goggles: framing a monocular display for a Raspberry Pi-based wearable computer. [John]’s eventual goal for the computer is a zzstructure-based personal organizer and general notifier. We covered [John]’s zzstructure emulator to our great delight in July 2011. Go ahead and check that out, because it’s awesome. We’ll wait here.

[John] has been interested in wearable computing for some time, but is unimpressed with Google Glass. He had read up on turning head-mounted displays into monocular devices and recognized a great opportunity when his friend gave him most of an Adafruit display. With some steampunk goggles he’d bought at an anime convention, he started on the path to becoming a Gargoyle. He encountered a few problems along the way, namely SD card fail, display output issues, and general keep-the-parts-together stuff, but came out smelling like a rose. [John] has ideas for future input additions such as simple infrared eye tracking, the addition of a chording keyboard, and implementing a motorized glove for haptic learning. 

Want to make your own wearable display but have an aversion to steampunk? Check out this homebrew solution with (mostly) 3-D printed frames. And it has servos!

[Thanks John]