Raspberry Pi Camera Board Incoming

camera

Your Raspberry Pi has on-board connectors for cameras and displays, but until now no hardware demigod has taken up the challenge of connecting an image sensor or LCD to one of these ports. It seems everyone is waiting for official Raspi hardware designed for these ports. That wait is just about over as the Raspberry Pi foundations is hoping to release a camera board in the coming weeks.

The camera module is based on a 5 megapixel sensor, allowing it to capture 2560×1920 images as well as full 1080 video with the help of some drivers being whipped up at the Raspberry Pi foundation.

Considering the Raspi USB webcam projects we’ve seen aren’t really all that capable – OpenCV runs at about 4 fps without any image processing and about 1 fps with edge detection – the Raspberry Pi camera board should be less taxing for the Pi, enabling some really cool computer vision projects.

The camera board should be available in a little more than a month, so for those of us waiting to get our hands on this thing now, we’ll have to settle for the demo video of the Pi streaming 1080p video to a network at 30fps after the break.

Continue reading “Raspberry Pi Camera Board Incoming”

Rack Mount Home Automation With A RPi

RPi Home Automation

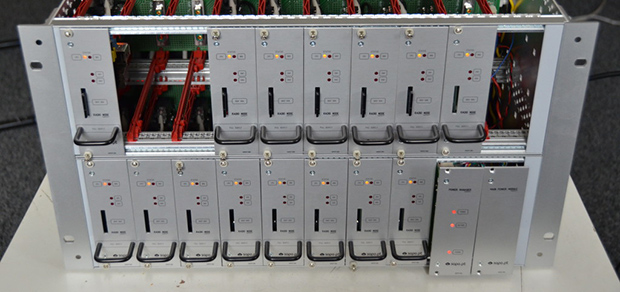
[Patrick] wanted to have centralized sensing and control over various parts of his house. His Raspberry Pi Home Automation System integrates a bunch of functionality in one rack mount package, salvaged from an old network switch.

The automation system is based on a Raspberry Pi running Arch Linux, which talks to an ATmega over SPI. We’ve seen this setup used many times before to add additional ports to the Raspberry Pi, but what makes [Patrick]’s build unique is the amount of control he’s built into the system.

The box controls outdoor lighting at sunset and sunrise, generates wakeup calls, controls IR cameras, and plays sounds based on events. It’s capable of monitoring sump pump water level, the state of a house alarm, and more. A custom REST API is used to interact with the device. This allows for programs on any platform to interface with his home, and acts as an API for his house.

[Patrick] provides a lot of details in his build log, which should be helpful to anyone looking to roll their own home automation system. The source is also provided.

Getting Rid Of Telemarketers With A Banana Phone

Banana

The Federal Trade Commission really doesn’t like robocalls and other telephone solicitors selling you vinyl siding or home security upgrades. The FTC is even offering $50,000 to anyone who can do away with these robocalling telemarketers, and [Alex] looks like he might just claim the prize. He developed The Banana Phone, a device that eliminates those pesky telemarketers.

The basic idea of the Banana Phone is requiring callers to enter a four-digit pass code (played via text to speech over a relevant song to prevent a bot from getting through) before connecting them to the main line. Once a caller has been verified as human, their number is added to a white list so they won’t have to listen to [Raffi] every time they call.

The Banana Phone uses off-the-shelf parts  including a Raspberry Pi and a phone/Ethernet adapter with the total build cost under $100. You can check out a demo of the Banana Phone in action after the break starting at about 2:25.

Continue reading “Getting Rid Of Telemarketers With A Banana Phone”

Controlling A Raspberry Pi With Real Life Redstone

minepi

We’ve seen computers built in Minecraft out of redstone, the game’s version of electricity, circuits, and digital logic. We’ve even seen a few redstone contraptions controlling real-world devices. [Angus]’ build, though, takes things to a whole new level. He’s created a bridge between Minecraft circuits and their real life counterparts using a Raspberry Pi.

[Angus]’ build relies on a mod for Minecraft servers running as a Bukkit plugin. Blocks powered by redstone are labeled with an in-game sign, and messages regarding the state of a block are passed over the network using the MQTT protocol.

The hardware side of the build is a Raspberry Pi with a PiFace expansion board. With this setup, [Angus] can control LEDs on the PiFace by toggling Minecraft levers, or light up redstone lamps using the PiFace’s buttons.

If you’d like to try this out for yourself, you can grab the Bukkit plugin over on [Angus]’s git. Check out the video of the real life redstone in action after the break.

Continue reading “Controlling A Raspberry Pi With Real Life Redstone”

Raspberry Pi Becomes A Guitar Effects Processor

One of the more interesting use cases for the Raspberry Pi is exploiting its DSP capabilities in interesting ways. There’s a lot of horsepower inside the Raspberry Pi, more than enough to do some very interesting things with audio, all while being powered by a small wall wart adapter. [Pierre] over on the Pure Data mailing list has a proof-of-concept working that uses the Raspi as a guitar effects processor. The results are very encouraging – [Pierre] is able to use his Raspi as a delay, pitch shifter, and of course a classic flanger, phaser, and chorus with a latency of about 16 ms.

There are a few steps necessary to get low latency with the Raspi’s audio interface. [Pierre] is running his Pi headless, and allocated more RAM to the CPU.

If you’d like to try this out for yourself, [Pierre] has a tutorial for setting up Pure Data with the Raspberry Pi. He’ll be updating his blog soon with more tutorials and verified USB audio interfaces later.

Check out the processor in action after the break.

Continue reading “Raspberry Pi Becomes A Guitar Effects Processor”

Building Your Own Model A Raspberry Pi

A

When the Model A Raspberry Pi is released in the coming weeks or months, you’ll have the opportunity to buy an even cheaper ARM Linux computer that will draw 1/3rd the power of the classic Model B. Some people just can’t wait a month to get their hands on it, so [Blair] decided to make his own.

The Model A Raspberry Pi is nearly the same as the Model B; the only things missing are an Ethernet port, a single USB port, and the associated chips required to drive these ports. In a brave bit of desoldering, [Blair] removed the Ethernet/USB controller with a butane torch.

In part two of [Blair]’s adventures, he removed the Ethernet connector and replaced the two-high USB ports with a single port, greatly decreasing the height of the Raspberry Pi.

As of right now, this is just about the only way to get your hands on the lower power, more compact Raspberry Pi. We can’t wait, though, for the eventual tutorial of how to turn a Model A into a Model B. That’ll be an awesome demonstration of god-like soldering skills.

Raspberry Pi Becomes A Torrent Box

If you’re making a media server out of a Raspberry Pi, why not add an interface to the biggest torrent sites on the Internet? That’s what [Alan] did when he wanted an automated media downloader that can stream movies and TV shows to any device.

[Alan]’s torrent box is basically a web app running on a Raspberry Pi. By accessing the Pi from the browser of a desktop or mobile device, he can search a collection of torrent sites and download just about everything to the Pi with a touch of a button. Once the files are downloaded, the Pi is able to move them to any directory, either locally or on a network, or just serve them up on a TV with a media player.

While we’re not endorsing  file sharing, we can’t think of a simpler way to set up a seedbox that draws a minuscule amount of power. It’s a great addition to any media server, and a great way to get the latest season of <<Linux Distribution>> streaming to your TV.