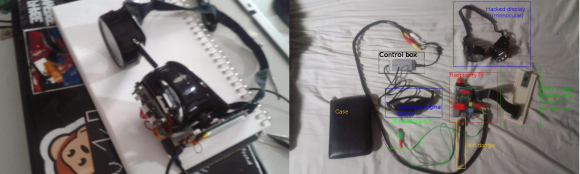
Battery Backup For RasPi Keeps Your Data Safe

We’ve all raised a clench fist in anger over lost data, and it’s usually the result of unjustified optimism and lack of planning. [George] shared his solution that prepares for the worst: a circuit that provides backup power to a RasPi and its hard drives. [George’s] Pi setup runs as both an Apple Time Machine server and a website backup server, and a power outage could corrupt the data stored on the Pi’s attached hard drives.

Rather than turn to commercial solutions, however, [George] wanted to take advantage of the Pi’s low power consumption and create an inexpensive custom circuit that would safely and automatically power down the devices upon loss of power. To detect a power failure, the build connects one of the Pi’s GPIOs to an opto-isolator, which—through a zener diode—connects to the 12V wall adapter: though [George] welcomes suggestions for alternative methods of safely identifying a mains power loss. The rest of the circuit serves as a trickle charger for the two attached 9V batteries and as a regulator to supply the correct voltage to the RasPi. Power MOSFETs connected to a GPIO handle the delayed power off.

You can view (and edit!) the circuit online here and find the relevant source code on [George’s] website. If you want to build your own RasPi file server, try cramming all the parts into an old optical drive enclosure.

Unbricking A Router With A Raspi

About a decade ago, [Mansour] learned of the Linksys WRT54G, a wireless router that’s been shoved into just about every project under the sun. After learning of this device’s power, he decided a firmware upgrade was in order. Unfortunately, he accidentally bricked this router and left it sitting on a shelf for a few years.

Idle devices are the devil’s playthings, and when [Mansour] discovered a Samsung hard drive with a an SDRAM that was compatible with the WRT54G, he decided he would have a go at repairing this ancient router. There was only one problem: the most popular utility for programming the router through the JTAG header required a PC parallel port.

No problem, then, as [Mansour] had a Raspberry Pi on hand. The parallel port utility bit-banged the new firmware over to the router, something the GPIO port on the Pi could do in spades. By adding Pi support to the debricking utility, [Mansour] had a functional WRT54G with just a little bit of patience and a few wires connecting the GPIO and JTAG header.

Upstagram: A Flying Raspberry Pi

Upstagram Pre-flight

This tiny paper house, modeled after the one in Disney’s UP, contains a Raspberry Pi, battery pack, camera, and 3G stick. The Upstagram, built by the folks at HackerLoop, took to the skies of Paris to snap and share photos on Instagram.

We’ve seen Raspberry Pis in flight before, but this build pulls it off using simple party balloons. It took around 80 balloons to get the house to a height of 300 feet. A kite string was used to tether the device and control its flight.

This hack also required some reverse engineering of Instagram. Since the photo sharing service only allows the official Android and iOS apps to upload, they had to use a reverse engineered Instagram client. This allows the unsupported Raspberry Pi to interact with the service, snapping pictures periodically and sharing them on the device’s stream.

After the break, check out a quick video overview of the project.

Continue reading “Upstagram: A Flying Raspberry Pi”

Detect Disguises With A Raspberry Pi

maskdetect

Computer vision based face detection systems are getting better every day. Authorities have been using face detection and criminal databases for several years now. But what if a person being detected is wearing a mask? High quality masks have been making their way out of Hollywood and into the mainstream. It isn’t too far-fetched to expect someone to try to avoid detection using such a mask. To combat this, [Neil] has created a system which detects face masks.

The idea is actually rather simple. The human face has a well-defined heat signature. A mask will not have the same signature. Even when worn for hours, a mask still won’t mimic the infrared signature of the human face. The best tool for this sort of job would be a high resolution thermal imaging camera. These cameras are still relatively expensive, so [Neil] used a Melexis MLX90620 64×8 16×4 array sensor. The Melexis sensor is interfaced to an Arduino nano which then connects to a Raspberry Pi via serial.

The Raspberry Pi uses a Pi camera to acquire an image. OpenCV’s face detection is then used to search for faces. If a face is detected, the data from the Melexis sensor is then brought into play. In [Neil’s] proof of concept system, a temperature variance over ambient is all that is needed to detect a real face vs a fake one. As can be seen in the video after the break, the system works rather well. Considering the current climate of government surveillance, we’re both excited and a bit apprehensive to see where this technology will see real world use.

Continue reading “Detect Disguises With A Raspberry Pi”

Transmitting Data With A Pi And RTL-SDR

Sometimes the best builds aren’t anything new, but rather combining two well-developed hacks. [Marc] was familiar with RTL-SDR, the $30 USB TV tuner come software defined radio, but was surprised no one had yet combined this cheap radio dongle with the ability to transmit radio from a Raspberry Pi. [Marc] combined these two builds and came up with the cheapest portable radio modem for the Raspberry Pi.

Turning the Raspi into a transmitter isn’t really that hard; it only requires a 20cm wire inserted into a GPIO pin, then toggling this pin at about 100 MHz. This resulting signal can be picked up fifty meters away, and through walls, even.

[Marc] combined this radio transmitter with minimodem, a program that generates audio modem tones at the required baud rate. Data is encoded in this audio stream, sent over the air, and decoded again with an RTL-SDR dongle.

It’s nothing new, per se, but if you’re looking for a short-range, low-bandwidth wireless connection between a computer and a Raspberry Pi, this is most certainly the easiest and cheapest method.

The Raspberry Pi Becomes A Form Factor

Despite the cries for updated hardware, the Raspberry Pi foundation has been playing it cool. They’re committed to getting the most out of their engineering investment, and the current board design for the Raspi doesn’t support more than 512Mb of memory, anyway.

What you see above isn’t a Raspberry Pi, though. It’s the Carrier-one from SolidRun. All loaded out, it has a system-on-module with a quad core ARM Cortex-A9, 2GB of RAM, 1000 Mbps Ethernet, USB host ports, eSATA, and LVDS display connector, a real time clock, and everything else you get with a Raspberry Pi, header pins included. It’s all the awesomesauce of the newer ARM boards that will still work with all your Raspberry Pi hardware.

If you’re thinking this is a product announcement, though, think again. The folks at SolidRun are merely using this Raspberry Pi form factor board as a prototyping and development platform for their CuBox-i device, In its lowest configuration, the CuBox-i1 is still no slouch and would be more than able to keep up with the most demanding Raspberry Pi applications.

Still, though, a hugely powerful board with lots of I/O is something we’d all love, and if SolidRun gets enough complaints praise, it seems like they might be willing to release the Carrier-one as an actual product.

Can An 8 Node Raspberry Pi Cluster Web Server Survive Hackaday?

Plenty of folks have used their Raspberry Pi as a web server. [Steve] however is the first 8 node load balanced pi cluster server we’ve run into.  While we have seen pi clusters before, they’ve never been pressed into service as a public facing web server. [Steve] has created a really nice informative website about the Raspberry Pi, and Linux in general. As his page views have increased, he’s had to add nodes to the server. Currently [Steve] sees about 45,000 page views per month.

At first glance it would seem that the load balance system would be the weak link in the chain. However, [Steve] did realize that he needed more than an Pi to handle this task. He built the load balancer using an old PC with 512MB of RAM and a 2.7GHz x86 CPU. The most important thing about the balancer is dual network interfaces, one side facing the internet, the other facing the Pi cluster. The balancer isn’t a router though. Only HTTP requests are forwarded. The Pi nodes themselves live on their own sub net. Steve has run some basic testing with siege, however nothing beats a real world test. We figured a couple of links in from Hackaday would be enough to acid test the system.