A Raspberry Pi Video Intercom System

When it comes to hacks, we’re always amazed by the aesthetic of the design as much as we are by the intricacies of the circuit or the cleverness of the software. We think it’s always fun to assemble projects that were just sort of rigged up in our shop really quickly and made to just work, without worrying about much else. But, when you really invest time in the aesthetics and marry form with function, the results are always one to marvel at.

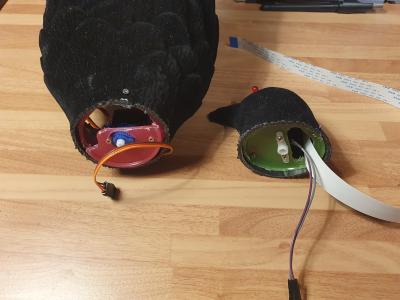
That’s what the engineers over at [Hacker Shack] did with their Raspberry Pi-based video intercom system over on Hackster. Now we’ve seen RPi doorbell projects here on Hackaday before, but it’s the implementation of a full-duplex video intercom system that makes [Hacker Shack’s] project really stand out. (Unless you want to be a bit more secretive). They used a Raspberry Pi 3 Model B with an off-brand Pi camera, but the R Pi branded camera will also work just fine. Couple the camera with a very crisp LCD display, microphone, and speaker and you’re good to go! Continue reading “A Raspberry Pi Video Intercom System”

OpenScan 3D Scans All Of The (Small) Things

The OpenScan project has been updated quite a bit since its inception. OpenScan is an open source, Arduino or Raspberry Pi-based 3D scanner for small objects that uses 3D printed hardware and some common electronic components to create 3D scans using photogrammetry; a process by which a series of still images from different angles are used to create a 3D point cloud of an object, which can then be used to generate a 3D model.

Feature visualization overlays detected features onto the camera preview to help judge quality. Broadly speaking, green is good.

Photogrammetry is a somewhat involved process that relies on consistent conditions, so going through the whole process only to find out the results aren’t up to snuff can be tiresome. Happily, OpenScan offers some interesting new functions such as feature visualization via the web interface, which helps a user judge scan quality and make changes to optimize results without having to blindly cross their fingers quite so much. OpenScan remains a one-person project by [Thomas], who is clearly motivated to improve his design and we’re delighted to see it getting updates.

Embedded below is a video that walks through the installation and web interface. It’s a fairly long and comprehensive, but if you like you can skip directly to [Thomas] demonstrating the interface around the 8:22 mark, or watch it below. Interested in your own unit? [Thomas] has an e-shop for parts and the GitHub repository is right here; the project also has its own subreddit.

Continue reading “OpenScan 3D Scans All Of The (Small) Things”

Raspberry Pi Cluster Shows You The Ropes

Raspberry Pi clusters are a common enough project, but a lot of the builds we see focus on the hardware side of the cluster. Once it’s up and running, though, what comes next? Raspberry Pis aren’t very powerful devices, but they can still be a great project for learning how to interact with a cluster of computers or for experimental test setups. In this project from [Dino], four Pis are networked together and then loaded with a basic set of software for cluster computing.

The first thing to set up, after the hardware and OS, is the network configuration. Each Pi needs a static IP in order to communicate properly. In this case, [Dino] makes extensive use of SSH. From there, he gets to work installing Prometheus and Grafana to use as monitoring software which can track system resources and operating temperature. After that, the final step is to install Ansible which is monitoring software specifically meant for clusters, which allows all of the computers to be administered more as a unit than as four separate devices.

This was only part 1 of [Dino]’s dive into cluster computing, and we hope there’s more to come. There’s a lot to do with a computer cluster, and once you learn the ropes with a Raspberry Pi setup like this it will be a lot easier to move on to a more powerful (and expensive) setup that can power through some serious work.

Queue Up Your Tracks With A Well Placed Hexagon

Besides a few stalwart holdouts, most of us have have switched over listening to music in digital form, often via an online stream. As long as no data caps stand in your way, it’s a quick and easy way to listen to your favorite artists or discover new ones. But there’s something visceral about act of loading a piece of physical media into a player that can’t be replicated by just clicking or tapping on a screen.

Which is why [InfiniteVideo] put together this RFID playlist launcher peripheral. There’s an important distinction to be made here, as this device isn’t actually playing or even storing audio. A nearby Raspberry running Volumio handles the actual playback. This device is just an RFID reader with some clever tokens that the listener can use to select their favorite artists and albums with physical tokens. It’s certainly not a new concept, but we think the nuances of this particular build warrant a closer look.

The “player” consists of a ESP8266 with a MFRC522 RFID reader wired directly to the GPIO pins. The pair are housed in a rather large 3D printed enclosure, which at first might seem a bit excessive. But it turns out that [InfiniteVideo] is actually trying to replicate a crowd sourced project called Qleek which is based around a similarly chunky reader.

Likewise, the hexagon tiles are also lifted from the Qleek concept. But rather than being made out of wood as in the original, [InfiniteVideo] is printing those as well. Halfway during the process, the print is paused and an RFID sticker is placed in the middle of the hexagon. Once resumed, the RFID tag becomes permanently embedded in the tile with no visible seams to reveal how the trick was pulled off. With the addition of a suitable label, each printed hexagon gets associated with the desired album or artist in software.

This project is notable for its convenience and visual flair, but using RFID tags for media identification can also be a practical choice. It can be used as an assistive technology, or as a way for young children to easily interact with devices.

Coffee Maker Gives Plants An Automatic Drip

Somehow, [Jeremy S   Cook]’s wife was able to keep a Keurig machine going for 10 years before it quit slinging caffeine. [Jeremy] got it going again, but decided to buy a new one when he saw how it was inside from a decade of water deposits.

But why throw the machine out like spent coffee grinds? Since the pump is still good, he decided to turn it into an automatic plant watering machine. Now the Keurig pumps water using a Raspberry Pi Zero W and a transistor. [Jeremy] can set up watering cron jobs with PuTTY, or push water on demand during dry spells. We love that he wired up a soil moisture sensor to the red/blue LEDs around the brew button — red means the plant is thirsty, purple means water is flowing, and no light means the plant is quenched and happy.

This project is wide open, but cracking into the Keurig is up to you. Fortunately, that part of the build made it into the video, which is firmly planted after the break.

Old coffee makers really do seem suited to taking up plant care in retirement. Here’s a smart garden made from an espresso machine.

Continue reading “Coffee Maker Gives Plants An Automatic Drip”

Rock Out With Toilet Paper Rolls

Singing in the shower is such a common phenomenon, rarely anyone ever bats an eye about it. Singing in the toilet on the other hand is probably going to raise an eyebrow or two, and it’s not for nothing that the Germans euphemistically call it “stilles Örtchen”, i.e. the little silent place. But who are we to judge what you do in the privacy of your home? So if you ever felt a lack of instrumental accompaniment, or forgot to bring your guitar, [Max Björverud] has just the perfect installation for you. (Video, embedded below.)

Inspired by the way bicycle computers determine your speed, [Max] took a set of toilet paper holders, extended each roll holding part with a 3D-printed attachment housing a magnet, and installed a Hall-effect sensor to determine the rolling activity. The rolls’ sensor data is then collected with an Arduino Mega and passed on to a Raspberry Pi Zero running Pure Data, creating the actual sounds. The sensor setup is briefly shown in another video.

Before you grab your pitchforks, [Max] started this project a little while back already, long before toilet paper became an object of abysmal desire. Being an artist in the field of interactive media, this also isn’t his first project of this kind, and you can find some more of his work on his website. So why of all things did we pick this one? Well, what can we say, we definitely have a weakness for strange and unusual musical instruments. And maybe there’s potential for some collaboration here?
Continue reading “Rock Out With Toilet Paper Rolls”

Automatic Timelapses, Made Educational And Easy

Timelapse fragment from an infrared sky camera watching cloud patterns.

There are plenty of ways to create timelapse videos, but [Andy] has an efficient method for ensuring up-to-date ones exist for his infrared sky camera, and he has it running thanks to some well-documented shell scripts on a spare Raspberry Pi. The resulting timelapse video is always available from the web, and always up-to-date for the current day.

The idea is to automatically fetch images from a remote source (in his case, an infrared sky camera) and turn them into a cumulative video that is regularly updated for the day in question. The resulting video file is either served from the same machine, or sent elsewhere. All that’s needed besides a source for the stills are two shell scripts and some common Linux utilities.

Since [Andy] is mainly interested in tracking clouds his system only runs during daylight hours, but it can be easily changed. In fact, [Andy]’s two shell scripts are great project resources, not only because they are easily modified and well documented, but because he doesn’t make assumptions about how well one might know the command line. He also provides tips from experience; for example he has found that a 120 second interval makes for the best timelapses.

[Andy] runs his scripts on an Raspberry Pi 4, but any Linux system will do. For those who might prefer a more embedded approach, the ESP32-CAM can make a great time lapse camera with remarkably little effort.