Retake On A Wii Remote Controlled Balancing Robot

[Tijmen Verhulsdonck] built his own version of a Wii remote-controlled balancing robot. He drew his inspiration from the SegWii, which was built by [Ara Kourchians].

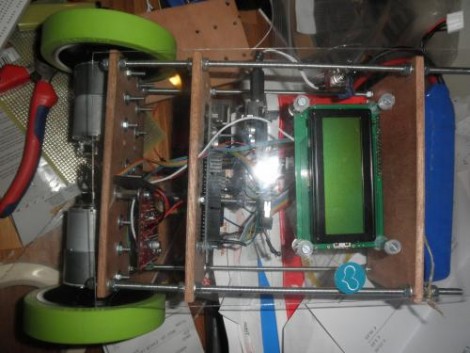
The body is built using one of our preferred fabrication methods; threaded rod makes up a rail system, with three sheets of hard board serving as a mounting structure for the motors, electronics, and battery. This does away with the 9V batteries used on the original SegWii, opting for a very powerful lithium battery perched on the highest part of the assembly. It uses an Arduino as the main microcontroller. That detects roll, pitch, and tilt of the body by reading data from a Sparkfun IMU 5 board (we’re pretty sure it’s this one). Check out the videos after the break. The first demonstrates the robot balancing on its own, then a Wii remote is connected via Bluetooth and [Tijmen] drives it around the room by tilting the controller. The second video covers the components that went into the build.

This is impressive work for a 17-year-old. [Tijmen] lists his material cost at $800 but since he’s Dutch this might not be a USD currency.

Continue reading “Retake On A Wii Remote Controlled Balancing Robot”

Propeller Lamp

Wanting to replace a power hungry halogen lamp in the living room, [Jason Dorie] went out to design a Remote Controlled, Dimmable Led Lamp (pictures). The body of the lamp is a pretty interesting idea, sporting a couple waste baskets with a translucent HDPE skin as the lampshade and a PVC column for structure.

The column is wrapped in a spiral of 16 foot long led strips , and are wired so they can be controlled in groups. Light output is (estimated) at about the same as a 100-150 watt incandescent while only consuming 24 watts.

The lamp is controlled via a universal remote and features a TLC5940 driven by a Propeller, all sitting on a CNC machined PCB. With that much horsepower under a lamp you can expect that it will not just simply dim in and out, so join us after the break for a video to see how to turn on a lamp with style.

Continue reading “Propeller Lamp”

USB Dongle Hack Tethers DSLR Cameras At A Fraction Of The Price

wireless_usb_grip

[Neal] wanted to tether his DSLR to his computer, but he wasn’t about to fork out the $1,000 Nikon was asking for their wireless adapter. Instead, he opted to construct his own solution using two separate camera accessories which cost him less than $200 when finished.

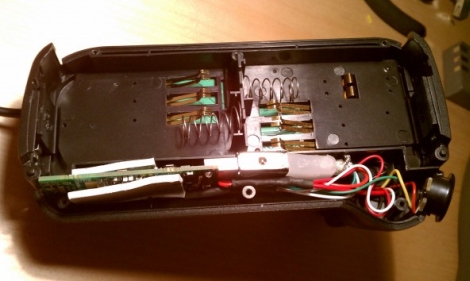
The two components he purchased were a wireless USB transmitter/receiver pair and an external battery grip. The battery grip allows him to use a pair of batteries to power his camera, while providing just enough space to wedge in the USB transmitter. He stripped the casing off the transmitter and connected it to a mini USB plug that he wired into the battery grip. He then added a small voltage regulator to step down the Nikon battery voltage from 7.2v to the 5v required by the USB transmitter.

The battery grip and transmitter were then hooked directly into his camera using the weatherproof plug built into the grip. Once he powered on his camera, it was connected to the PC immediately.

It’s amazing how the simplest hacks can save incredible amounts of money.  Nice job!

Be sure to check out the video embedded below to see the wireless adapter in action.

Continue reading “USB Dongle Hack Tethers DSLR Cameras At A Fraction Of The Price”

Remote Operated Security Gate Lets You Phone It In

ring_detection_circuit

[Itay] has a friend who works in a rented office where the parking lot is secured by a remote-controlled gate. Unfortunately, while his friend shares an office with several people, they only received a single remote. To help his friends out, he built a small device that triggers the remote control whenever a phone call is received.

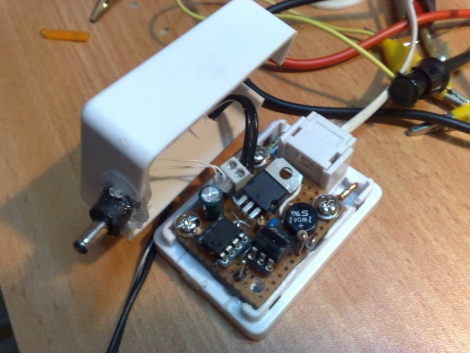
The remote modification was rather straightforward. He simply opened the device, adding a single wire to each button terminal. Rather than connect to the remote using wires, he decided to fit it with what looks like a scavenged DC power jack. The ring detector circuitry was constructed and stuffed in a small phone box, which is connected to the remote using a DC power plug. It’s a great solution to the problem, but let’s just hope no one gets a hold of the phone number they used for the trigger!

There are plenty of pictures on his site, as well as video of the ring detector being tested. Unfortunately [Itay] lost the original schematics for the circuit, so you will have to flesh that part out on your own if you wish to build a similar device.

Keep reading to see a few videos of the remote in testing and in use.

Continue reading “Remote Operated Security Gate Lets You Phone It In”

Remote Camera Trigger Built From Air Freshener Parts

Remote camera trigger assembled front view

[jcopro] took a look at a Glade automatic air freshener he had sitting around and couldn’t help but open it up to determine how the mechanism worked.  After taking it apart, he found that the automated system was comprised of a 3v motor, a series of gears, and a mechanical arm.  When actuated, this arm simply pressed the spray nozzle of the air freshener canister contained within the device.  After some consideration, he decided that the components would make a great remote trigger for his Casio point and shoot camera.  He fabricated a small plywood rig including both the camera and air freshener components, which was able to be mounted on a tripod.  [jcporo] also mentions that the air freshener has the ability to be triggered by a built-in timer.  Although the presets are locked at 9, 18, and 36 minutes, he suggests that a 555 timer could easily be used to add some custom timing intervals when wired to the manual trigger.  Be sure to check out his video of the remote trigger in action.

Shutter Remote For RICOH Cameras

[Toby] wanted to have a remote shutter trigger for his RICOH GR III camera. This brand doesn’t have a dedicated port for remote operation but a bit of research allowed him to build his own trigger. The camera’s USB port is used for triggering but not using the USB protocol. Instead, a pulse pattern on the 5V line identifies the half-press, full-press, and release states of the shutter button. From there it was just a matter of wiring up a circuit centering around an Arduino that leaves room for a lot of expansion into realms like photo automation.

If You’re Photographing And You Know It Clap Your Hands

If you’ve ever tried to take pictures of yourself you’ll know that it can be a pain. It’s especially hard to get that perfect shot of your godly features when you’re out of breath from sprinting across the room. OK, yes, they have remote controls for that. But what if you lost your remote or you just don’t want to have to carry it? [LucidScience] put together a sweet, um, “hands free” alternative.

Essentially this hack emulates the IR signals sent by a Nikon remote, either to take a picture right away or to take time lapse photographs at regular intervals. We’ve seen a similar time lapse remote using an arduino before and a really thorough one using an AVR, but they don’t take the same approach as [LucidScience]’s design in terms of monitoring a microphone input for triggering. The project includes several status LEDs and adjustments for ambient noise and triggering, and it can be mounted to the camera body. We wonder how many of the Nikon’s features could be controlled using clap encoding, and how detailed your timing would need to be to have a kind of hand-made (get it?) pulsetrain syntax.  You’d probably need to have world record clap skills.

Check out the demo vid after the break.

Continue reading “If You’re Photographing And You Know It Clap Your Hands”