Counter-Strike Gets The RGB LED Treatment

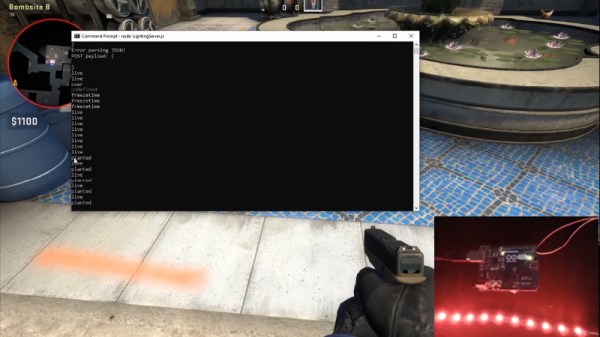
Inspired by the over-the-top stage lighting and pyrotechnics used during e-sport events, [Hans Peter] set out to develop a scaled-down version (minus the flames) for his personal Counter-Strike: Global Offensive sessions. It might seem like pulling something like this off would involve hacking the game engine, but as it turns out, Valve was kind enough to implement a game state API that made it relatively easy.

According to the documentation, the CS:GO client can be configured to send out state information to a HTTP server at regular intervals. It even provided example code for implementing a simple state server in Node.js, which [Hans] adapted for this project by adding some conditional statements that analyze the status of the current game.

These functions fire off serial commands to the attached Arduino, which in turn controls the WS2812B LEDs. The Arduino code takes the information provided by the HTTP server and breaks that down into various lighting routines for different conditions such as wins and losses. But things really kick into gear when a bomb is active.

[Hans] wanted to synchronize the flashing LEDs with the beeping sound the bomb makes in the game, but the API doesn’t provide granular enough data. So he recorded the audio of the bomb arming sequence, used Audacity to precisely time the beeps, and implemented the sequence in his Arduino code. In the video after the break you can see that the synchronization isn’t perfect, but it’s certainly close enough to get the point across in the heat of battle.

With the special place that Counter-Strike occupies in the hearts of hackers and gamers alike, it’s little surprise people are still finding unique ways to experience the game.

Continue reading “Counter-Strike Gets The RGB LED Treatment”

MQTT And The Internet Of Conference Badges

Today, nearly every modern consumer device wants to connect to the Internet for some reason. From your garage door opener to each individual smart bulb, the Internet of Things has arrived in full force. But the same can’t be said for most of our beloved conference badges. Wanting to explore the concept a bit, [Ayan Pahwa] set out to create his own MQTT-connected badge that he’s calling CloudBadge.

As this was more of a software experiment, all of the hardware is off-the-shelf. The badge itself is an Adafruit PyBadge, which doesn’t normally have any networking capabilities, but does feature a Feather-compatible header on the back. To that [Ayan] added a AirLift FeatherWing which allows him to use the ESP32 as a co-processor. He also added a strip of NeoPixel LEDs to the lanyard, though those could certainly be left off if you’re not looking to call quite so much attention to yourself.

The rest was just a matter of software. [Ayan] came up with some code that uses the combined hardware of the PyPadge and ESP32 to connect to Adafruit.io via MQTT. Once connected, the user is able to change the name that displays on the screen and the colors of the RGB LEDs through the cloud service. If you used something like this for an actual conference badge, the concept could easily be expanded to do things like flashing the badge’s LEDs when a talk the wearer wanted to see is about to start.

The modern conference badge has come a long way from simple blinking LEDs, offering challenges that you’ll likely still be working on long after the event wraps up. Concerns over security and the challenge of maintaining the necessary infrastructure during the event usually means they don’t include networking features, but projects like CloudBadge show the idea certainly has merit.

Continue reading “MQTT And The Internet Of Conference Badges”

Sleek, Sophisticated Skittle Sorter

Sorting candy by color is a classic problem that has its roots in the contract riders of rock stars who were just trying to make sure that more important contractual obligations were not being overlooked by concert venues. Through the years, candy sorting has become a classic problem for hobbyists to solve in various ways. After a false start a few years back, [little french kev] was compelled to dust off those plans and make the most compact sorter possible.

This minimalist beauty uses an Arduino Nano and RGB sensor to assess the color. At the top, a small servo rotates an arm inside the hopper that both shakes the Skittles and sets them up single file before the sensor. Another small servo spins the tube rack around to catch the rainbow. There’s an RGB LED in the base that bathes the tube from below in light that matches the Skittles. Check out the series of gifs on [little french kev]’s personal project site that show how each part works, and then watch the build video after the break.

Did you know you can roll your own color sensor from an RGB LED and a photocell? If you don’t think candy is so dandy, you could always color-sort your LEGO.

Continue reading “Sleek, Sophisticated Skittle Sorter”

A LED Cube Designed For Easy Assembly

LED cubes are mesmerizing and fun, but they’re usually a pain to build. Not so with [burkethos]’s cleanly designed cube. 

Many cubes are put together in an elaborate sculptural style. Traditionally the leads of the LEDs are artistically bent and then hours are spent laboring over the future rainbow Borg cube. This build is more reminiscent of a motherboard or back plane design. The LEDs are surface mount units re-flowed onto a rake shaped PCB. At the base of each “rake” there’s a right angle male header. This is then soldered to base board which creates a reliable mechanical bond.

There are some downsides to this approach. For example, the PCBs occlude the LEDs at some viewing angles. However, this can be mitigated with careful placement in the room, or in one variation, mounting the cube at a different orientation so the rakes are horizontal rather than vertical.

Regardless, we appreciate this new take on an old project and can definitely see it having a more universal appeal than the kits that require a couple weeks of afternoons to finish.

Angela Sheehan Is Developing Wearable Tech With Whimsy

As a concept, wearable technology excites many of us, but in practice, it’s been hard to nail down. Up to this point, the most high-tech thing the average person might reasonably wear has been a wrist watch. Devices like Google Glass tried to push the state-of-the-art, but it arguably raised more questions than it answered. It demonstrated in a very public way that developing wearable technology that’s simultaneously visually appealing, useful, and robust enough to handle daily life is exceptionally difficult. If Google couldn’t pull it off, what hope do we lowly hackers have?

But maybe we’ve been going about things the wrong way. Compelling as the end result may seem, the move from wrist watches to head-mounted computers is simply too large of a technical and psychological leap to make. To help develop the skills and techniques necessary to build practical wearable electronics, it might help to take a slightly more fanciful approach.

It seems to be working pretty well for Angela Sheehan, at least. In her talk “Building Whimsical Wearables: Leveling Up Through Playful Prototyping” at the 2019 Hackaday Superconference, she went over some of the things she’s learned while developing her Color Stealing Fairy costume. The product of several years of iterative design, the costume is able to mimic colors seen in the environment through the use of a wireless sensor wand, and features a number of design elements that are critical to any successful wearable project.

Even if a custom RGB Fairy costume isn’t on your short list of projects, there’s information in this talk that will surely be of interest to anyone who’s even contemplated a wearable project. From technical aspects like battery placement to logistical considerations such as making adjustments for multiple wearers, Angela’s make-believe creation has become a testbed for real-world considerations.

Continue reading “Angela Sheehan Is Developing Wearable Tech With Whimsy”

Don’t Hang Christmas Lights, Embed Them

Finding it hard to get into the holiday spirit this year? Maybe you just need a timely project to light up the evenings until Santa (or Krampus) pays your house a visit. Whoever visits this season, delight or distract them with a 3D printed tree featuring embedded RGB LEDs.

[MakeTVee] printed this tree in four stages to make it a little bit easier to wire everything up. Each stage has six LEDs embedded in a 5mm transparent layer at the bottom. The top stage has a second color change to make a tree topper that holds a single LED. The color change feature in PrusaSlicer 2.0 made it easy to pause the print, insert the wired-up LEDs, and resume seamlessly in green filament. There’s a hidden base of what appears to be appropriately delicious cinnamon filament that holds the Trinket M0 and the power switch.

This lil’ tree looks great, especially considering how fiddly and nerve-wracking the wiring and assembly must have been. [MakeTVee] made it easier on himself with a printed wiring stencil that holds the LEDs in their star formation while he solders them up with magnet wire (a solid choice in our book). He thoughtfully included that stencil in the files which are up on the Prusa site. Dim the lights, grab a hot beverage, and check out [MakeTVee]’s build video after the break.

If you want a holiday hack that people can play with, invite them to paint your addressable tree.

Continue reading “Don’t Hang Christmas Lights, Embed Them”

Keeping Time With Blinkenlights

If we’ve learned anything over the years, it’s that hackers like weird clocks, and they love packing as many multicolored LEDs into a device as is humanly possible. Combine both of those concepts into one project, and you’ve got a perfect storm. So as far as unnecessarily complex timepieces go, we’d say the “Crazy Clock 4” built by [Fearless Night] ranks up there among the all-time greats.

This Arduino Pro Mini powered clock syncs the current time via GPS, with a temperature compensated DS3231 RTC to keep it on the straight and narrow between satellite downlinks. Once the clock has the correct time, how do you read it? Well, at the top you’ve got a basic numerical readout for the normies, and next to that there’s a circular LED display that looks like it could double as a sci-fi movie prop. On the lower level there’s a binary clock for the real show-offs, and as if that wasn’t enough, there’s even dual color-coded analog meters to show the hours and minutes.

[Fearless Night] has provided everything you need to follow along at home, from the Arduino source code to the 3D models of the case and Gerber files for the custom PCB. Personally we think just the top half of the clock would be more than sufficient for our timekeeping needs. If nothing else it should help save some energy, as the clock currently pulls an incredible 20 watts with all those LEDs firing off.

Should you decide to take a walk down memory lane and check out some of the other interesting LED clocks we’ve featured in the past, you’d be busy for quite awhile. But for our money, it’s still hard to beat the impossibly obtuse single-LED clock.