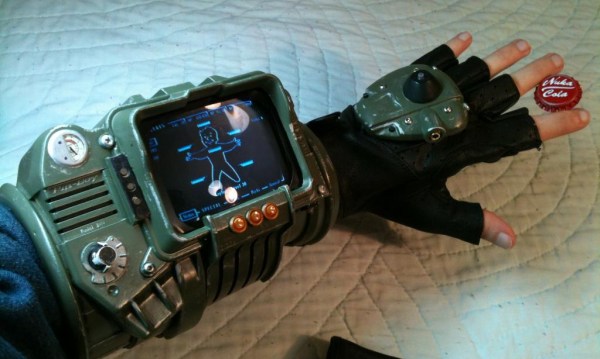
Easy Rotary Encoding For Your Projects

Want to monitor how much a wheel has turned in your project? Then you need a rotary encoder! Here’s a way to add rotary encoding without changing the mounting method of your wheels (translated). [Jorge] added it as a way to improve the functionality of this line-following robot. It uses a paper encoder wheel which is monitored by an optical sensor.

The paper wheel consists of alternating white and black pie pieces. You can make this with a felt-tipped marker, or use a tool like the one we featured a couple of years ago to print out a disc rendered to your own specifications. This is glued to the inside of the wheel and monitored by a CNY70 reflective sensor (the same one used in that electric keyboard retrofit).

The homemade board which holds the sensor can be seen mounted on top of each wheel’s motor. It requires three wires, voltage, ground, and data. The data line is connected to the output of the phototransistor in the CNY70 package so it can be used with a microcontroller interrupt for easy integration with the firmware driving the robot.

[Jorge] goes into some detail about how the added data helps to improve the speed performance seen in the clip after the break.

Continue reading “Easy Rotary Encoding For Your Projects”

Control LED Lighting With An Old Stereo Receiver

stereo_controlled_home_lighting

[Marklar] needed an IR receiver for a project he was working on, and his local electronics store was fresh out. He dug through his junk pile and found an old stereo receiver, so he decided to pull the IR module from it before tossing it out. Once he had it taken apart, he figured that he could utilize the wide array of electronic components he found inside, and set off to start a new project.

The control panel housed the components which interested him most of all. Using an Arduino, he was able to easily interface with the rotary encoders as well as the buttons, giving him a cheap and easy way to control his home lighting system. With a bit of programming, he was able to map lighting presets to various buttons, as well as use the rotary encoder to control the LEDs’ brightness and color. As an added bonus, he kept the IR receiver intact and can control his setup wirelessly as well.

Check out the video we have embedded below to see his scavenged control system at work.

[via HackedGadgets]

Continue reading “Control LED Lighting With An Old Stereo Receiver”

XBMC Controller Is An All-in-one Usb Solution For HTPCs

On the original Xbox, XBMC was a software-only solution (assuming you had a chipped or soft-modded console). That’s because the Xbox was already meant to connect to a television and work with an IR remote control. Now that the XBMC software has transitioned to focus on a wider range of hardware, it may be more complicated to get the same functionality on an HTPC. Realizing this, [Dilshan] developed a USB connected XBMC controller that features an IR receiver, character LCD, and a rotary encoder with two buttons.

As long as your HTPC has a way to connect to the audio and video inputs on your TV, this should take care of the rest of the presentation. LCD screens were popular with XBMC from very early on because modchips included an interface. Because of this, XBMC is already setup to provide navigation and media information this way. So you can use XBMC for audio playback without needed to have your TV turned on. Add to that the ability to control your box with either  a remote control or the navigation tools on the front bezel and you’ve got a winning solution.

You can download an archive that includes all the info about this device over at the project repository. For your convenience we’ve embedded the schematic and PDF description of the project, which we found in that package, after the break.

Continue reading “XBMC Controller Is An All-in-one Usb Solution For HTPCs”

ChronoTune: Listen To Radio By Year, Not By Frequency

The ChronoTune is a radio that plays sounds from different eras. This project was developed as an entry for the Redbull Creation Challenge by some members of i3Detroit, a hackerspace in the motor city. It allows a user to turn the dial to tune in a new moment in history, but they can also listen in on the present day. They’ll be greeted with the sounds of a tuning radio, followed by music or audio clips common to the period displayed on the dial.

As you know from the last contest entry, each project must use an Arduino to qualify. It reads a rotary encoder attached to one of the knobs on the front of the case. This doesn’t directly move the tuning needle. Instead, it’s attached to the guts of an inkjet printer to move it back and forth. This lets the radio tune itself if need be.

The audio is played from several sources. There is an MP3 module that allows for longer clips, but there are also some ISD voice recorder chip modules that play back shorter clips. If the dial is tuned to present day, an FM radio module tunes in a station over the air.

Having trouble reading that dial? Don’t worry, there’s a simulated Nixie tube display sticking out the top of the case to provide a digital readout of the currently selected time period. Check out the video after the break to see the team walk us through each part of the ChronoTune.

Continue reading “ChronoTune: Listen To Radio By Year, Not By Frequency”

Are Phones With Haptic Feedback In Our Future?

Can we do away with a keypad and just squeeze our phones to check messages and dial contacts? [Sidhant Gupta] has been researching the idea of an electronically adjustable spring mechanism that might just make this possible. He calls the prototype above the SqueezeBlock. If you pick it up and give it a squeeze you can feel springs pushing back against your fingers, but it’s all a trick. Inside you’ll find one motor with a gear that converts the linear motion into a rotating force. Attached to the same axle as that gear are a motor and a rotary encoder. A microcontroller monitors that encoder to detect a user squeezing the two plates together, then drives the motor to vary the resistance. [Sidhant] outlines some possible uses that included stiffer resistence as unread email starts to pile up, or squeezing the device to its smallest size to turn the ringer volume all the way down.

We’re a little skeptical of this functionality in handhelds just because of the power consumption issue. But if that is somehow overcome we think this would make a pretty interesting phone feature… at least at first. Click through the link above for a video demonstration or get the details from the research presentation (PDF)

[Thanks Dan]

Shiny Motorcycle Computer

We’re rather surprised at how popular it has become to build your own motorcycle computer. [Mario Mauerer] tipped us off about his shiny motorcycle computer (translated) for his Yamaha XTZ 750. It uses an ATmega644 microcontroller to pull a variety of data together and display it on this white LED backlit display. He connected a flow meter to the fuel line to monitor gas consumption. Oil temperature is captured by inserting a brass tube (containing the sensor) through a hole in the oil cap and soldering it in place. Water temperature is gathered by measuring the external temperature of one of the cooling lines. [Mario] uses a rotary encode with a click function as the control interface device, and a battery backed real time clock keeps time.

A quick look at the PCBs tells the tale of good circuit design. But we do wonder about catching the reflection of the sun in that shiny bezel.

Full-featured AVR Time-lapse

This time-lapse photo trigger was built [Lukasz Goralczyk]. It is controlled by an ATmega168 and we were surprised to read that it uses about 12k of code. Curious about what takes up that much space, we were impressed to see all the features demonstrated in the video after the break. The small device, running on two AA batteries, has a well-designed user interface displayed on a 3V character LCD that is navigated with a clickable rotary encoder.

It isn’t the smallest intervalometer we’ve ever seen, but it deserves respect for the features packed into a diminutive form-factor.

Continue reading “Full-featured AVR Time-lapse”