An L-shaped orange mounting structure with two white reservoirs on top, a set of pumps on the outer bottom edges, and a membrane cell bolted together in the center. The parts are connected by a series of transparent tubes.

Open Source Residential Energy Storage

Battery news typically covers the latest, greatest laboratory or industry breakthroughs to push modern devices further and faster. Could you build your own flow battery stationary storage for home-built solar and wind rigs though?

Based on the concept of appropriate technology, the system from the Flow Battery Research Collective will be easy to construct, easy to maintain, and safe to operate in a residential environment. Current experiments are focusing on Zn/I chemistry, but other aqueous chemistries could be used in the future. Instead of an ion exchange membrane, the battery uses readily attainable photo paper and is already showing similar order of magnitude performance to lab-developed cells.

Any components that aren’t off-the-shelf have been designed in FreeCAD. While they can be 3D printed, the researchers have found traditional milling yields better results which isn’t too surprising when you need something water-tight. More work is needed, but it is promising work toward a practical, DIY-able energy storage solution.

If you’re looking to build your own open source wind turbine or solar cells to charge up a home battery system, then we’ve got you covered. You can also break the chains of the power grid with off-the-shelf parts.

Scratch Built Wind Turbine Makes Power And Turns Heads

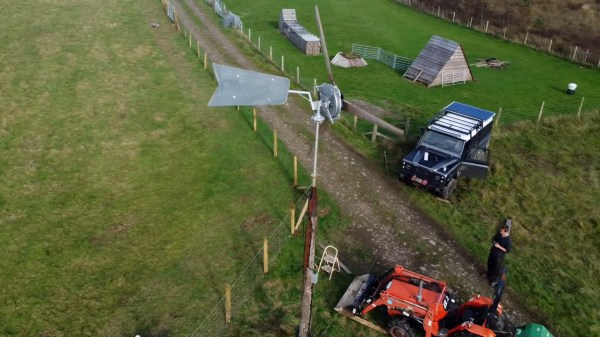
If you’ve ever aspired to live off the grid, then it’s likely that one of the first things you considered was how to power all of your electrical necessities, and also where to uh… well we’ll stick to the electrical necessities. Depending on your location, you might focus on hydroelectric power, solar power, or even a wind turbine. Or, if you’re [Kris Harbor], all three. In the video below the break, we get to watch [Kris] as he masterfully rebuilds his wind turbine from scratch and reconfigures his charging solution to match.

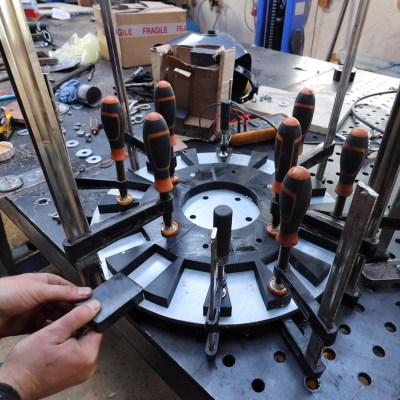
The Rotors Are Built With a 3d Printed Rotor Jig

A true hacker at heart, [Kris] has used a everything from 3d printing to broken car parts in order to build his new wind turbine. The three phase generator is constructed from scratch.  A hand wound stator is held firmly between two magnetic rotors, where 3d printed jigs hold the magnets in place.

A CNC cut backing plate holds everything together while also supporting the automatically furling vane that keeps the entire turbine from self destructing in inclement weather. A damaged wheel hub from [Kris]’ Land Rover provides the basis for a bearing so that the entire turbine can turn to face the wind, and various machined parts round out the build. The only things we didn’t see in the build were hot glue and zip ties, but we remain hopeful. Continue reading “Scratch Built Wind Turbine Makes Power And Turns Heads”

Scratch Building A Supersized CNC Router

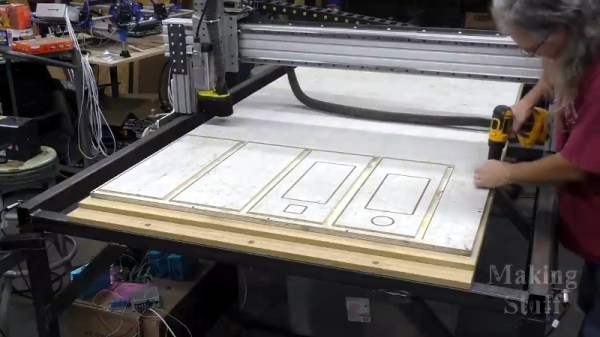
Many of us have spent the better part of a year on COVID-19 lockdown, and what do we have to show for it? Bit of progress on the Netflix queue? Maybe a (slightly) cleaned up garage or workshop? Not if you’re [Bob] of Making Stuff fame: he’s spent the last nine months working on a completely custom CNC router big enough to take a whole sheet of plywood.

The build is documented over a series of nearly a dozen YouTube videos, the first of which was put out all the way back in January of 2020. Seeing [Bob] heading to the steel mill to get his frame components with nary a mask in sight is a reminder of just how long he’s been working on this project. He’s also put together a comprehensive Bill of Materials on his website should anyone want to follow in his footsteps. Coming in at only slightly less than $4,000 USD, it’s certainly not a budget build. But then when we’re talking about a machine of this scale, nothing comes cheap.

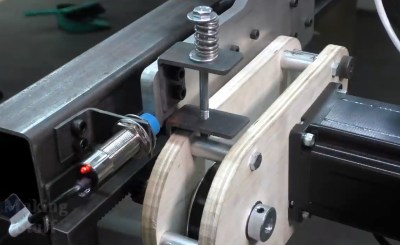
Every component on this build is heavy-duty.

Even if you don’t build you own version of this router, it’s impossible to watch the build log and not get inspired about the possibilities of such a machine. In the last video we’re even treated to a bit of self-replicating action, as the jumbo CNC cuts out the pieces for its own electronics enclosure.

You can tell from the videos that [Bob] is (rightfully) proud of his creation, and isn’t shy about showing the viewer each and every triumph along the way. Even when things don’t go according to plan, there are lessons to be learned as he explains the problems and how they were ultimately resolved.

Of course, we know a home-built CNC router doesn’t need to cost thousands of dollars or take up as much space as a pool table. The average Hackaday reader probably has no need of a monster like this, and wouldn’t have anywhere to keep it even if they did. But that doesn’t mean we can’t look on with envy as we wait to see what kind of projects [Bob] churns out with such an incredible tool in his arsenal.

Continue reading “Scratch Building A Supersized CNC Router”

A Home Made Dumper You’d Swear Came From A Factory

When it comes to YouTube videos, there’s little we like more than some good quality workshop action, watching someone in command of their tools craft a machine from raw materials with an amazing result. It’s something [Workshop From Scratch] delivers with his homemade mini dumper, in which he makes a small dump-truck from scratch with a result that looks as though he’d bought it factory-made from his agricultural supplier.

At its heart is a substantial chassis made from welded together double box section tube, to which he’s bolted a second-hand hydraulic transmission of the type you would find on larger walk-behind groundskeeping machinery. At the back is a front steering axle from a mobility scooter, that pivots on a bearing and wheel hub from a Ford Mondeo to ensure stability on rough ground. There is a platform for the operator to stand on as the little Honda 4-stroke engine moves it around. The bucket is plasma cut and welded, and it’s safe to say that his welding ability exceeds ours.

The result is a machine that looks to be very useful, and dare we admit it, one we wouldn’t mind having a go on. It may not be as powerful as this electric home-built dump truck, but we like it.

Continue reading “A Home Made Dumper You’d Swear Came From A Factory”

Scratch Built Magnetic Vise Stays Where You Need It

For those who might not have run into one before, a magnetic vise is used when you want to quickly anchor something to a metal surface at an arbitrary position. They’re often used to hold the workpiece down when machining, and can be a real time saver if a lot of repositioning is involved.

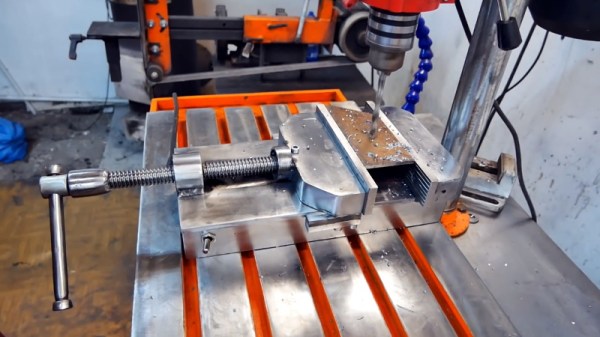
[Workshop From Scratch] recently wanted to put together one of these handy pieces of gear, and as we’ve come to expect from his channel, the finished product is an absolute beast. Starting with little more than scraps of metal, the video after the break takes the viewer on a fascinating journey that ends with some demonstrations of the vise in action.

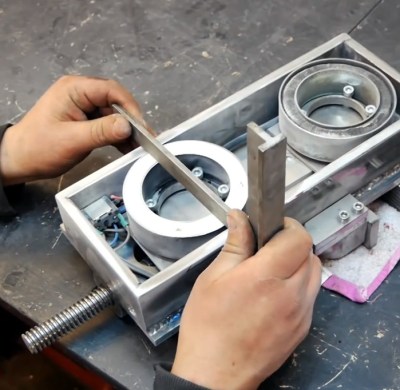
Conceptually, this build is relatively simple. Start with a vise, put a hollow base on it, and fit it with powerful electromagnets that will anchor it down once you flip the switch. Technically you could just build a magnetic base and bolt a commercially available vise onto it, but that’s not how [Workshop From Scratch] does things.

Every element of the build is done by hand, from the pattern cut into the jaws to the t-handle nut driver that gets adapted into a very slick crank. Of particular interest is how much effort is put into grinding down the surface of the electromagnets so they are perfectly flush with the base of the vise. Incidentally, these beefy electromagnets were salvaged from automotive air conditioning compressors, so you might want to add that to your junkyard shopping list.

Eagle-eyed readers might recognize the surface [Workshop From Scratch] uses the vise on as the custom drill press table he built a few months ago. These videos are not only reminders of what you can accomplish when you’ve mastered the use of a few common tools, but just how much design and thought goes into the hardware many of us take for granted.

Continue reading “Scratch Built Magnetic Vise Stays Where You Need It”

Giant 3D Printer For Giant Projects

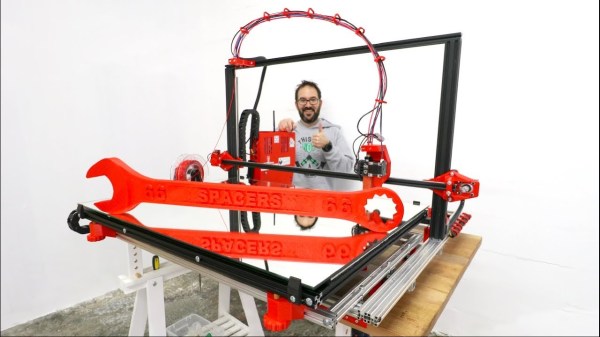
Established FDM 3D printers designs generally lead themselves well to being scaled up, as long as you keep frame stiffness, alignment and movement in mind. [Ivan Miranda] needed a big printer for his big projects (videos below), so he built his own i3 style printer with a 800 mm × 500 mm usable print bed and about 500 mm vertical print height.

The frame of the new machine is built using 20×20 and 20×40 aluminium V-slot extrusions with some square tubing for reinforcement. To move all the weight, all 3 axes are driven by double NEMA17 steppers, via a DUET3D board with an expansion board for the extra motors. The extruder is the new E3D Hemera with a 0.8 mm nozzle. The print bed is a mirror, on top of the aluminium plate, headed by a large silicone heat pad. The first bed version used a smaller heat pad directly on the back of the mirror, but it heated up unevenly and the mirror ended up cracking. Look out for the ingeniously lightweight and simple cable management to the extruder. When all was said and done he printed a 800 mm long size 66 wrench as a test piece with zero warp, which is pretty good even for PLA. This project is also a perfect example of the power of 3D printing for rapid iterative development, as lot of the printed fittings went through multiple versions.

Although [Ivan] received most of the components for free, a printer like this is still within reach of the rest of us. We look forward to a lot of big prints by [Ivan] in his signature red, like a massive nerf gun and the ridable tank he is currently working on. Continue reading “Giant 3D Printer For Giant Projects”

A 3D Printer Scratch Built For Your Viewing Pleasure

Today it’s almost always cheaper to buy an imported 3D printer kit than it is to source your own parts and build one yourself. But that doesn’t stop people from doing it anyway. Whether they’re looking for something a bit more solid, or just want to do things their own way, there are still valid reasons to design and build your own machine. Luckily for us in the audience, [Rob Mech] decided to document the build of his custom “LayerFused C201” printer on his YouTube Channel.

If you’ve ever dreamed of taking the plunge and building a 3D printer exactly the way you want, but were never able to manage the time, this seven video series might be the next best thing. Each video takes you through a different step of the construction, from building the frame out of aluminum extrusion all the way to wiring up the endstop switches and the 32-bit SKR v1.3 controller. There’s even a video that introduces the viewer to the concept of a “Frankenstein” printer that uses cobbled together parts just long enough to produce its own final components.

All told, [Rob] says the Bill of Materials for the LayerFused C201 comes to at least $200, but that’s going to take shopping around for the lowest possible prices and potentially even salvaging some components from other machines and projects. Like we said, building a cheap printer is absolutely not the goal here; it’s all about building a printer you want to use. Continue reading “A 3D Printer Scratch Built For Your Viewing Pleasure”