Arduino hearing test device overview

DIY Arduino Hearing Test Device

Hearing loss is a common problem for many – especially those who may have attended too many loud concerts in their youth. [mircemk] had recently been for a hearing test, and noticed that the procedure was actually quite straightforward. Armed with this knowledge, he decided to build his own test system and document it for others to use.

audiogram showing the results of the arduino hearing test device
Resultant audiogram from the device showing each ear in a different color

By using an Arduino to produce tones of various stepped frequencies, and gradually increasing the volume until the test subject can detect the tone, it is possible to plot an audiogram of hearing threshold sensitivity.  Testing each ear individually allows a comparison between one side and the other.

[mircemk] has built a nice miniature cabinet that holds an 8×8 matrix of WS2812 addressable RGB LEDs.  A 128×64 pixel OLED display provides user instructions, and a rotary encoder with push-button serves as the user input.

Of course, this is not a calibrated professional piece of test equipment, and a lot will depend on the quality of the earpiece used.  However, as a way to check for gross hearing issues, and as an interesting experiment, it holds a lot of promise.

There is even an extension, including a Class D audio amplifier, that allows the use of bone-conduction earpieces to help narrow down the cause of hearing loss further.

There’s some more information on bone conduction here, and we’ve covered an intriguing optical stimulation cochlear implant, too.

Continue reading “DIY Arduino Hearing Test Device”

Sight And Sound Combine In This Engaging Synthesizer Sculpture

We’ll always have a soft spot for circuit sculpture projects; anything with components supported on nice tidy rows of brass wires always captures our imagination. But add to that a little bit of light and a lot of sound, and you get something like this hybrid synthesizer sculpture that really commands attention.

[Eirik Brandal] calls his creation “corwin point,” and describes it as “a generative dual voice analog synthesizer.” It’s built with a wide-open architecture that invites exploration and serves to pull the eyes — and ears — into the piece. The lowest level of the sculpture has all the “boring” digital stuff — an ESP32, the LED drivers, and the digital-to-analog converters. The next level up has the more visually interesting analog circuits, built mainly “dead-bug” style on a framework of brass wires. The user interface, mainly a series of pots and switches, lives on this level, as does a SeeedStudio WIO terminal, which is used to display a spectrum analyzer of the sounds generated.

Moving up a bit, there’s a seemingly incongruous vacuum tube overdrive along with a power amp and speaker in an acrylic enclosure. A vertical element of thick acrylic towers over all and houses the synth’s delay line, and the light pipes that snake through the sculpture pulse in time with sequencer events. The video below shows the synth in action — the music that it generates never really sounds the same twice, and sounds like nothing we’ve heard before, except perhaps briefly when we heard something like the background music from Logan’s Run.

Hats off to [Eirik] for another great-looking and great-sounding build; you may remember that his “cwymriad” caught our attention earlier this year.

Continue reading “Sight And Sound Combine In This Engaging Synthesizer Sculpture”

Hackaday Links Column Banner

Hackaday Links: October 23, 2022

There were strange doings this week as Dallas-Forth Worth Airport in Texas experienced two consecutive days of GPS outages. The problem first cropped up on the 17th, as the Federal Aviation Administration sent out an automated notice that GPS reception was “unreliable” within 40 nautical miles of DFW, an area that includes at least ten other airports. One runway at DFW, runway 35R, was actually closed for a while because of the anomaly. According to GPSjam.org — because of course someone built a global mapping app to track GPS coverage — the outage only got worse the next day, both spreading geographically and worsening in some areas. Some have noted that the area of the outage abuts Fort Hood, one of the largest military installations in the country, but there doesn’t appear to be any connection to military operations. The outage ended abruptly at around 11:00 PM local time on the 19th, and there’s still no word about what caused it. Loss of GPS isn’t exactly a “game over” problem for modern aviation, but it certainly is a problem, and at the very least it points out how easy the system is to break, either accidentally or intentionally.

In other air travel news, almost as quickly as Lufthansa appeared to ban the use of Apple AirTags in checked baggage, the airline reversed course on the decision. The original decision was supposed to have been based on “an abundance of caution” regarding the potential for disaster from its low-power transmitters, or should a stowed AirTag’s CR2032 battery explode. But as it turns out, the Luftfahrt-Bundesamt, the German civil aviation authority, agreed with the company’s further assessment that the tags pose little risk, green-lighting their return to the cargo compartment. What luck! The original ban totally didn’t have anything to do with the fact that passengers were shaming Lufthansa online by tracking their bags with AirTags while the company claimed they couldn’t locate them, and the sudden reversal is unrelated to the bad taste this left in passengers’ mouths. Of course, the reversal only opened the door to more adventures in AirTag luggage tracking, so that’s fun.

Energy prices are much on everyone’s mind these days, but the scale of the problem is somewhat a matter of perspective. Take, for instance, the European Organization for Nuclear Research (CERN), which runs a little thing known as the Large Hadron Collider, a 27-kilometer-long machine that smashes atoms together to delve into the mysteries of physics. In an average year, CERN uses 1.3 terawatt-hours of electricity to run the LHC and its associated equipment. Technically, this is what’s known as a hell of a lot of electricity, and given the current energy issues in Europe, CERN has agreed to shut down the LHC a bit early this year, shutting down in late November instead of the usual mid-December halt. What’s more, CERN has agreed to reduce usage by 20% next year, which will increase scientific competition for beamtime on the LHC. There’s only so much CERN can do to reduce the LHC’s usage, though — the cryogenic plant to cool the superconducting magnets draws a whopping 27 megawatts, and has to be kept going to prevent the magnets from quenching.

And finally, as if the COVID-19 pandemic hasn’t been weird enough, the fact that it has left in its wake survivors whose sense of smell is compromised is alarming. Our daily ritual during the height of the pandemic was to open up a jar of peanut butter and take a whiff, figuring that even the slightest attenuation of the smell would serve as an early warning system for symptom onset. Thankfully, the alarm hasn’t been tripped, but we know more than a few people who now suffer from what appears to be permanent anosmia. It’s no joke — losing one’s sense of smell can be downright dangerous; think “gas leak” or “spoiled food.” So it was with interest that we spied an article about a neuroprosthetic nose that might one day let the nasally challenged smell again. The idea is to use an array of chemical sensors to stimulate an array of electrodes implanted near the olfactory bulb. It’s an interesting idea, and the article provides a lot of fascinating details on how the olfactory sense actually works.

Look Inside This “Meditation Headband” And Integrate It Into Your Own Projects

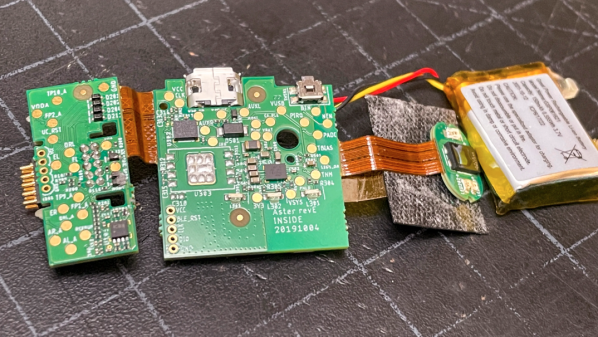
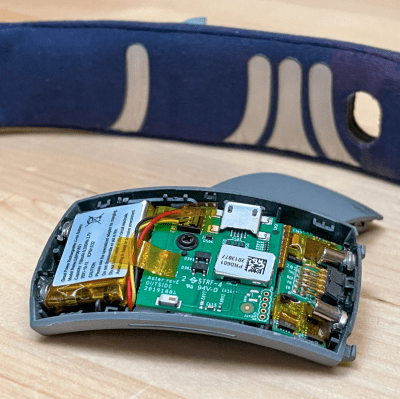
Muse makes a variety of wearable devices aimed at measuring brain and body activity, and [Becky Stern] did a detailed teardown of the Muse S model, revealing what goes on inside the device.

The Muse S is a soft, sleep-friendly biofeedback wearable mounted on silver-plated fabric. Not only does [Becky] tear it down, but she provides loads of magnified images and even has it CT scanned. The headband has conductive fabric embedded into it, and the core of the device is stuffed with three separate PCBs that get pretty thoroughly scrutinized.

While the Muse S is sold mainly as a meditation aid and works with a companion app, there is, fortunately, no need to go digging around with a screwdriver and soldering iron to integrate it into other projects. The Muse S is supported by the Brainflow project which opens it up to different applications. Brainflow is a library intended to obtain, parse, and analyze EEG, EMG, ECG, and other kinds of data from biosensors.

If you think Muse and Brainflow sound familiar, that might be because of another project we featured that integrated a Muse 2 and Brainflow with Skyrim VR, creating a magic system whose effectiveness depends on the player’s state of mind. Good things happen when hardware and software are accessible to users, after all.

You can watch a video tour of the teardown in the video, embedded just under the page break.

Continue reading “Look Inside This “Meditation Headband” And Integrate It Into Your Own Projects”

A sequence of pictures with arrows between each other. This picture shows a Wokwi (Fritzing-like) diagram with logic gates, going to a chip shot, going to a panel of chipsGA footprint on a KiCad PCB render with DIP switches and LEDs around the breakout. Under the sequence, it says: "Tiny Tapeout! Demystifying microchip design and manufacture"

Design Your Own Chip With TinyTapeout

When hackers found and developed ways to order PCBs on the cheap, it revolutionized the way we create. Accessible 3D printing brought us entire new areas to create things. [Matt Venn] is one of the people at the forefront of hackers designing our own silicon, and we’ve covered plenty of his research over the years. His latest effort to involve the hacker community, TinyTapeout, makes chip design accessible to newcomers – the bar is as low as arranging logic gates on a web browser page.

Six chip shots shown, with various densities of gates being used - some use a little, and some use a the entire area given.
Just six of the designs submitted, with varying complexity

For this, [Matt] worked with people like [Uri Shaked] of Wokwi fame, [Sylvain “tnt” Munaut], [jix], and a few others. Together, they created all the tooling necessary, and most importantly, a pipeline where your logic gate-based design in Wokwi gets compiled into a block ready to be put into silicon, with even simulations and compile-time verification for common mistakes. As a result, the design process is remarkably straightforward, to the point where a 9-year-old kid can do it. If you wanted, you could submit your Verilog, too!

The first round of TinyTapeout had a deadline in the first days of September and brought 152 entries together – just in time for an Efabless shuttle submission. All of these designs were put on a single instance of a chip, that will be fabbed in quantity, tested, soldered onto breakouts, and mailed out to individual participants. In this way, everyone will be getting everyone’s design, but thanks to the on-chip muxing hardware, they’re able to switch between designs using on-breakout DIP switches.

More after the break…

Continue reading “Design Your Own Chip With TinyTapeout”

Protected Mode On A Z80! (Almost)

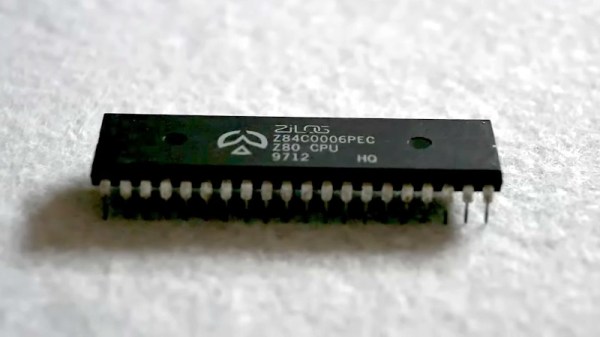
The microprocessor feature which probably most enables the computing experience we take for granted today is protected mode. A chip with the required hardware can run individual software processes in their own environments, enabling multitasking and isolation between processes. Older CPUs lacked this feature, meaning that all the resources were available to all software. [Andy Hu] has done the seemingly impossible with a Zilog Z80, enabling a protected mode on the chip for the first time in over four decades. Has he found an elusive undocumented piece of silicon missed by every other researcher? Not quite, but it is a clever hack.

The Z80 has two address spaces, one for memory and the other for I/O. He’s taken the I/O request line and fed it through a flip-flop and some logic to call a hardware interrupt the first time an I/O call is made or when a RST instruction is executed. Coupled with a small piece of memory for register contents, and he’s made a Z80 with a fully-functional protected mode, for the cost of a few logic chips. It’s explained in the video below the break, and we hope you agree that it’s rather elegant given the resources in hand. It’s too late for the commercial 8-bit machines of the past, but it would be interesting to see what today’s retrocomputer designers make of it.

Continue reading “Protected Mode On A Z80! (Almost)”

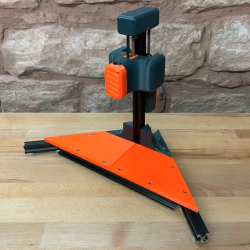
DIY Heat-Set Insert Press Says Complicated = Comfort

Heat-set inserts are a great way to embed mechanically-strong, threaded parts into a 3D print. For installation, all that is required is an economical soldering iron; something most of us already have.

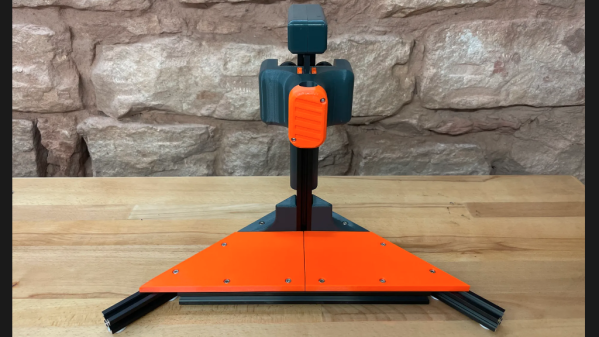
The carriage and counterweight use a v-wheel gantry, GT2 belt, and other common hardware.

That’s fine for a handful of occasional inserts, but when a large number need to be inserted reliably and cleanly, something a little more refined is called for. That’s where [virchow]’s threaded insert press design comes in. It adds 3D-printed parts to an aluminum extrusion frame to create a press that smoothly lowers a soldering iron directly up and down, with minimal effort by the user.

The holder for the soldering iron is mounted to a small v-wheel gantry that rides along the vertical extrusion. The gantry features a counterweight to take care of resetting the position of the iron. [Virchow] admits that the design could be considered unnecessarily complicated (hence the “UC” in the name) but on the other hand, there’s nothing like doing a hundred or so inserts to make one appreciate every bit of comfort and stability.

Heat-set inserts aren’t difficult to use, but a little technique goes a long way. Spend a few minutes reading Joshua Vasquez’s guide on the optimal way to use them in 3D-printed parts to make sure yours not only go in straight but end up looking great as well.