Behold The Mighty Floppotron 3.0

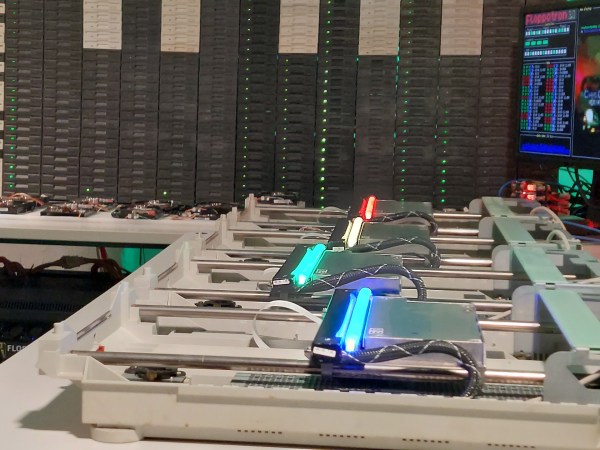
If anyone has been struggling to get hold of a 3.5″ floppy drive lately, we think we’ve got a clue as to why — behold, the mighty floppotron 3.0 by [Paweł Zadrożniak.] With an utterly bonkers 512 floppy drives, four flatbed scanners and sixteen hard disks of various sizes, the floppotron 3.0 MIDI synthesiser is possibly the biggest such retro hardware synthesiser so far. Since every part of the system is motor-based, nobody is going to be surprised that to power the show is quite an undertaking, with nearly twenty switched-mode PSU modules needed to keep up with the demand, averaging 300W but rated at 1.2kW peak!

A full custom MIDI-to-RS485 gateway based around the nRF52xx series MCU deals with the communication to 
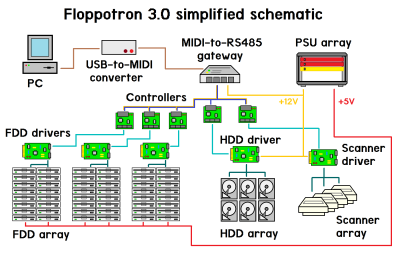
the collection of instrument controllers. These controllers are generic enough to take RS485 input and control a dedicated driver for either an array of floppy drives (up to 192), an array of hard drives or the handful of scanners. The way the floppy drives are grouped is quite neat. Rather than using each drive to generate a specific tone, the software uses the whole column for each note. By varying the number of drives moving simultaneously over time, the sound volume varies, simulating the note envelope and giving a richer sound. Multiple columns driving in parallel give the system a 16-note polyphony. The floppies cover the low notes, with the four flatbed scanners covering the higher notes. MIDI drum sounds are mapped to the hard disks, operating in a, well, percussive manner, with different case shapes giving unique sounds. Even the firmware can be updated over MIDI! So, checkout the demo video after the break for a sweet rendition of the very familiar “Entry of the gladiators” by Czech composer Julius Fučík.

If you think this looks familiar, you’re not mistaken, we’ve covered an earlier floppotron before, but we reckon nobody has attempted to do it with ye olde eight-inch drives yet!

Continue reading “Behold The Mighty Floppotron 3.0”

The RP2040 Doth A Motor Controller Make

When the Raspberry Pi people launched their RP2040 microcontroller, it seemed as though it might be destined as a niche product for those areas in which the Pi has traditionally been strong. But during the global semiconductor shortage, it has remained almost alone among microcontrollers in having plenty of fab capacity to keep the supplies rolling. That, and its very vanilla set of ARM peripherals alongside those programmable state machines have thus seen it find a home in many places it might not otherwise have seen. Take the dual RP2040 motor controller from [Twisted Fields] as an example, would it have been more likely to have sported an STM32 in previous years?

It’s been produced as part of the Acorn Precision Farming Robot platform, and it’s a fully open-source two-channel controller on a board the same size as a credit card. The schematic appears fairly conventional through a cursory glance at the PDF, but we know from experience that motor controllers are never as deceptively simple to get right as their circuit would lead the unwary engineer to believe. The heat dissipation, current, and transient handling all play a part in a successful design, and we expect this one to evolve to fix any issues it might still contain.

If you’d like to remind yourself about the Acorn farming robot, then take a look at our earlier coverage of the project.

Thanks [Mark] for the tip.

Recreating A Camera Shot

People rolling off shields and spears clashing against swords as the camera zooms in and out wildly makes the hallmark action sequences in the movie 300 so iconic. Unfortunately, achieving this effect wasn’t particularly easy. Three cameras were rolling, each with a different lens (100mm, 50mm, and 21mm) to capture a different view of the same scene. In post-production, you can dramatically switch between the three cameras since the shot is synchronized. The folks over at [Corridor Crew] wanted to recreate the effect, but rather than create a custom mount to hold three expensive cameras, they 3d printed a custom mount to hold three costly smartphones.

While there are three cameras on the back of most phones, most phones can’t shoot in slo-mo from all cameras simultaneously. So they would need a rig to hold three phones. The first design was simple and just brackets to hold phones. While nice and sturdy, getting the phones in or out wasn’t easy, and getting to the record button was tricky. iPhones have this handy little magnetic ring on the back. They had a bracket that worked pretty well after a few iterations on the design and some printer issues. Since each camera has optical image stabilization, it is easy for the lenses to get out of alignment, which can mar the shot. However, they somewhat covered up the effect in post. With a working prototype, the only thing left to do was to slice a bunch of piñatas in slow motion with a thrumming soundtrack.

We love seeing exciting camera setups and iterating to find something that works. This dual-camera setup has a very different goal and tries to lean into the parallax effect rather than hide it. Video after the break.
Continue reading “Recreating A Camera Shot”

Kved: An Embeddable Key/Value Datastore

At some point when developing embedded applications, you’re going to want to store unique values in non-volatile memory, values that can’t be fixed at compilation time. Many microcontrollers have a small amount of EEPROM memory for this very purpose, but it’s usually rather limited if it’s provided at all. Even if you do have a bit of space on an EEPROM at your disposal, actually formatting your values into the memory and dealing with the pesky problem of wear leveling (necessary for parameters that need to change often) can be a bit of a hassle.

Lucky for us, [Marcelo Barros] decided to share his own implementation, Kved (key/value database) which uses the flash memory instead for such storage. Kved implements a dictionary type data structure, using numeric keys and values, supporting a few integer types. Using the library should be straightforward enough, as [Marcelo] says, all you need are a pair of spare flash sectors and the ability to port the flash the sector read, write, and erase functions. There are plenty of examples of such code available for practically any microcontroller out there, so that should be no barrier. For those who want to play with it right now, the repo currently has ports for the STM32L433RC and STM32F411CE, as well as a simulated version you can compile and run on your computer.

From an implementation perspective, the write algorithm uses a COW (Copy On Write) method. Changed values are invalidated by over-writing the storage location with all-zeros, and re-writing the changed value to a new location, cycling through the unused locations until the sector is full. Data-integrity mechanisms are implemented, preventing corruption of the data structure due to power fail situations, so incorrectly written values will be corrected on start-up and not affect the integrity of the configuration.

When looking around, we found a similar project, Embedis, over on hackaday.IO, as well as this article on the subject of embedded filesystems from a little while back.

Odd Inputs And Peculiar Peripherals: The Morse Keyboard

When it comes to rendering text input into an electronic form,the newest keyboards use USB for wired interfacing, while the oldest Morse keys use a single conductor. Shall the two ever meet? For [Matthew Sparks] the answer is yes, with his “The Gadget” Morse-to-USB HID interface which presents a Morse key to a computer as though it were a USB keyboard.

At its heart is a Seeduino Arduino clone, upon which the Morse key waggles a pin, and which through the extensive magic of software recognizes the keyed characters and converts them into USB key presses for the computer. It’s thus a surprisingly simple project, and the write-up spends far more time proselytizing the art of the carrier wave than it does on Arduino code.

Morse is simultaneously a manual art form, an efficient means of communicating through congested radio bands, and an anachronism, which probably explains its continued appeal in the radio amateur fraternity. We’re not sure how many keyboard warriors will switch to the single key with this project, but we can see that it might be a useful aid to learning as well as a pretty quick input method for the owner of an experienced fist.

Morse has featured in many projects here before, not least in this assistive Morse keyboard.

Linux Fu: Up Your GDB Game!

If you want to buy a car, there are plenty of choices. If you want to buy a jetliner, there are fewer choices. If you want to use the Large Hadron Collider, you have a choice of exactly one. The harder something is to create, the less likely there is to be many of them. If you are looking for a Linux debugger, there are only a few choices, but gdb is certainly the one you will find most often. There is lldb and a handful of non-open commercial offerings, but for the most part you will use gdb to debug software on Linux.

Of course, not everyone’s a fan of gdb’s text-based interface, so there’s no shortage of front ends available for it. In fact, gdb has two potentially built-in interfaces although depending on how you install gdb, you might not have both of them. Of course, if you use an IDE, it very likely is a front end for gdb among other things. But at the core is gdb and — usually — there is a window somewhere that you can stuff gdb commands into. Even emacs — which might be considered the original IDE — can run gdb and gives you a sort-of GUI experience.

Continue reading “Linux Fu: Up Your GDB Game!”

LMN-3: Putting The ‘OP’ In Open Source Synthesizers

Some projects you come across simply leave you in awe when you look at the thought and the resulting amount of work that went into it, not only for the actual implementation, but everything around it. Even more so when it’s a single-developer open source project. [Stone Preston]’s synth / sampler / sequencer / DAW-in-a-box LMN-3 absolutely fits the description here, and it seems like he has set his heart on making sure everyone can built one for themselves, by providing all the design files from case down to the keycaps.

The LMN-3 (LMN as in “lemon”, not “comes before the OP“) is intended as a standalone, portable digital audio workstation, and is built around a Raspberry Pi 4 with a HyperPixel display for the user interface. The UI itself, and with it the core part of the software, was created using the Tracktion Engine, which itself uses the JUCE framework and combines your typical synthesizer, sequencer, and sampler features with the DAW part to handle recording, editing, and mixing. The remaining hardware is a custom-designed PCB with a set of function and keyboard buttons, along with a pitch bend joystick and four rotary encoders with push buttons that serve as main input handlers. Oh yes, and a Teensy board.

The UI is actually entirely controlled via MIDI commands, and custom firmware on the Teensy is translating the input events from buttons, encoders, and joystick accordingly. This essentially decouples the hardware from the software, and using a cross-platform framework underneath, you can also run the UI standalone on your computer and use any 3rd-party MIDI controller you like. Or then, as [Stone] thought really about everything, use a hardware emulator he created in addition. You could even leave out the Raspberry Pi and software altogether and turn this into a pure MIDI controller. If that sounds tempting, but you’re looking for something with more knobs and sliders instead of buttons, check out the Traktorino. And if you actually prefer a mouse as input device, there’s always something running in a browser.

Continue reading “LMN-3: Putting The ‘OP’ In Open Source Synthesizers”