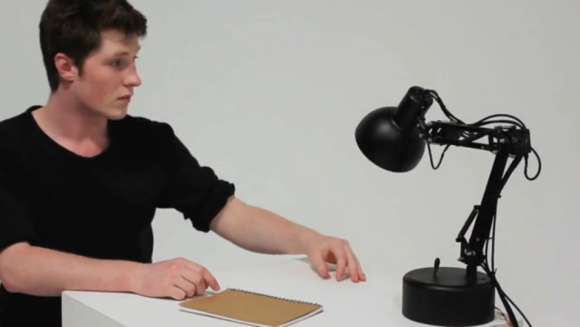
Halloween Props: Monster In A Box

This furry Halloween decoration proves to be a simple build, but it’s still quite popular with the little ones. [Chris] had a Halloween party for a group of 2-5 year olds and this monster that peeks out of a box was a huge hit. The trick really isn’t in the complexity of the build, but in the interactivity.

The enclosure is just a shoe box which has been covered in synthetic black fur. The lid was hinged on the back, and a hobby servo with a bit of an extension on the arm is used to lift the front which reveals the monster’s paper eyes. Inside you’ll find an Arduino, breadboard, and battery pack. It’s not visible above, but a distance sensor on the front of the box is monitored by the Arduino. When it detects something in front of it the servo fires up and pops open the lid. The firmware includes a timer so that the monster waits a bit before taking its next peek at the party.

A Collection Of Hands To Inspire Your Halloween Animatronics

Jump scares are a lot of fun, but if you want to hold the attention of all those trick-or-treaters we’d suggest a creepy prop. One of the best choices in that category is a ghoulishly lifelike hand. You can draw some inspiration from this roundup of robot hands which Adafruit put together.

We’ve chosen four examples for the image above but there are more to be had than just these. In the upper left there is a laser-cut acrylic hand that actually features some force sensitive resistors on the fingertips to help implement some haptic feedback. This project was inspired by the hand seen in the lower right which uses flex sensors on a glove to control the bot’s movement. If you’re looking for something more realistic the 3D printed parts on the lower left are the best bet. But if you’re looking to put something together by Halloween night the offering in the upper right is the way to go. It’s hacked together using cardboard templates to cut out plastic parts and using polymorph to form joints and brackets.

The Inner Workings Of Servo Motors

Servos seem to be the go-to option when adding motors to hobby projects. They’re easy to hack for continuous rotation for use in a robot, but with the control board intact they are fairly accurate for position-based applications. But do you know how the hardware actually works? [Rue Mohr] recently published an article that looks at the inner world of the servo motor.

As you know, these motors use a voltage, ground, and signal connection for control. The position of the horn (the wheel seen on the servos above) is dependent on that control signal. The duty cycle of a 20 ms pulse decides this. Inside the housing is a control board capable of measuring this signal. It’s got a chip that monitors the incoming PWM pulses, but that’s only half of the equation. That controller also needs feedback from the horn to know if its position is correct or needs to be changed. Integrated with the gear box that connects the motor to the horn is a potentiometer. It’s resistance changes as the horn turns. Knowing this, it is possible to fine tune a servo by altering that resistance measurement.

Turning A Plush Dalek Into A WiFi Enabled Robot

You can now “EX-TER-MIN-ATE!” with one finger since this plush Dalek from Doctor Who has been turned into a wireless robot. The build started out with the toy whose only trick was to spout quotes from the popular science fiction television series. [Madox] took it apart to see how it worked, then added some of his own goodies to make it better.

We just looked in on a project from this guy on Tuesday. It was a light painting wand that used the TP-Link TL-WR703N wireless router. This uses the same tiny hardware as the controller. Since it’s a WiFi router it’s quite simple to serve up a control interface on any browser. To make it all work [Madox] designed and printed a new base plate. This provides brackets on which the two servo motors can  be mounted. It also gives him a place to anchor the driver board and the router itself. The original voice hardware is still there, driven by a connection to the router hardware. See the final product in the clip after the jump.

Continue reading “Turning A Plush Dalek Into A WiFi Enabled Robot”

Hand Cranked Electric Toy Has No Batteries Or Power Supply

We think this hand cranked robot design is nothing short of absolute brilliance. The toy is remote-controlled through a short section of wire. It can drive forward and turn, but not at the same time. Still that’s impressive considering it uses no battery or power supply and, of the two servo motors, only one is actually in the robot itself.

The second servo, which is visible to the right, acts as a dynamo. When you crank it electricity is generated. The inputs of that servo are connected to the inputs of the one in the robot to power it. If you crank in one direction the colorful toy will drive forward. But there is a one-way catch on one of the side wheels so when the servo is cranked backward the little guy actually executes a reverse turn. The magic of building a project like this is perfect for a weekend activity with the kids. Don’t miss the demo embedded after the jump.

Continue reading “Hand Cranked Electric Toy Has No Batteries Or Power Supply”

Crystal Doorbell Helps Class Up The Joint

Even if you live in a dump this quick build will make your doorbell sound high-class. The new rig uses a crystal goblet to alert you of guests at the door. We suppose the room-silencing sound of flatware on a wine glass does make a great attention getter.

For [Tobias] the hardest part of the build was getting his wife to sign off on it. But he says the 1970’s era original was looking pretty shabby, which kind of made his argument for him. It took just two hours to develop and install the replacement. It uses a servo motor with an articulated striker to ping the glass which is hanging inverted between two pegs. The original AC transformer (which are most often 16V) was used to power the Arduino. He built a simple rectifier along with a big smoothing capacitor to make sure the Arduino doesn’t reset when voltage dips. Although it’s not mentioned in his comments, we’d bet the doorbell wire has been rerouted to connect directly to the Arduino, rather than remain patched into the power loop.

Don’t miss the clip after the break to hear how great this thing really does sound.

Continue reading “Crystal Doorbell Helps Class Up The Joint”

Making Your Anime Papercraft Move To The Music

This anime character is dancing to the music thanks to some animatronic tricks which [Scott Harden] put together. She dances perfectly, exhibiting different arm and head movements at just the right time. The secret to the synchronization is actually in the right channel of the audio being played.

The character in question is from an Internet meme called the Leekspin song. [Scott] reproduced it on some foam board, adding a servo to one arm to do the leek spinning, and another to move the head. These are both driven by an ATtiny44. All of the movements have been preprogrammed to go along with the audio track. But he needed a way to synchronize the beginning of each action set. The solution was to re-encode the audio with one track devoted to a set of sine wave pulses. The right audio channel feeds to the AVR chip via an LM741 opamp. Each sine wave triggers the AVR to execute the next dance move in the sequence. You can see the demo video for the project after the break.

Continue reading “Making Your Anime Papercraft Move To The Music”