A Trio Of Last-minute 555 Timer Projects

555_timer_secret_knock_circuit.jpg

[Bob] has been busy lately putting the finishing touches on three different projects that he plans on entering into the 555 Design Contest.

His first entry is a low-power H-bridge, which can be used to drive small servos. While he admits that it is a bit odd to build use a 555 timer to construct an H-bridge, they are cheap and plentiful enough to justify their use. Check out the video below to see the simple H-bridge controlling a servo.

[Bob’s] second entry is quite a bit more complex than his H-bridge. His secret knock detector listens for a pattern of knocks, triggering a relay if the proper cadence is detected. If a knock is heard, the first 555 timer starts, listening for another knock within a specific time range. If a knock is heard during this period, the next timer is triggered, and the process is repeated. Subsequent knocks must be timed correctly, or the circuit halts, waiting for a reset timer to expire before listening is resumed. It’s a bit hard to get the knocks just right, but that should be fixable with a few small tweaks.

The third entry he sent us is a project that is pretty common, though with a somewhat uncommon implementation. Class D amplifiers are often built as low-power headphone amps for personal audio applications. He liked the idea of a Class D amplifier, but wanted to build something with enough power to listen to his music in a small room. To accomplish this task, he looked over the internal block schematics of a 555 timer and constructed a pair of high-power 555 timers himself, using discrete components to mimic those usually found in the 555 package. His results were decent, though admittedly not of the highest quality, and could be tweaked a bit to provide better sound fidelity.

Continue reading to see videos of each project in action.

Continue reading “A Trio Of Last-minute 555 Timer Projects”

Analog Robotic Concepts

Everyone’s getting on board with the 555 timer projects. But [Tom] didn’t just come up with one project, he shared a slew of ideas related to analog robotics. They’re center around servo motor control. You can see in the video after the break he has a pleasing way of sharing a lot of details while also making an easy to view demonstration video. He’ll put up a schematic for about one second and then move on, saving those that don’t care about the details by not droning on.

The first schematic that flashes by is the main circuit for controlling the servo motor. The rest of the concepts build from this circuit, using light, sound, flex, and other sensors as inputs. For instance, the setup above is using a light sensor. When the ball blocks the light the servo moves that vertical rod hitting it out of the way. When it swings back the process repeats. It’s striking how lifelike the reactions are, reminding us of insect movements. But this is really just the tip of the iceberg as he’s got a lot of future video ideas that we can’t wait to see.

Continue reading “Analog Robotic Concepts”

DIY Animatronic Penguin Shakes And Grooves

animatronic_penguin

Instructables user [djsfantasi] wanted to build an animated holiday display using puppets as a means of raising money for a local arts program. After doing a bit of reading and research however, he decided that building animatronic characters for the display was not that far fetched an idea.

His first inclination was to build a penguin, allowing him to focus mostly on torso motion rather than having to articulate arms and legs as well. His goal was to enable his penguin to “dance” by shimmying and shaking as well as flapping his wings. Using plywood, four servos, along with some miscellaneous connecting rods and cables, he went to work.

The penguin is operated using a SSC-32 servo controller that features an ATmega168 MCU at its core. This allows him to control all of the servos independently, and also in concert, allowing for combined movements. The penguin’s mouth also functions, using a circuit that synchronizes its movements to an audio file.

While the robot is currently tethered to his computer via a serial cable, [djsfantasi] mentions that he is currently working on an iPhone app that will be able to control the robot wirelessly. All he needs to do now is build an animatronic Tom Servo then toss a Crow skin over this one, and he’ll be all set!

Keep reading to get a look at the penguin moving and grooving in the video below.

Continue reading “DIY Animatronic Penguin Shakes And Grooves”

Machine Pushes Cellphone Buttons From Anywhere In The World

[Mok Young Bacq] works on the weekends for mobile game monitoring service. He has three cellphones that he uses for work, and although you would think this means he could work from anywhere in the world, the roaming charges are a killer. His solution was to build an incredibly intricate machine that can use three different cellphones (PDF) on his behalf.

Above you can see it perched underneath the apex of the ladder, but you’re definitely going to want to watch the video after the break. This interface method uses a camera to look at each phone. It’s hung pointing downward and moves like a pendulum to look at one of the three screens at a time. Each phone has one servo motor for each button, which uses a flexible cable as an actuator. Now he can take trips abroad, just checking in over the Internet for his two 17-hour weekend shifts (10am to 3am the next morning) working the phones.

This reminds us of the cellphone endurance tests. What happens when a button stops working?

Continue reading “Machine Pushes Cellphone Buttons From Anywhere In The World”

KiwiDrive HouseBot

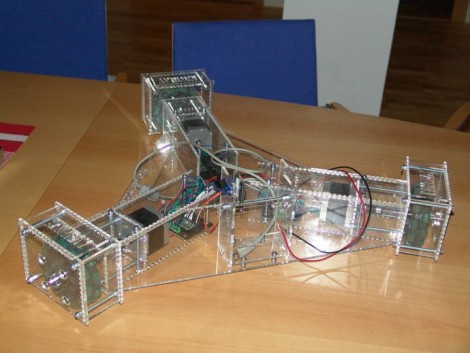
Forskningsavdelningen, a Swedish hackerspace, had a hackathon last weekend and the KiwiDrive HouseBot is one of the items that resulted from the group effort. They set a goal to use standard, easy to obtain parts, so that the robotic platform would be accessible for reproduction by individuals or at other hackerspaces. The three-limbed device rolls around on a triad of omni-directional wheels -which are probably the hardest part to source but you can always print your own. An Arduino Uno was used as the hardware interface, driving the three stepper motors for locomotion.

It’s not pictured above, but the fourth generation of the little guy also includes a webcam. The camera rides in the center of the body and is mounted on a servo. This makes it possible to turn the camera, meaning there’s no real front or back to this design. Future plans include adding an on-board computer (this is larger than it appears) and implementing emoticons on an 8×8 LED matrix, presumably so you can tell how the bot is feeling today.

[Thanks KiwiRay]

DIY Pick And Place Seems Easy To Build

We’re not saying it’s a simple project, but the build methods that [Alan Sawula] used for this DIY pick and place are probably the easiest we’ve seen yet. As this is just a CNC machine, the methods he used would also work quite well for mills or other machines. Instead of using precision rods for the X and Y axes, he used square tubing. The tubing is oriented more like a diamond, with the ninety degree corners providing the travel surface. Two bearings with a shim between them provide a groove that rides along the corner, and since this is square and not just ‘L’ bracket, the sleds are secured both above and below the tube. Stepper motors provide the movement along X and Y, with a servo motor for Z and another one to rotate the medical grade needle that serves as the vacuum tip. Starting four minutes into the video you can see that this not only works, but it’s lightning fast!

Continue reading “DIY Pick And Place Seems Easy To Build”

Bluetooth Tomy Omnibot Hack


tomy_omnibot_hack

[DJ Sures] sent us his most recent hack, and it’s one that is sure to please those who enjoy a good dose of 80’s nostalgia. He located a Tomy Omnibot on eBay and snatched it up immediately. While he was waiting for it to arrive, he planned out what he would add to it once it showed up at his door. Once the robot was delivered, he cleaned it up, painted it, then got down to business.

The original robot had no ability to move its arms or head, so he immediately added servos to enable those actions. A wireless camera was inserted between the Omnibot’s eyes, and a wireless mic was mounted in his chest. He has also added some features found in his previous projects, such as voice recognition, visual recognition, voice synthesis, and the ability to remotely control the bot. He plans on adding an ultrasonic ping sensor and IR floor sensors in the near future. This is a great build so far, and it sounds like he has plenty more in store.

Be sure to stick around for a video of the robot in action, and if you are interested in some of [DJ Sures’] previous work, check these out as well.

Continue reading “Bluetooth Tomy Omnibot Hack”