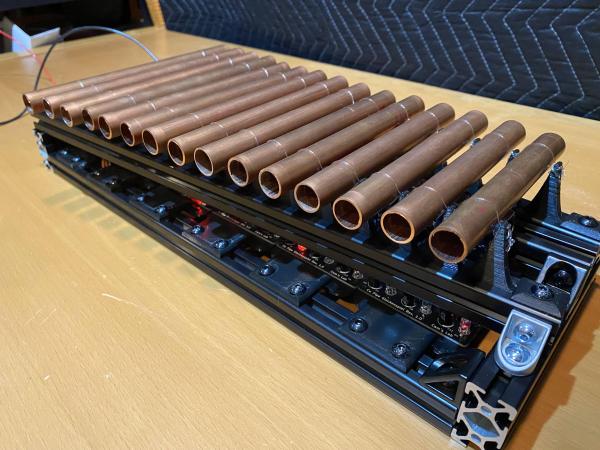
Virginia Cave Is The Largest Musical Instrument In The World

Hit something with a hammer, and it makes a sound. If you’re lucky, it might even make a pleasant sound, which is the idea behind the Great Stalacpipe Organ in Luray Caverns, Virginia. The organ was created in 1954 by [Leland W. Sprinkle], who noticed that some stalactites (the ones that come down from the ceiling of the cave) would make a nice, pure tone when hit.

So, he did what any self-respecting hacker would do: he picked and carved 37 to form a scale and connected them to an electronic keyboard. The resonating stalactites are spread around a 3.5 acre (14,000 square meters) cave, but because it is in a cave, the sound can be heard anywhere from within the cave system, which covers about 64 acres (260,000 square meters). That makes it the largest musical instrument in the world.

We’ll save the pedants the trouble and point out that the name is technically an error — this is not a pipe organ, which relies on air driven into resonant chambers. Instead, it is a lithophone, a percussion instrument that uses rock as the resonator. You can see one of the solenoids that hits the rock to make the sound below.

This is also the sort of environment that gives engineers nightmares: a constant drip-drip-drip of water filled with minerals that love to get left behind when the water evaporates. Fortunately, the Stalacpipe Organ seems to be in good hands: according to an NPR news story about it, the instrument is maintained by lead engineer for the caverns [Larry Moyer] and his two apprentices, [Stephanie Beahm] and [Ben Caton], who are learning the details of maintaining a complex device like this.

Continue reading “Virginia Cave Is The Largest Musical Instrument In The World”

Forever Writing On Monofilament Fishing Line

Collectively, we have a long-term memory problem. Paper turns to mulch, dyes in optical disks degrade, iron oxides don’t last forever, and flash memories will eventually fade away. So what do you do when you want to write something down and make sure it’s around a couple of thousand years from now? Easy — just use something that even Mother Nature herself has trouble breaking down: plastic.

Specifically, fluoropolymer fishing line, which is what [Nikolay Valentinovich Repnitskiy] uses as a medium in his “Carbon Record” project. There’s not a lot of information in the repository, but the basic idea is to encode characters by nicking the fishing line along its length. The encoder is simple enough; a spool of fresh line is fed into a machine where a solenoid drives a sharpened bolt against the filament. This leaves a series of nicks that encode the ones and zeros of 255 ASCII characters. It looks like [Nikolay] went through a couple of prototypes before settling on the solenoid; an earlier version used a brushed motor to drive the encoder, but the short, rapid movements proved too much for the motor to handle. We’ve included a video below that shows the device encoding some text; sounds a little like Morse to us.

There seems to be a lot more going on with this device than the repo lets on; we’d love to know what the big heat sink on top is doing, for instance. Hopefully we’ll get more details, including how [Nikolay] intends to decode the dents. Or perhaps that’s an exercise best left to whoever finds these messages a few millennia hence.

It’s A Marble Clock, But Not As We Know It

[Ivan Miranda] is taking a very interesting approach to a marble clock. His design is a huge assembly that uses black and white marbles to create a (sort of) dot matrix display. It’s part kinetic art and part digital clock, all driven by marbles.

Here’s how it works: black and white marbles feed into a big elevator. This elevator lifts marbles to the top of the curved runs that make up the biggest part of the device. The horizontal area at the bottom is where the time is shown, with white and black marbles making up the numerical display. But how to make sure the white marbles and black marbles go in the right order?

The solution to that is simple. Marbles feed into the elevator in an unpredictable order. An array of sensors detects the color of each marble. Solenoids simply eject any marble that isn’t in the right place. For example, if the next marble for track n needs to be white, then simply kick out any black marbles in that position until there’s a white one. Simple, effective, and guarantees plenty of mesmerizing moving parts.

Of course, this means that marble ejection and marble color sensing need to be utterly reliable, and [Ivan] ran into problems with both. Marble ejection took some careful component testing and selection to get the right solenoids.  Color sensing (as well as detecting empty spaces) settled on IR-based sensors commonly used in line-following robots.

You can watch the clock in action in the video embedded below just under the page break. We recommend giving it a look, because [Ivan] does a great job of showing all of the little challenges that reared their heads, and how he addressed them. There are still a few things to address, but he expects to have those licked by the next video. In the meantime, [Ivan] asks that if anyone knows a source for high quality glass marbles in bulk, please let him know. Low quality ones vary in size and tend to get stuck.

Marble clocks are great expressions of creativity, especially now that 3D printing is common. We love clock hacks, so if you ever create or run across a good one, let us know about it!

Continue reading “It’s A Marble Clock, But Not As We Know It”

Pour One Out For This Bottle-Playing Robot

If you have an iota of musicality, you’ve no doubt noticed that you can play music using glass bottles, especially if you have several of different sizes and fill them with varying levels of water. But what if you wanted to accompany yourself on the bottles? Well, then you’d need to build a bottle-playing robot.

First, [Jens Maker Adventures] wrote a song and condensed it down to eight notes. With a whole lot of tinkling with a butter knife against their collection of wine and other bottles, [Jens] was able to figure out the lowest note for a given bottle by filing it with water, and the highest note by emptying it out.

With the bottle notes selected, the original plan was to strike the bottles with sticks. As it turned out, 9g servos weren’t up to the task, so he went with solenoids instead. Using Boxes.py, he was able to parameterize a just-right bottle holder to allow for arranging the bottles in a circle and striking them from the inside, all while hiding the Arduino and the solenoid driver board. Be sure to check it out after the break.

Don’t have a bunch of bottles lying around? You can use an Arduino to play the glasses.

Continue reading “Pour One Out For This Bottle-Playing Robot”

Auto Xylophone Uses Homemade Solenoids

Want to play the xylophone but don’t want to learn how? [Rachad]’s automatic xylophone might be just the ticket. It uses homemade solenoids to play tunes under computer control. Think of it as a player piano but with electromagnetic strikers instead of piano keys. You can hear the instrument in action in the video below.

Since the project required 24 solenoids, [Rachad] decided to build custom ones using coils of wire and nails. We were amused to see a common curling iron used as an alternate way to apply hot glue when building the coils. The other interesting part of the project was the software. He now uses a toolchain to convert MIDI files into a serial output read by the Arduino. Eventually, he wants to train an AI to read sheet music, but that’s down the road, apparently.

Honestly, we were a bit surprised that it sounded pretty good because we understand that the material used to strike the xylophone and the exact position of the strike makes a difference. We doubt any orchestra will be building one of these, but it doesn’t sound bad to us.

The last one of these we saw did have more conventional strikers if you want to compare. Honestly, we might have just bought the solenoids off the shelf but, then again, we don’t make our own relays either.

Continue reading “Auto Xylophone Uses Homemade Solenoids”

All-Mechanical Coil Winder Is A Scrap-Bin Delight

If there’s something more tedious than winding coils, we’re not sure what it is — possibly rolling and wrapping coins; that’s really a bother. But luckily, just like there are mechanical ways to count coins, there are tools to make coil production a little less of a chore, but perhaps none that have as much charm as this all-mechanical coil winder.

We’d say that [Ralph (VK3ZZC)]’s amazing invention firmly falls under the “contraption” category, without a hint of the term being used as a pejorative. The rig was based on the MoReCo Coilmaster, a machine that was once commercially available at a fairly steep price, according to [Ralph], and still seems to command a premium even today. Never being able to afford an original, [Ralph] spun up his own from scrap metal and tooling no more sophisticated than a drill press. It’s a riot of brass and steel, with a hand crank that drives the main winding shaft while powering a cam that guides the wire along the long axis of the coil form. Cams can be changed out for different winding patterns, and various chucks adapt to hold different coil forms to the winding shaft.

Continue reading “All-Mechanical Coil Winder Is A Scrap-Bin Delight”

Illustrated Kristina with an IBM Model M keyboard floating between her hands.

Keebin’ With Kristina: The One With The QWERTY Drum Set

What does portability in a keyboard mean to you? For Hackaday’s own [Brian McEvoy], the image evokes that quintessential 80s instrument, the keytar.

But those left-hand keys aren’t just for show — they’re macro keys. It runs on an Adafruit Feather 32u4 Bluefruit, so [Brian] can forego the cord and rock out all over the room.

I love the construction of this keyboard, which you can plainly see from the side. It’s made up of extruded aluminum bars and 2 mm plywood, which is stacked up in layers and separated with little wooden donuts acting as spacers. Unfortunately, [Brian] accidentally made wiring much harder by putting the key switches and the microcontroller on different planes.

Although you could theoretically use any key switches for this build, [Brian] chose my personal and polarizing favorite, browns. If you’re going to use a travel keyboard, you’re probably going to be around people, so blues are probably not the best choice. With browns, you kind of have yourself a middle ground, best-of-both-worlds thing going on. The keycaps are among the best parts of this build, and it seems [Brian] chose them because the legends are on the sides, which makes it much easier to type on while wearing it. Kismet!

Continue reading “Keebin’ With Kristina: The One With The QWERTY Drum Set”