Illustrated Kristina with an IBM Model M keyboard floating between her hands.

Keebin’ With Kristina: The One With The C64 Keyboard

[Jean] wrote into the tips line (the system works!) to let all of us know about his hacked and hand-wired C64 keyboard, a thing of beauty in its chocolate-brown and 9u space bar-havin’ glory.

A C64 keyboard without the surrounding C64.
Image by [Jean] via GitHub
This Arduino Pro Micro-based brain transplant began as a sketch, and [Jean] reports it now has proper code in QMK. But how is a person supposed to use it in 2025, almost 2026, especially as a programmer or just plain serious computer user?

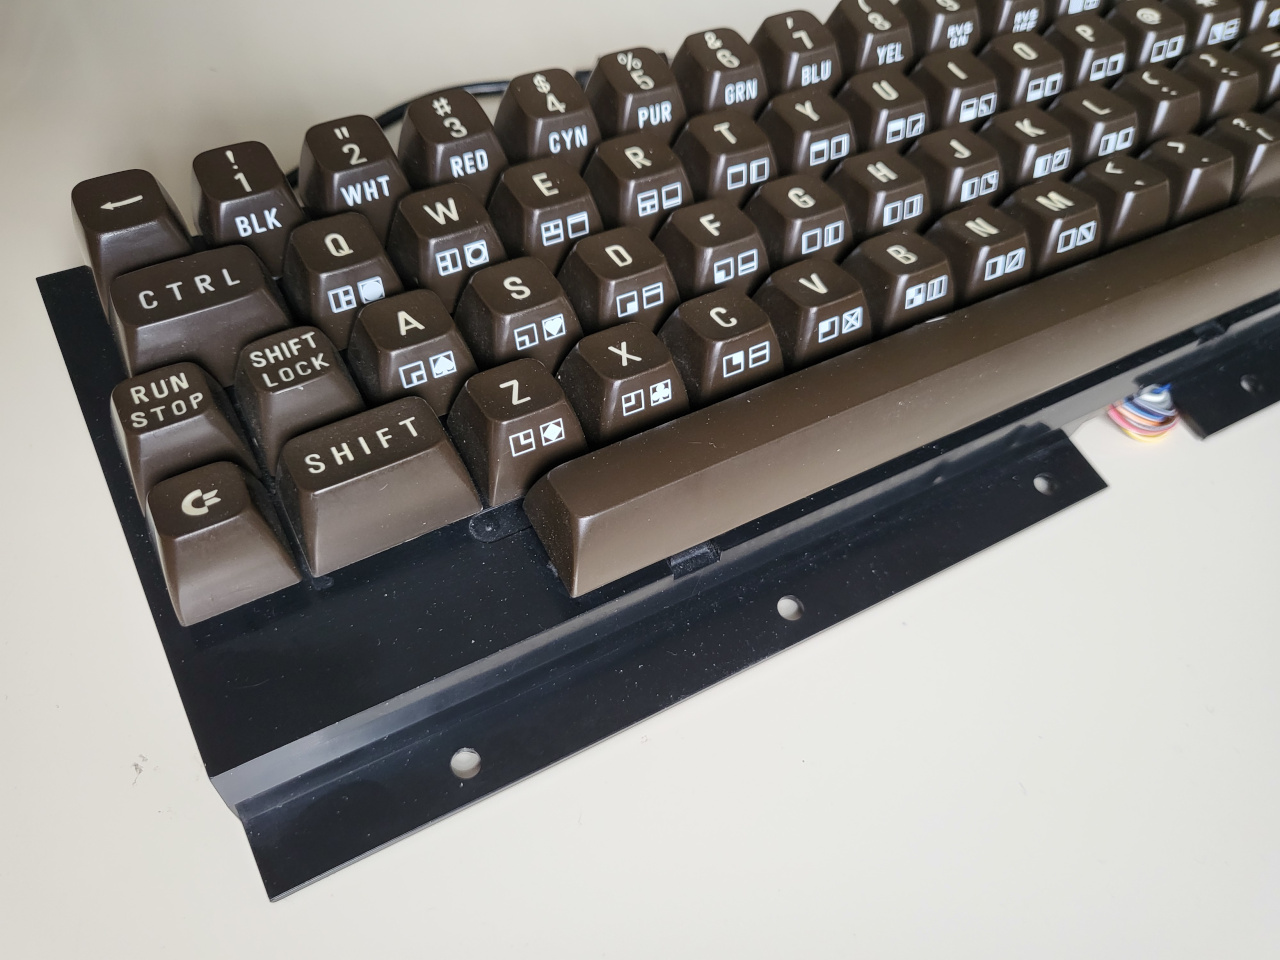
The big news here is that [Jean] added support for missing characters using the left and right Shift keys, and even added mouse controls and Function keys that are accessed on a layer via the Shift Lock key. You can see the key maps over on GitHub.

I’ll admit, [Jean]’s project has got me eyeing that C64 I picked up for $12 at a thrift store which I doubt still works as intended. But don’t worry, I will test it first.

Fortunately, it looks like [Jean] has thought of everything when it comes to reproducing this hack, including the requisite C64-to-Arduino pinout. So, what are you waiting for?

Continue reading “Keebin’ With Kristina: The One With The C64 Keyboard”

Split Keyboard Uses No PCB

When [daniely101] wanted a split keyboard, he decided to build his own. It wound up costing $25 to create a wireless board with no custom PCB required. Each half has its own microcontroller, and the whole thing connects via Bluetooth. While we don’t mind making a PCB, we can appreciate that you could change your mind easily with this wiring scheme.

The 3D printed case holds the keys, and then it is just a matter of carefully soldering the keys to the microcontrollers. Of course, each side also has to have its own battery. The ZMK firmware is split in half, one part for each side of the keyboard. The nRF52840 CPUs have plenty of wireless connectivity. The keys are set in rows and columns, so the amount of soldering back to the controller is manageable.

While we applaud the wireless design, it does seem odd that you have to charge both halves and turn them on and off separately. But that’s the nice thing about a design like this — you could modify the design to not have a split. Or, you could allow one flexible wire pair to run across for power. Of course, you could modify the layout, including adding or deleting keys.

You might consider adding a pointing device. At least you don’t have to pull out a saw.

Continue reading “Split Keyboard Uses No PCB”

Building A Cyberpunk Modular Keyboard

Perhaps you have a tilt towards glowing cyberpunk peripherals. Perhaps you’ve been hunting for a keyboard that you can position perfectly to suit both your left and right hands. In that case, you might just like this nifty design from [Modern Hobbyist].

The first thing you’ll note is the split design, which allows each half of the keyboard to be placed optimally for each arm’s comfort. They’re linked with a cable, which allows the STM32 microcontroller to read the keys on both sides and then spit out the right stuff upstream over its USB-C connection. The microcontroller is also in charge of running the per-key LED lighting and the LCD screens on each half.

The board owes its sleek and slim design at least in part to using Kailh Choc low-profile switches. They plug in to hotswap compatible sockets so the switches can easily be changed if desired. Keycaps are blank off-the-shelf parts because this is a keyboard for those who aren’t afraid to spend the time establishing the right muscle memory. It might take some adaptation if you’re not used to the staggered columnar layout. However, the LCD screens can display a keymap if you need a little help now and then.

We’ve seen a lot of great split keyboards over the years, including one amusing design made by hacking an existing keyboard in half with a saw.

Continue reading “Building A Cyberpunk Modular Keyboard”

DIY Split Keyboard Made With A Saw

Split keyboards are becoming more popular, but because they’re still relatively niche, they can be rather expensive if you want to buy one. So why not make your own? Sure, you could assemble one from a kit, but why not take a cheap mechanical keyboard, slice it in half and just waves hands connect the two halves back together? If this thought appeals to you, then [nomolk]’s literal hackjob video should not be ignored. Make sure to enable English subtitles for the Japanese-language video.

Easy split keyboard tip: just reconnect both halves... (Credit: nomolk, YouTube)
Easy split keyboard tip: just reconnect both halves… (Credit: nomolk, YouTube)

In it, the fancy (but cheap) mechanical keyboard with Full RGBâ„¢ functionality is purchased and tested prior to meeting its demise. Although the left side with the cable and controller still works, the right side now needs to be connected, which is where a lot of tedious wires have to be soldered to repair traces.

Naturally this will go wrong, so it’s important to take a (sushi) break and admire the sunset before hurling oneself at the tracing of faulty wiring. This process and the keyboard matrix is further detailed on the blog entry (in Japanese) for this process.

Although this was perhaps easier than the other split keyboard project involving a membrane keyboard, this tongue-in-cheek project demonstrates the limits of practicality with this approach even if it could be cleaned up more with fancier wiring.

We give it full points for going the whole way, however, and making the keyboard work again in the end.

Continue reading “DIY Split Keyboard Made With A Saw”

A 36-key monoblock split keyboard with three thumb keys on each side.

Lorem Ipsum 36? Dolor Sit Amet Keyboard!

You know, it’s a tale as old as custom mechanical keyboards. [penkia] couldn’t find any PCBs with 36 keys and Gateron low-profile switch footprints, so they made their own and called it the LoremIpsum36. Isn’t it lovely?

Close-up of the RP2040 sitting flush as can be in the PCB.This baby runs on an RP2040, which sits flush as can be in a cutout in the PCB. This maneuver, along with the LP switches in hard-to-find SK-33 sockets results in quite the thin board.

[penkia] says that despite using a 3 mm tray for added rigidity, the entire thing is thinner than the Nuphy Air60 v2, which is just over half an inch (13.9 mm) thick. For keycaps, [penkia] has used both XVX profile and FKcaps’ LPF.

And yeah, that area in the middle is crying out for something; maybe a trackball or something similar. But [penkia] is satisfied with it as-is for the first version, so we are, too.

Do you like 36-key boards, but prefer curves? Check out the Lapa keyboard, which doubles as a mouse.

Illustrated Kristina with an IBM Model M keyboard floating between her hands.

Keebin’ With Kristina: The One With The Copycat Keyboard

This is Crater75, an almost completely from-scratch row-staggered wireless split board that [United_Parfait_6383] has been working on for a few months. Everything but the keycaps and switches is DIY.

The Crater75 split keyboard, which features OLEDs on the Function row.
Image by [United_Parfait_6383] via reddit
As cool as a keyboard full of screens might seem, can you imagine what it would be like to type at speed on a sea of slick surfaces? Not very nice, I’m thinking. But having them solely on the Function row seems like the perfect compromise. Here, the Function row keys interact with foreground applications, and change with whatever has focus. For the curious, those are 0.42″ OLEDs from Ali with a resolution of 72×40.

I’m not sure what’s going on internally, but the two sides connect with magnets, and either side’s USB-C can be used to charge the board. Both sides have a 2100 mAh Li-Po battery, and the average current of the OLED displays is low enough that the board can run for months on a single charge.

The switches are Gateron low-profiles and are wearing keycaps recycled from a Keychron, which add to the professional finish. Speaking of, the enclosures were manufactured by JLC3DP using the Nylon Multi-Jet Fusion process, but [United_Parfait_6383] says the left side feels too light, so the next revision will likely be CNC’d aluminium. Be sure to check out this short video of Crater75 in action.

Continue reading “Keebin’ With Kristina: The One With The Copycat Keyboard”

Illustrated Kristina with an IBM Model M keyboard floating between her hands.

Keebin’ With Kristina: The One With The Folding Keyboard Mod

Let’s face it, failed Kickstarters are no good. But they can spark good things, like real versions of technologies that might have actually been faked for the platform. A touchscreen mouse, for instance, with shortcuts that can be programmed for various applications.

A DIY mouse with a large touch screen.
Image by [Sam Baker] via Hackaday.IO
This story is one of scope creep, as [Sam Baker] says in the project details. At first, he thought he could just basically duct tape a touchscreen with shortcuts to an existing mouse. A couple of mouse teardowns later, [Sam] arrived at the conclusion that things would not be so simple.

After some digging around, [Sam] found a repository where someone created a way to communicate with the ADNS-5050 optical sensor, so [Sam] started by creating a breakout board for this sensor. By combining that with an ESP32 dev board and a touchscreen, [Sam] had his shortcut mouse.

Does it work? Yes. Is it useful? Well, yes. And also no. The beauty part of using a regular mouse is that you don’t have to look down at it to know where the buttons are. In the future, [Sam] would like to implement some kind of buttons for tactility. In the meantime, haptic feedback could be nice.

Continue reading “Keebin’ With Kristina: The One With The Folding Keyboard Mod”