Touch Sensitive Cement With Just A Dash Of Neon

For quite some time now we’ve seen people casting their own countertops and other surfaces out of cement. It’s a combination of mold-making and surface finishing that produces a smooth and durable surface at quite a low cost, if you don’t factor in damage done to your back when lifting the thing for installation.

This offering is a little bit different. [Elliott Spelman] built his own touch sensitive cement table top. When you place your grubby hands on the polished surface, a loop of neon lighting is switched on. This is thanks to a 4:1 mix of quick setting cement and iron oxide powder. Bare copper wire was laid around the edges of the surface to be encased by the cement for making connections later.

There were some sad moments when [Elliott] was removing the cast surface from the mold. He ended up cracking it and suggests others be liberal with their use of both wax on the mold before casting, and patience in removing the cement afterward. We might also suggest a strengthening agent like fiber reinforcement. The edges and surface can be sanded to the finish desired and in this case, attaching table legs was easy since the wooden underside of the mold remains on the bottom of the cement.

The neon lighting adds a retro touch to this build. It’s sad to see this technology dying away, so a resurgence of artisanal neon is great in our book. [Elliott] found a Bay Area arts collective called the Crucible which does a lot of art glass education to help him make two hoops of glass tube and fill them with the appropriate gasses. A capacitive touch sensor (once Atmel, now Microchip part) AT42QT2120 (datasheet) monitors the wire coming from the slab and switches the power supply for the tubes using a combination of relay board and Arduino Uno.

We find the prospect of positional sensing in doped cement fascinating. Anyone have ideas for adapting this technique so that a more long and narrow slab could have positional awareness within, say, a few inches? Let us know in the comments.

Continue reading “Touch Sensitive Cement With Just A Dash Of Neon”

Stop Buying Expensive Circular Saw Blades, Use Paper Instead

[John Heisz] was contemplating the secrets of the universe when an errant thought led him to wonder, could I use a sheet of paper as the blade in my table saw?

He takes a sheet of regular printer paper, draws a circle on it the same diameter as his regular blades, and cuts it out. He then bolts it into place on the spindle, slots in the table saw insert for really really thin kerf blades, and fires it up.

The blade is surprisingly dangerous. One would maybe expect a paper blade to be minimally damaging to a finger at best, but it quickly shows itself to be capable of tearing through paper and cutting through wood at a reasonable clip. Since the paper is minimally conductive, a SawStop couldn’t save someone from a lack of caution.

The blade finally meets its match half way through a half-inch thick piece of wood scrap. Wood and paper dust explode outward as the experiment ends. Video after the break.

Continue reading “Stop Buying Expensive Circular Saw Blades, Use Paper Instead”

Concrete Table Just The Way You Like It

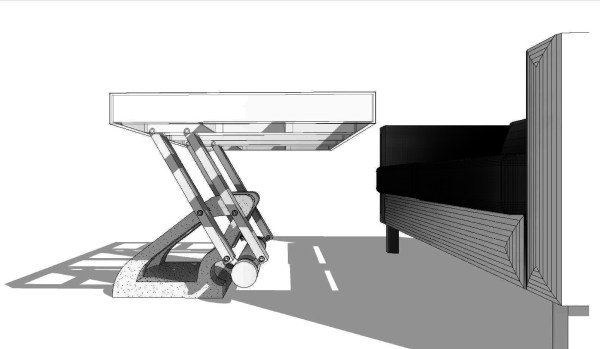
You need a coffee table, you need a dinner table. Do you really need two tables? [Shua] thinks the answer is “no”. That’s why he built this swinging countersink table out of concrete and a aluminum.

He started by making a simple half-scale prototype. Then a larger one. Through these explorations he learned how the table would be made, what kind of weight it needed, and how the mechanics needed to be constructed for the most stable table top.

Next he designed the final table in Autodesk Revit. This is software traditionally used for architecture. Since the table was to be made from concrete Revit’s useful set of concrete tools were useful for this project.

Most of the construction process was pretty standard. However, the use of CNC’d pink insulation as a mold for the concrete was interesting. The foam is closed cell, so it worked fine and gave a nice finish. The assembly was finished with a glass top and a carpeted base that contained a surge suppressor and two outlets. The table can be seen swinging between two positions in a video after the break.

Continue reading “Concrete Table Just The Way You Like It”

A Better Expanding Table

About a year ago, [Scott] completed what is probably one of the finest builds ever shown on a YouTube channel. It was an expanding wooden table, a build inspired by a fantastically expensive expanding table that was itself inspired by a creation by a mad woodworker in the early 1800s. Although [Scott]’s table is a very well-engineered build, there were a few things he wasn’t happy with. Over the past few months he’s been refining the design and has come up with the final iteration – and plans – for a wooden mechanical expanding table.

Late last year, [Scott] had about 450 hours of design and build time in his table, and by the time he got to the proof of concept stage, he simply ran out of steam. Another year brings renewed enthusiasm, and over the past month or so he’s been working on much-needed improvements to his expanding table that included a skirt for the side of the table, and improvements to the mechanics.

The expanding table is rather thick with three layers of tabletop stacked on top of each other, and those exposed mechanical linkages should be hidden. This means a skirt, and that requires a huge wooden ring. [Scott] built a ring 5 1/2″ deep, about an inch and a half thick, and has the same diameter of the table itself. This means cutting up a lot of plywood, and stacking, gluing, sanding, and routing the entire thing into a perfectly round shape.

The other upgrades were really about the fit and finish of the internal mechanics of the table. Screws were changed out, additional brackets were crafted, and the mounts for the internal ‘star’ was upgraded.

After all that work, is the table done? No, not quite; the skirt could use a veneer, proper legs need to be built, and the entire thing could use a finish. Still, this is the most complete homebuilt expanding table ever conceived, and [Scott] has the plans for his table available for anyone who would want to replicate his work.

Continue reading “A Better Expanding Table”

slab flattener

Router Jig Makes Quick Work Of Flattening Irregular Shaped Wood

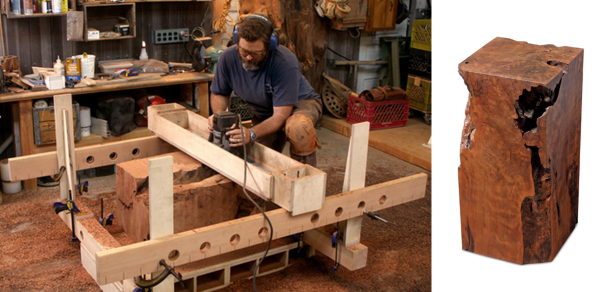
[Nick Offerman] is a pretty serious wood worker. He likes to make crazy stuff including organic looking tables out of huge chunks of wood. Clearly, the wood doesn’t come out of the ground shaped like the above photo, it has to be intensely worked. [Nick] doesn’t have a huge saw or belt sander that can handle these massive blocks of wood so he built something that could. It’s a jig that allows him to use a standard wood router to shave each side down flat.

The process starts by taking a piece of tree trunk and roughing it into shape with a chainsaw. Once it is flat enough to not roll around, it’s put into a large jig with 4 posts. Horizontal beams are clamped to the posts and support a wooden tray which a wood router can slide back and forth in. The router’s cutting bit sticks out the bottom of the tray and slowly nibbles the surface flat. Once one side is flat, the block is rotated and the flat side is used as a reference to make all the other sides square to the first. After flattening, sanding and finishing the block results in a pretty sweet piece of functional artwork.

An Expanding Wooden Table

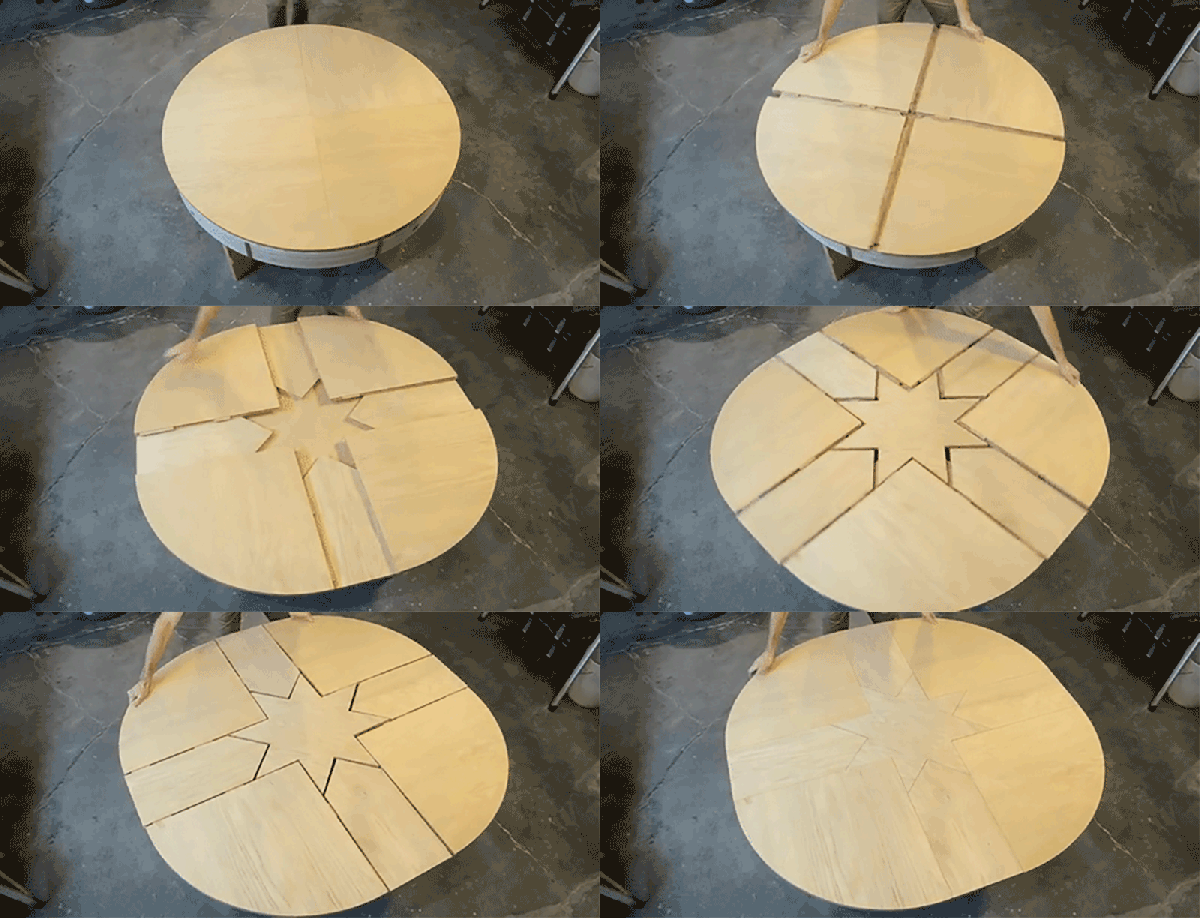
A few years ago, the world of fine woodworking was presented with the Fletcher Capstan table. It’s a round table, able to expand its diameter merely by rotating the top. A gloriously engineered bit of mechanics move the leaves of the tables out while simultaneously raising the inner part of the table. It’s a seriously cool table, very expensive, and something that will probably be found in museums 100 years from now.

[Scott Rumschlag] thought his woodworking skills were up to the task of creating one of these expanding tables and managed to build one in his workshop. Like the Fletcher Capstan table, it’s a table that increases its diameter simply by rotating the table top. Unlike the commercial offering, this one doesn’t cost as much as a car, and you can actually see the internal mechanism inside this table.

The top of [Scott]’s table is made of three pieces. The quarter-circle pieces are the only thing showing when the table is in its minimum position, and are arranged on the top of the ‘leaf stack’. When the table expands, four additional leaves move up from beneath with the help of a linear bearing made of wood and a roller that slides along the base of this mechanical contraption.

The center of the table – the star – is a bit more difficult to design. While the leaves move up the stack of table tops with the help of a ramp, this is an impractical solution for something so close to the center of the table. Instead of a ramp, [Scott] is using a lifting lever and metal hinge that brings the star of the table up to the right level. Even though it’s a crazy amount of woodworking and fine tuning to get everything right, it’s not too terribly difficult to get your head around.

Videos, including one of the assembly of the table, below.

Continue reading “An Expanding Wooden Table”

kegerator

End Table Kegerator Hides The Tap When You’re Not Looking

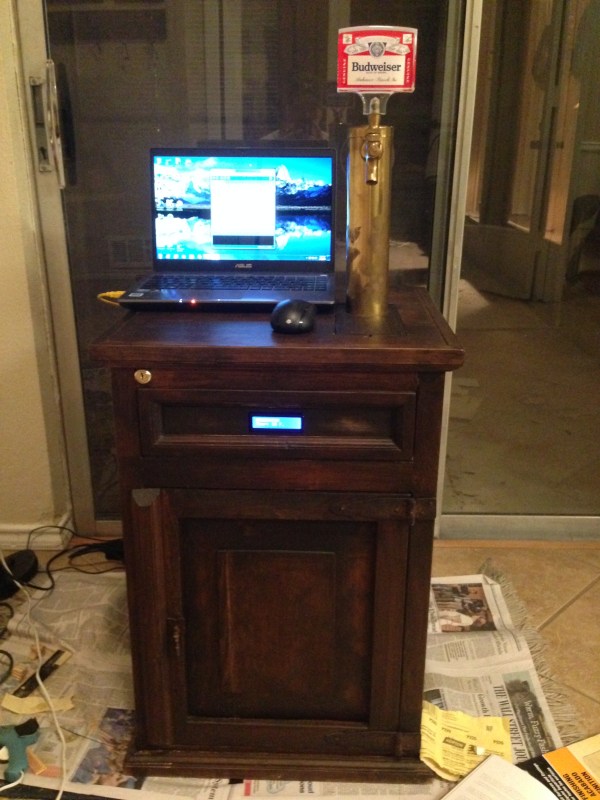
What’s better than an ordinary end table? How about an end table that can serve you beer? [Sam] had this exact idea and used his skills to make it a reality. The first step of the build was to acquire an end table that was big enough to hold all of the components for a functional kegerator. This proved to be a bit tricky, but [Sam] got lucky and scored a proper end table from a garage sale for only $5.00.

Next, [Sam] used bathroom sealant to seal up all of the cracks in the end table. This step is important to keep the inside cold. Good insulation will keep the beer colder, while using less electricity. Next, a hole was cut into the top of the table for the draft tower.

The draft tower is mounted to a couple of drawer slides. This allows the tower to raise up and down, keeping it out of sight when you don’t want it. The tower raises and lowers using a simple pulley system. A thin, high strength rope is attached to the tower. The other end is attached to a spool and a small motor. The motor can wind or unwind the spool in order to raise and lower the tower.

The table houses an Arduino, which controls the motor via a homemade H bridge. The Arduino is hooked up to a temperature sensor and a small LCD screen. This way, the users can see how cold their beer will be before they drink it.

To actually keep the beer cold, [Sam] ripped apart a mini fridge. He moved the compressor and condenser coils to the new table. He had to bend the coils to fit, taking care not to kink them. Finally he threw in the small keg, co2 tank and regulator. The final product is a livingroom gem that provides beer on demand.

Demo video (which is going the wrong way) can be found after the break.

Continue reading “End Table Kegerator Hides The Tap When You’re Not Looking”